
Start is your control center for everything you need day to day: applications, websites, folders, and shortcuts. You manage them all in one place – and launch them in an instant.
|
This manual covers Start v10.0 or later. |
Key Features Overview
Universal Launcher
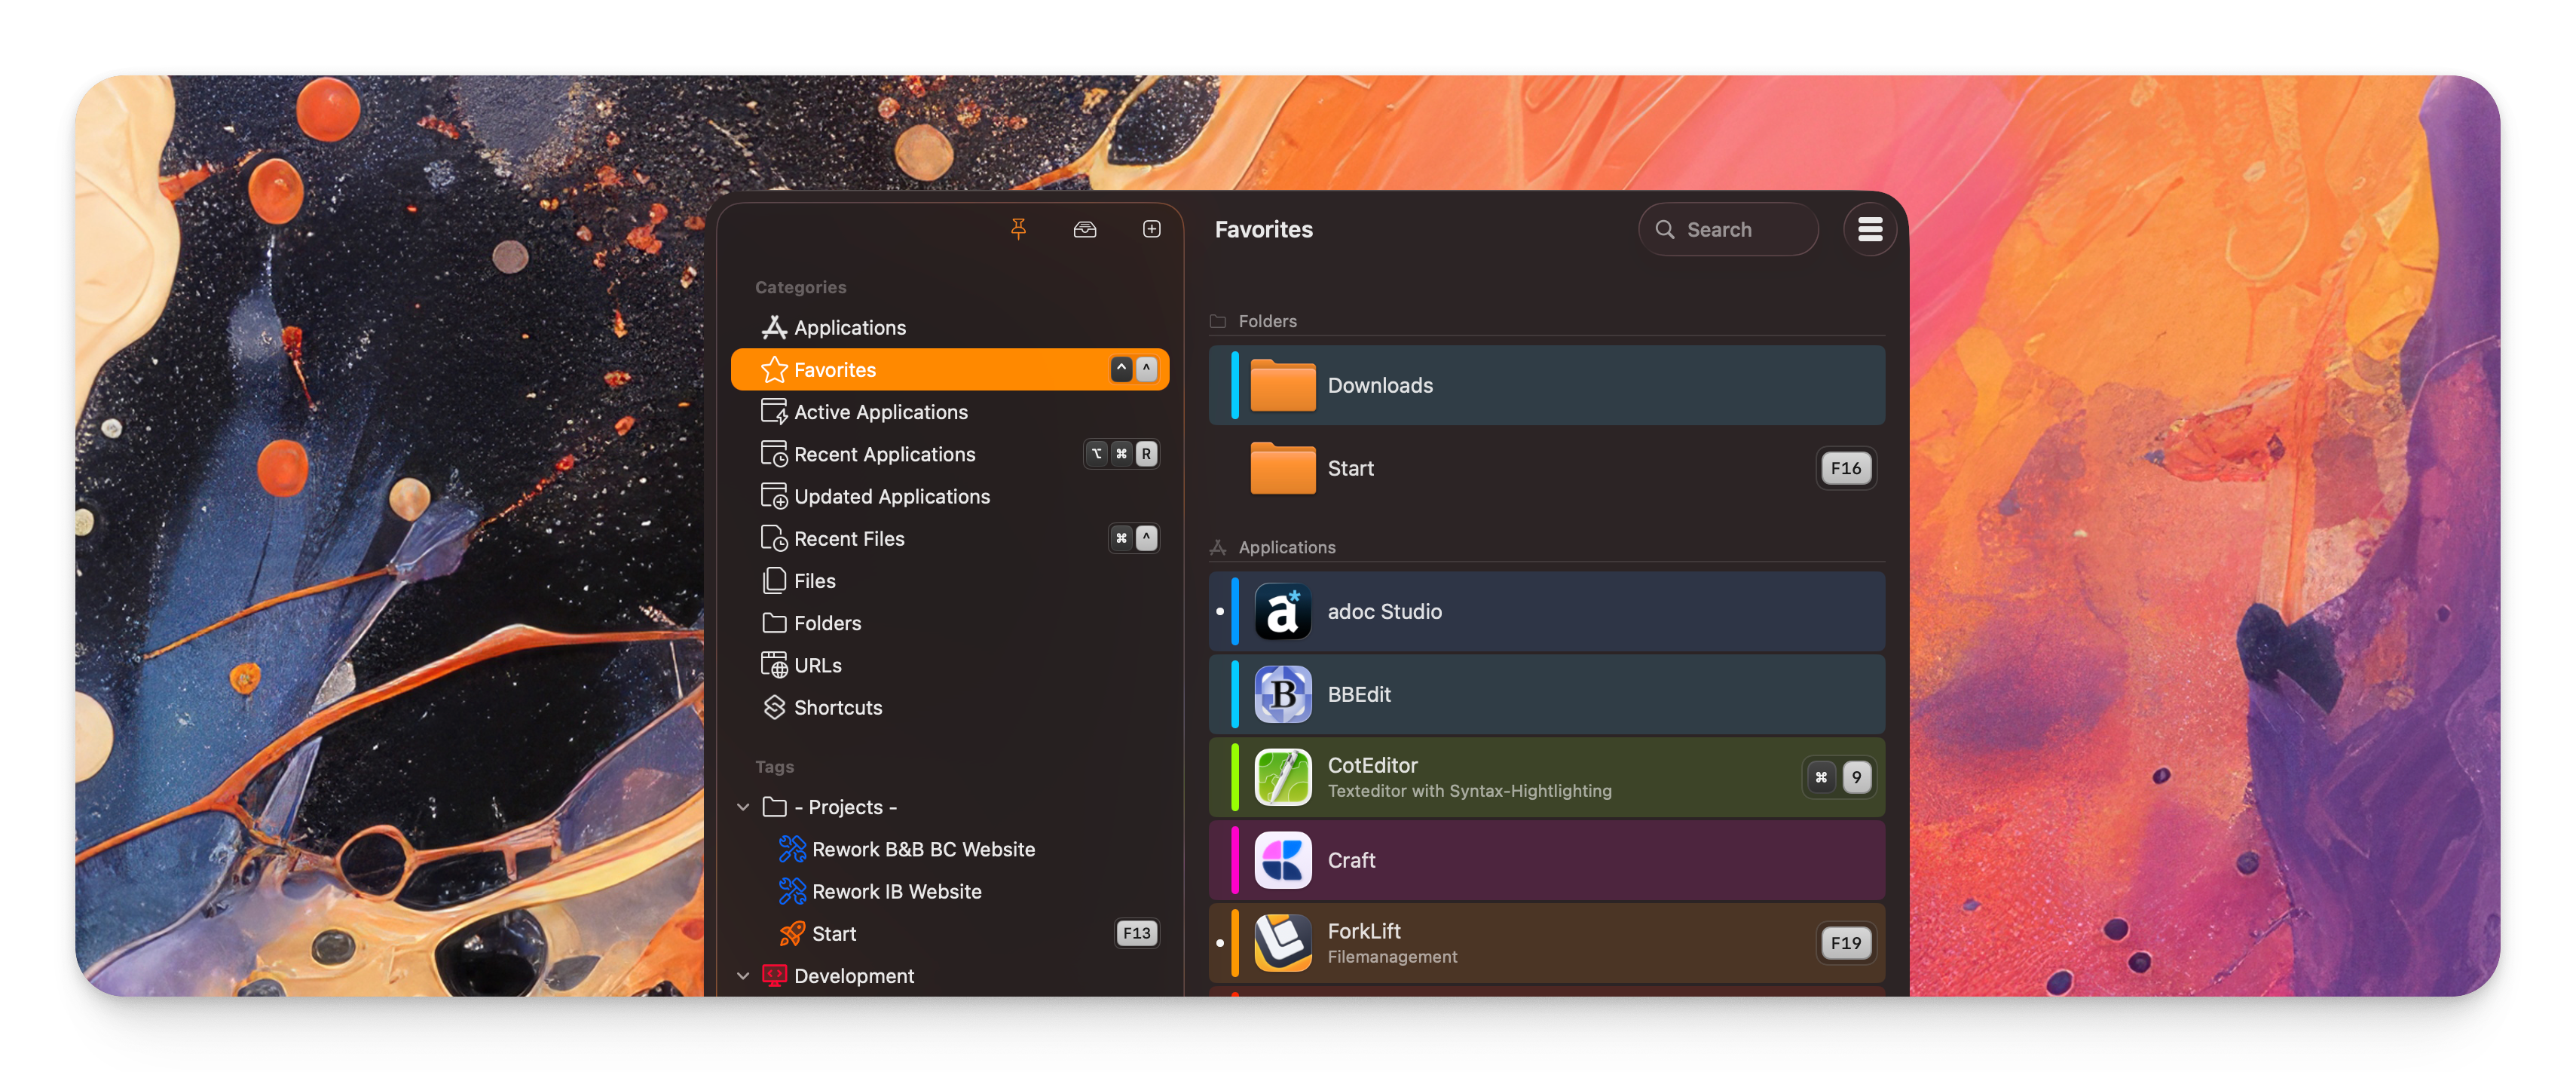 With Start you manage and launch all kinds of things – among them:
-
Applications: Launch your favorite programs in an instant.
-
Websites and other URLs: Open the sites you visit most. Or trigger specific actions through URL schemes. You can use your default browser or pick a different one for individual entries – handy when you want to test a page in a particular browser (see here).
-
Folders: Keep your files organized and open important folders directly.
-
Shortcuts from the Shortcuts app: Run the shortcuts you have built straight from Start.
Quick Access through Hotkeys
You can assign an individual hotkey to every entry in Start (see here). That lets you:
-
Launch applications with a key combination and move between tasks without clicking through menus.
-
Open websites directly with a single keystroke.
-
Reach frequently used folders straight away. Your everyday documents are then only a keystroke away.
Active Corners
Besides hotkeys, Start also supports Active Corners (see here). As soon as you move the mouse pointer into a corner of the screen, Start performs an action.
This lets you open Start’s main window or launch an entry assigned to that corner.
There are only four screen corners. That is why you can combine each of them with the Command, Option, or Control key – which gives you far more triggers to choose from.
Intelligent Organization with Tags
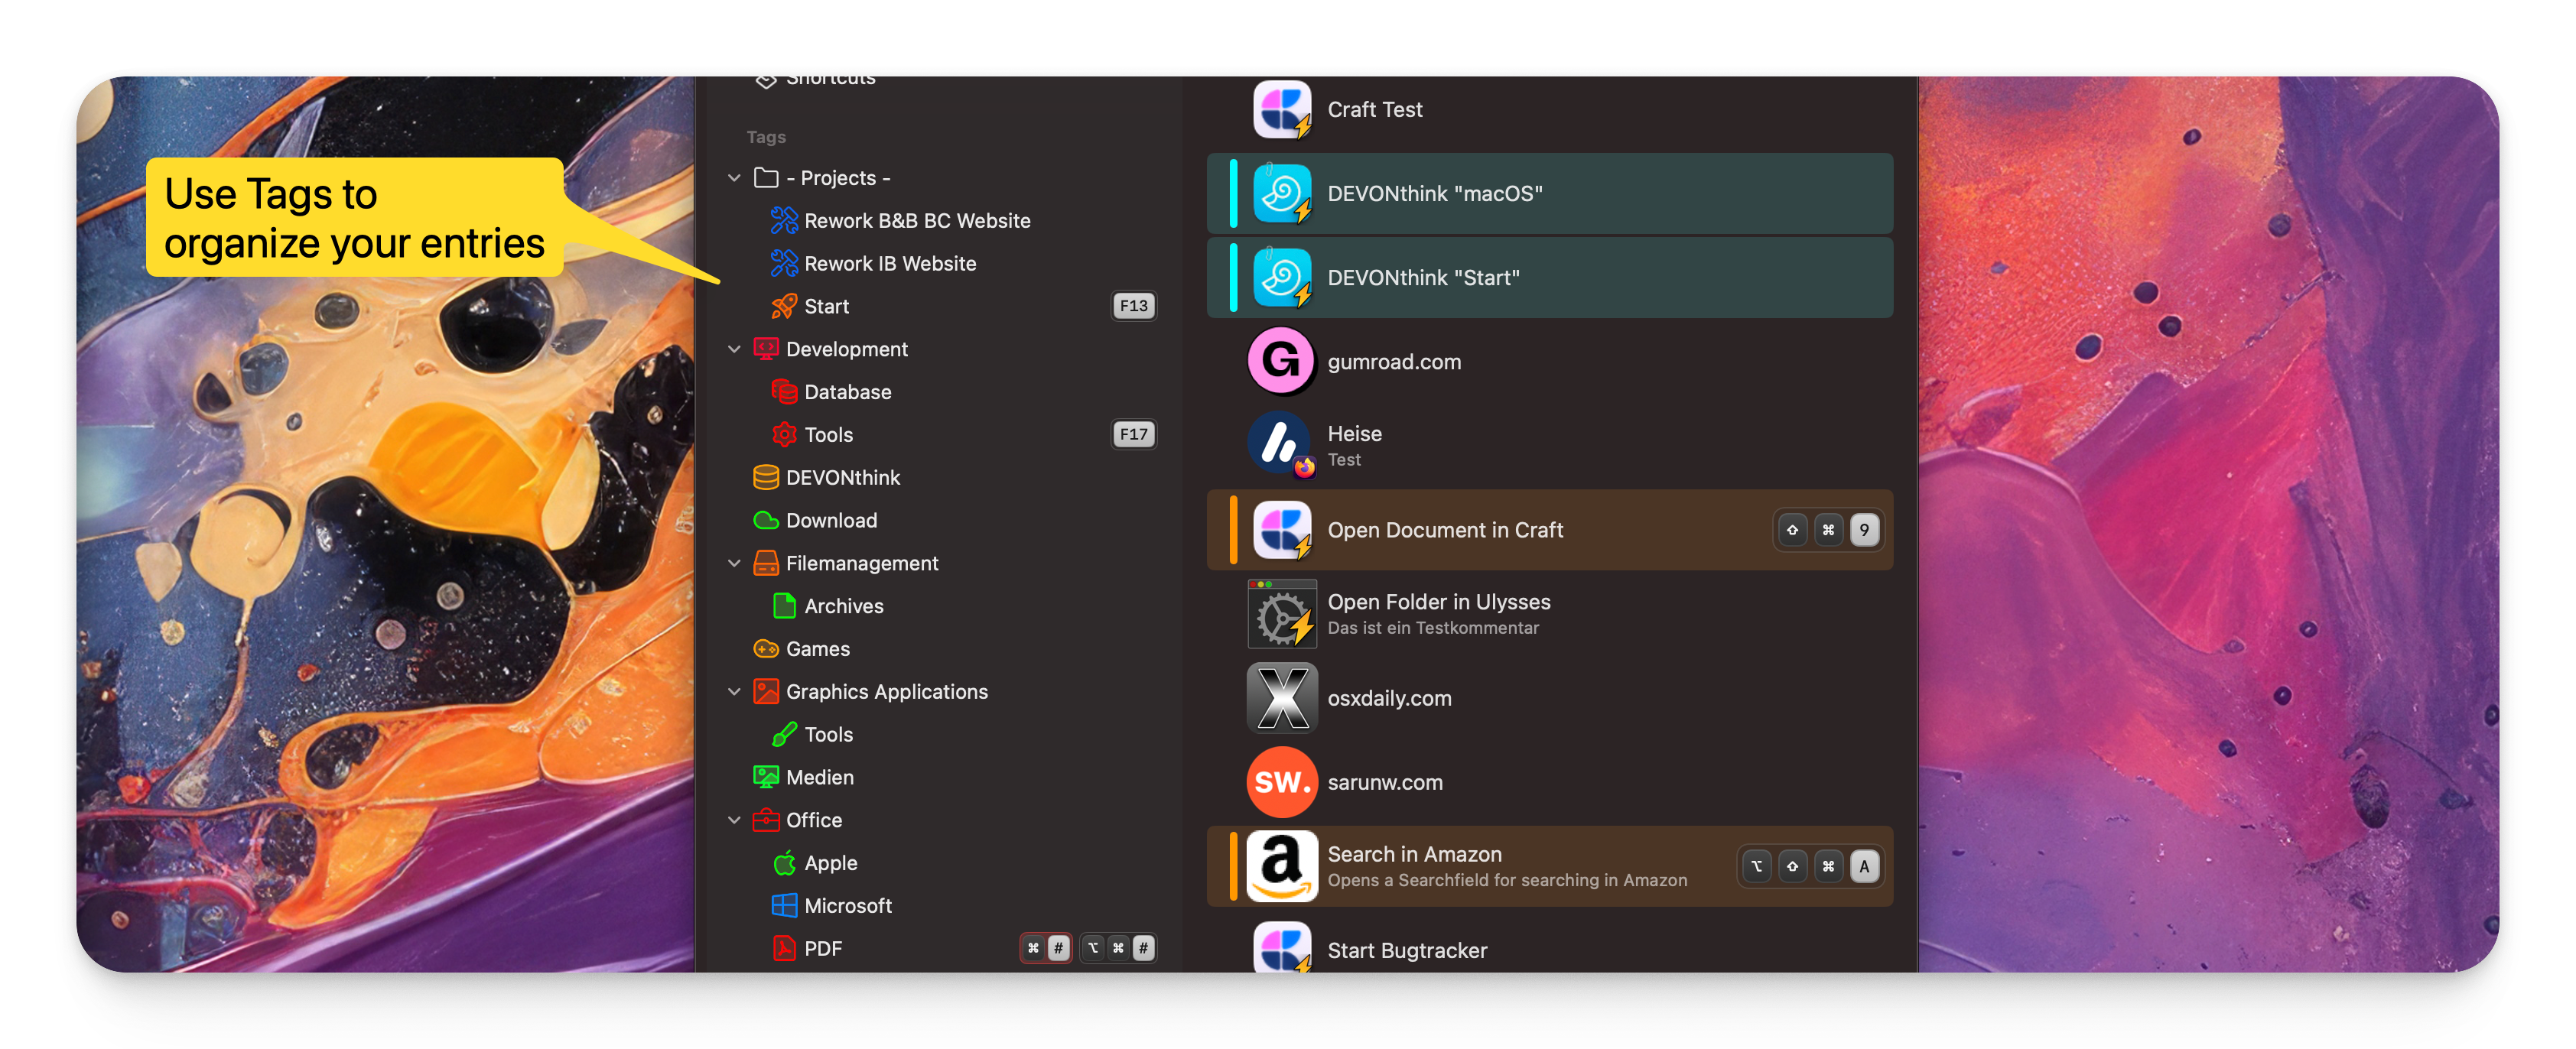 Start comes with a flexible tagging system. It keeps your entries tidy (see here):
-
You assign any tags you like to your entries and organize them to suit the way you work.
-
You group related entries to keep everything you need for a project together.
Tags do more than just sort:
-
You can assign hotkeys to tags as well (see here).
-
Launch all entries of a tag at once – with a single key combination. Ideal when a task always needs the same programs and documents: one keystroke, and your workspace is ready.
Access to Active Applications
Start shows you which applications are currently running. Whether you are working on a project or preparing a presentation: one click is enough. You see everything you have open at a glance and switch between programs seamlessly.
Access to Recent Files
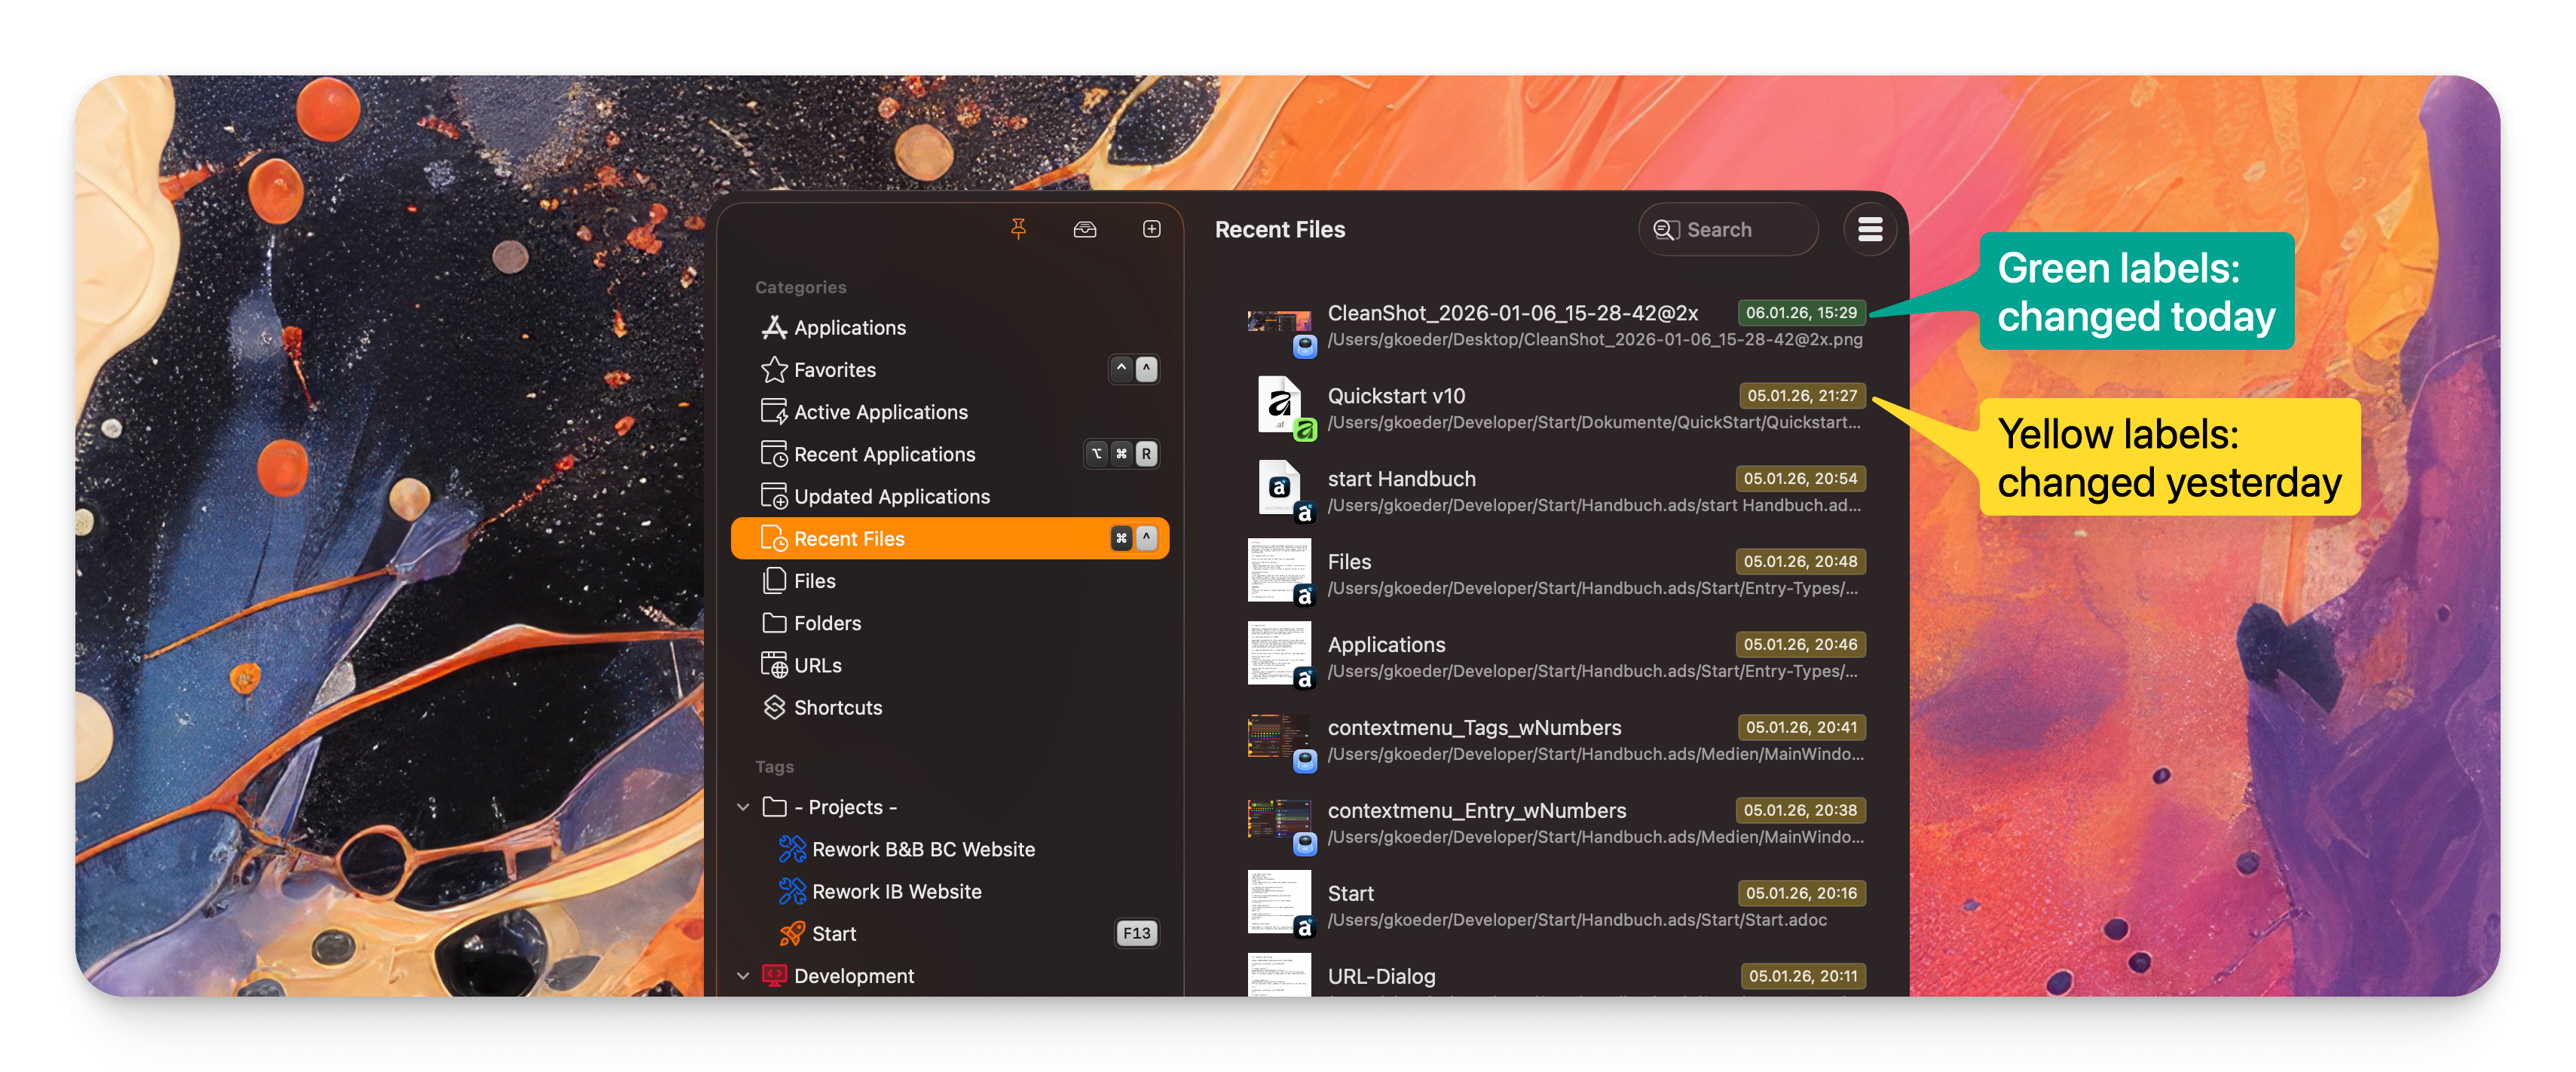
Start keeps track of your recently edited files in the background. That way you reach your current documents right away, without searching for them. It saves time and keeps you in the flow.
Access to Recently Used Applications
You can also quickly access your most recently used applications. Frequently used tools are open again in no time – whether you switch between several projects or just need one specific program.
Monitor Recently Updated or Added Applications
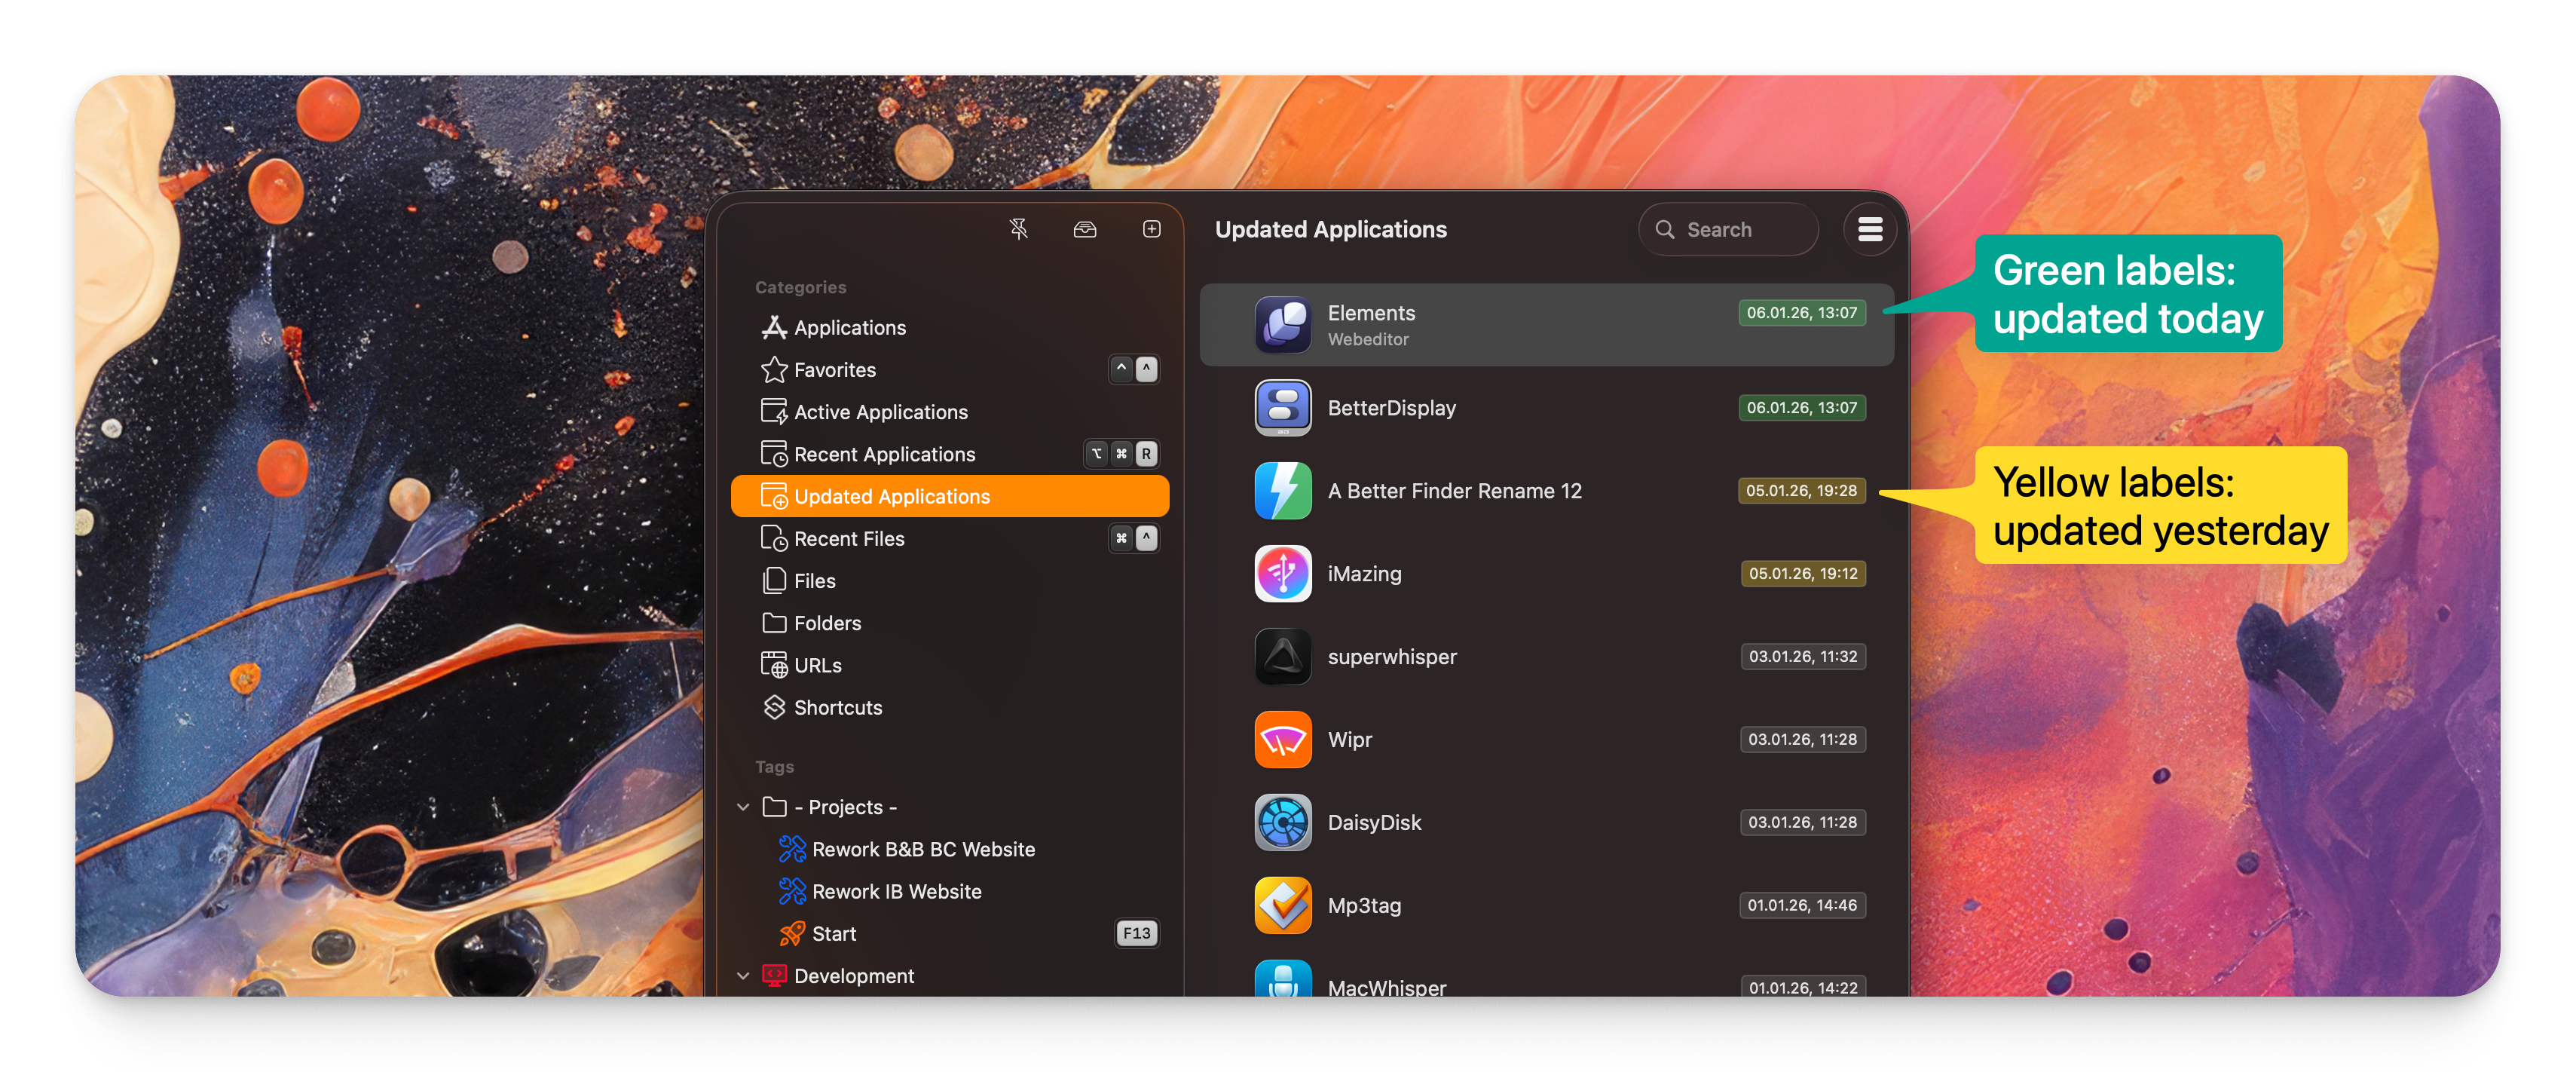 Start shows you at a glance which applications were most recently updated or added.
|
Disclaimer Regarding Third-Party Applications
Important Notes:
All trademarks and registered trademarks mentioned are the property of their respective owners and are used here solely for identification purposes in accordance with fair use principles. |
First Steps
You launch Start – and at first you see … nothing. That is intentional: the app runs in the background and is accessible only through a small icon in the menu bar. A click on that icon opens the main window. Start then shows you every application it has found. Use the search field above the list to narrow down your choice. You launch an application with a click or with the Return key.
|
From macOS 26 onward, menu bar items can be hidden in System Settings. Can’t find the Start icon in your menu bar? Then open System Settings and check whether it has been hidden. The same applies to apps that manage menu bar items. If you use one of these, make sure the Start icon is visible in that app’s settings. |
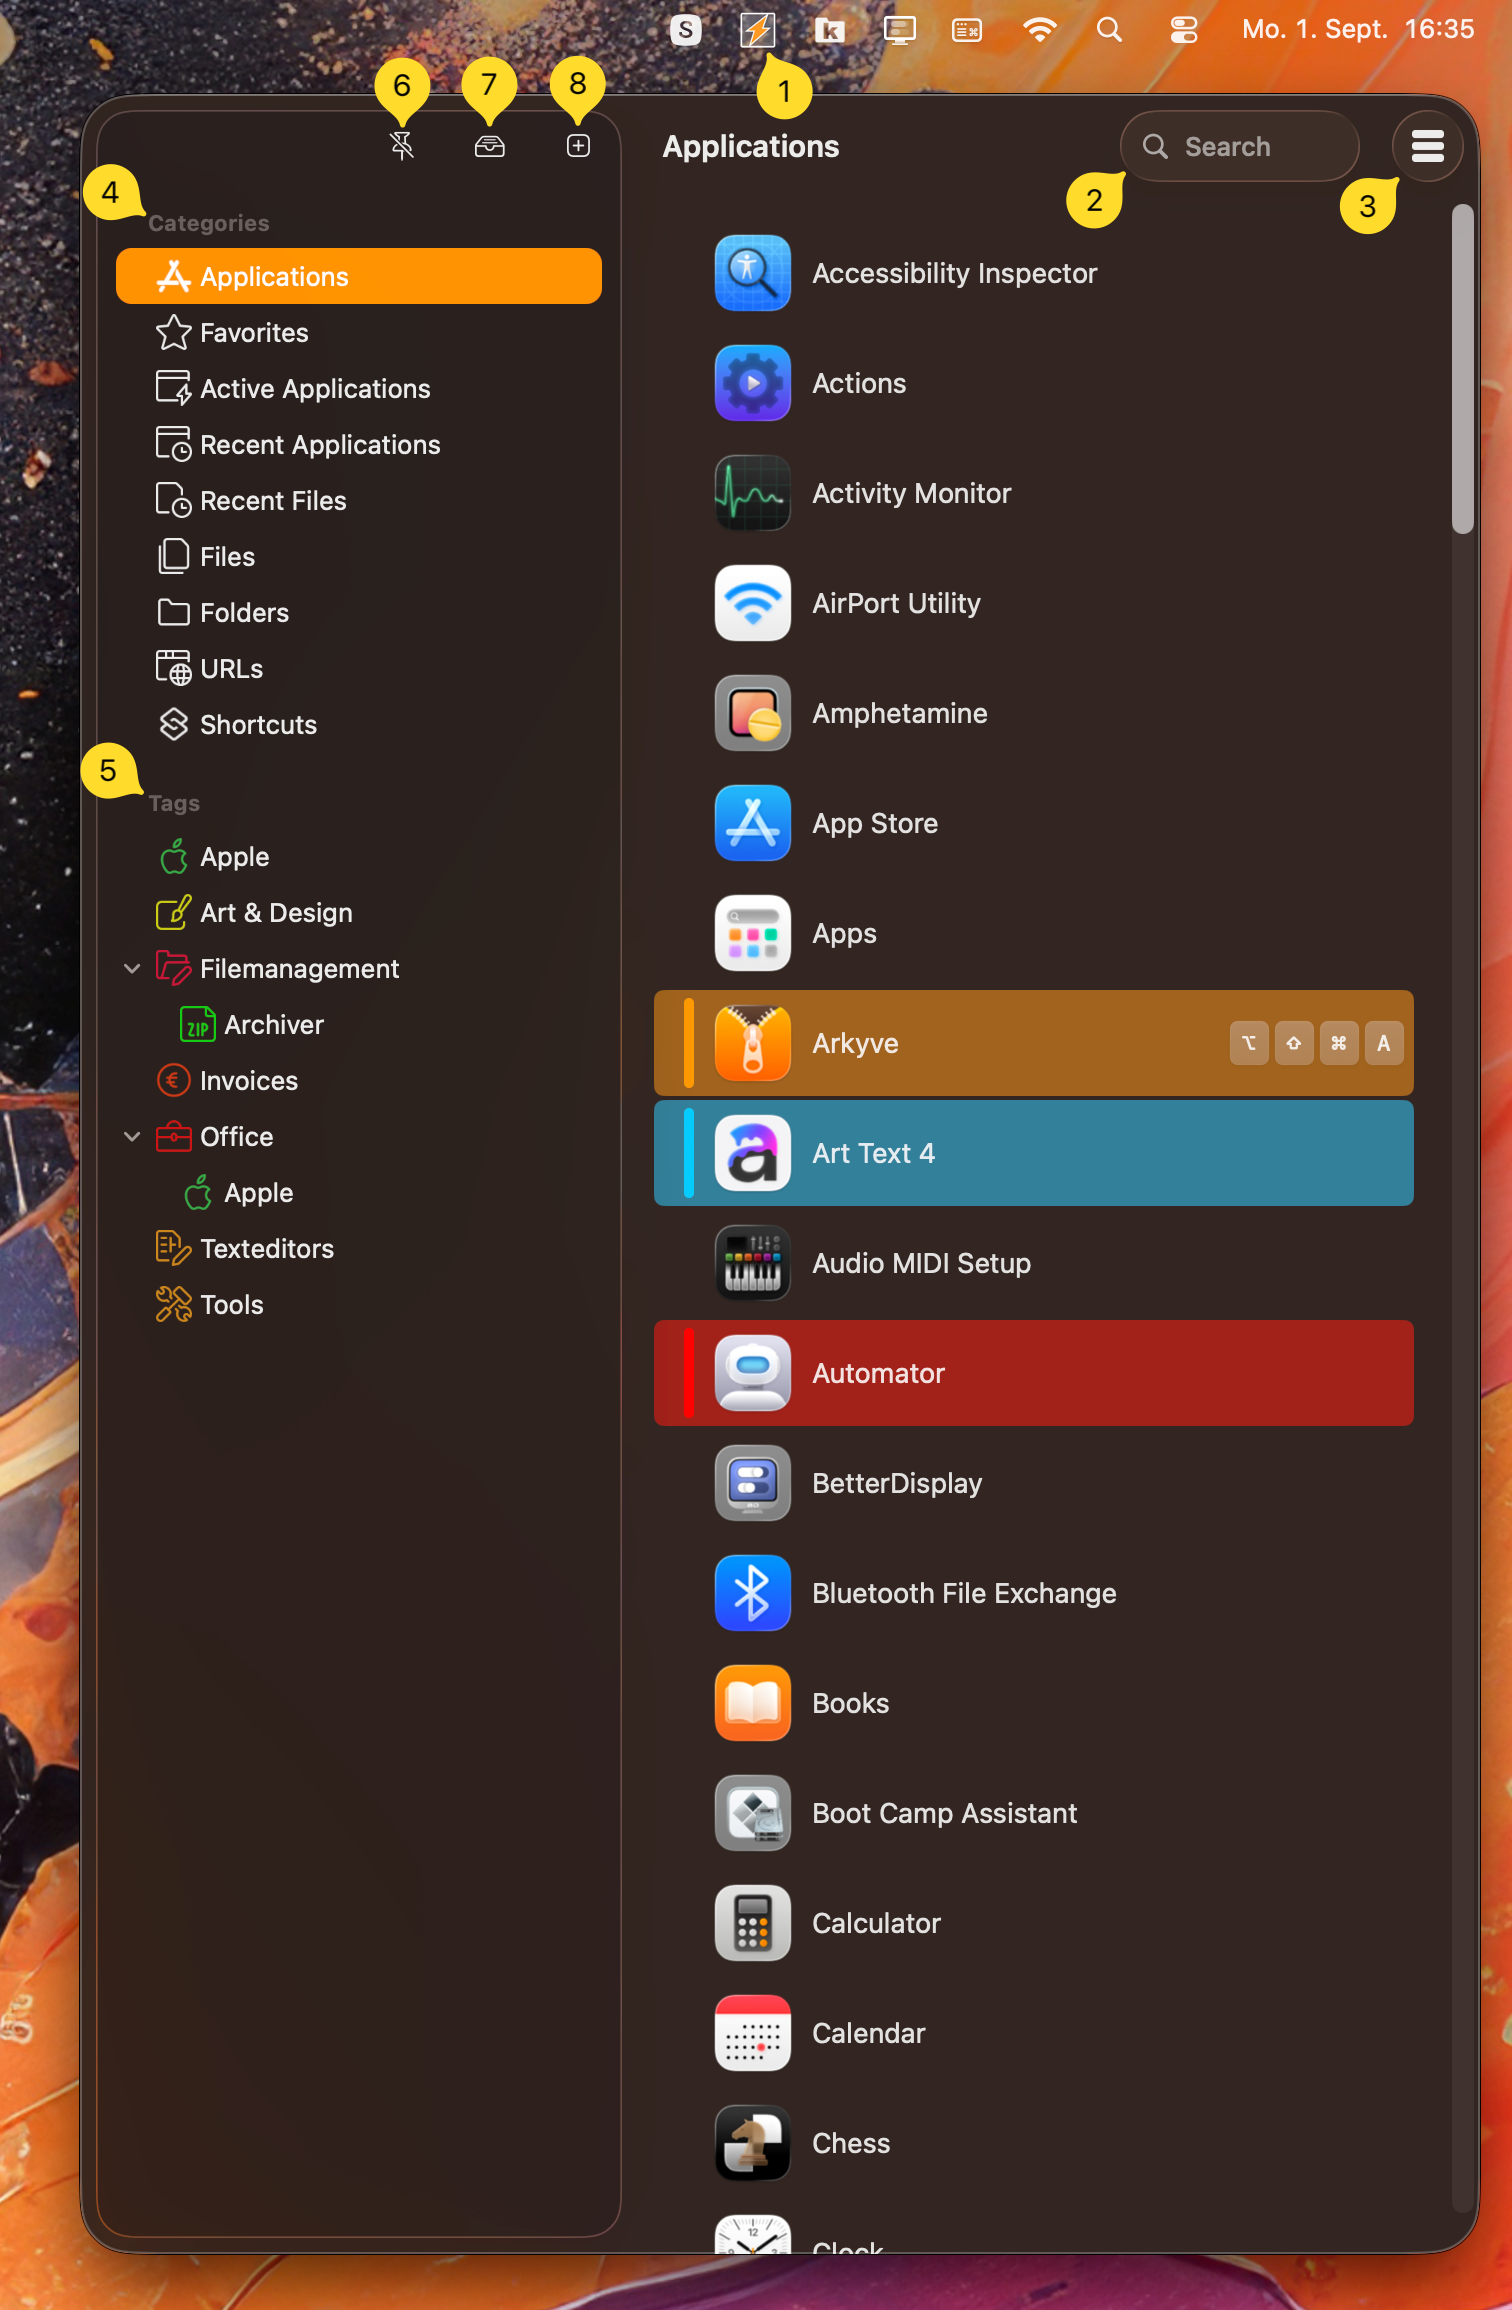
|
|
|
|
|
|
|
|
|
|
|
|
|
How Start searches: |
What is an Entry?
Throughout this manual, the term entry stands for anything Start manages and launches – regardless of its type. An entry can be:
-
an application
-
a file
-
a folder
-
a URL or a URL scheme
-
a shortcut from the Shortcuts app
No matter its type, every entry shares the same basic capabilities. You can
-
assign tags to it,
-
assign a hotkey or an Active Corner to it,
-
mark it as a favorite,
-
add a comment, or
-
mark it with a color.
|
We will look at each entry type in detail later in this manual (see here). |
Menus
|
|
|
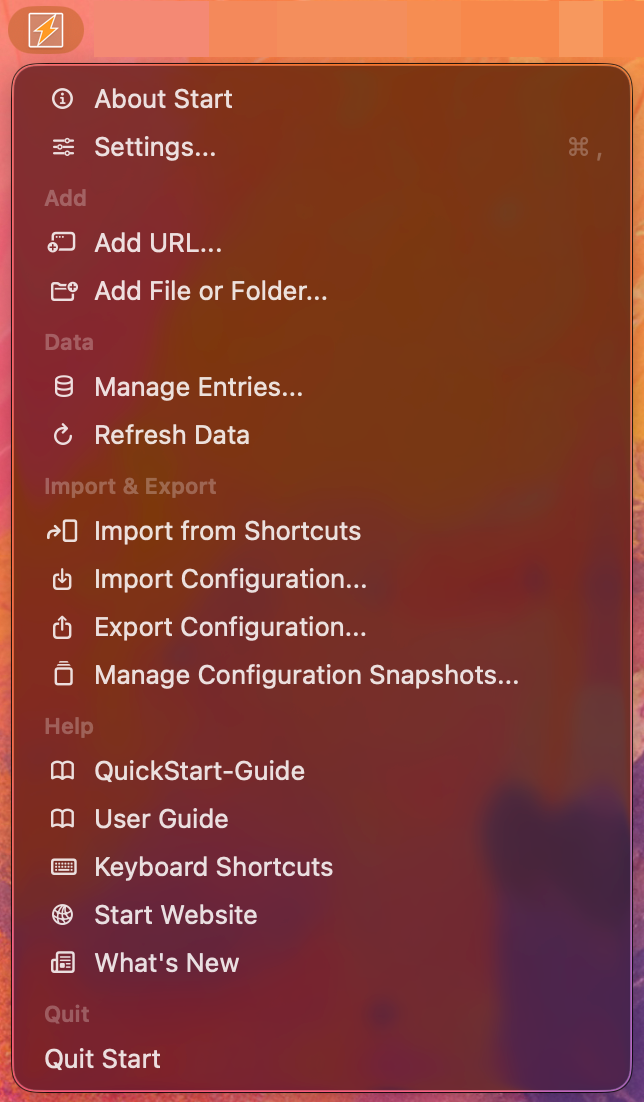
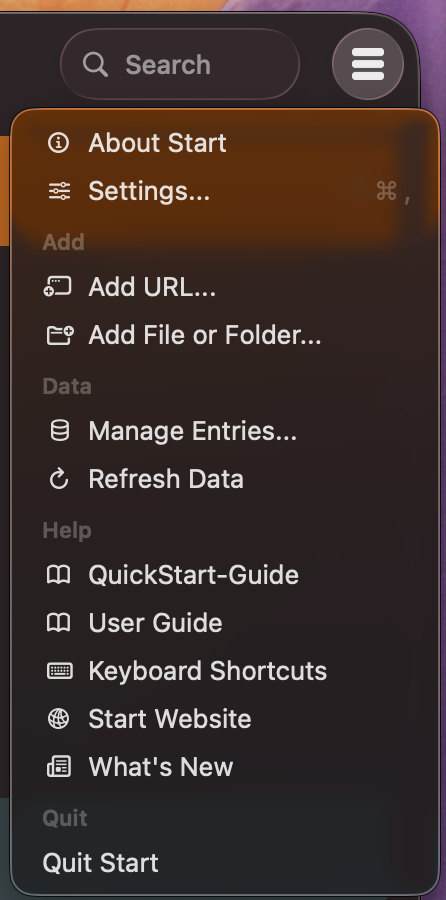
Start has two nearly identical menus. They give you access to all key features at any time. There are two ways to open them: right-click the icon in the menu bar, or click the menu icon at the top right of the main window.
- About Start
-
Displays the About dialog with information such as the current version number.
- Settings
-
Opens the Settings dialog, where you can configure Start’s behavior and appearance (see here).
- Assign default App-Categories as Tags
-
This menu command reads the app categories from Spotlight and assigns them as tags to your apps. This is useful when you want to create many tags at once. You also choose whether the default categories apply only to apps without tags, or to all of them.
Add
- Add URL
-
Opens a dialog to enter a URL and add it to Start (see here).
- Add File or Folder
-
Opens a dialog to add a file or folder to Start.
Alternatively, you can simply drag files and folders onto Start’s main window.
Data
- Manage Entries
-
Opens a dialog showing every entry Start currently manages (see here).
- Refresh Data
-
Refreshes the data managed in Start (restarts the Spotlight queries, etc.).
Import & Export
- Import from Shortcuts
-
Imports shortcuts from the Shortcuts app into Start, or updates previously imported shortcuts.
- Import Configuration
-
Imports a previously exported configuration file of Start.
- Export Configuration
-
Exports the current configuration of Start to a file.
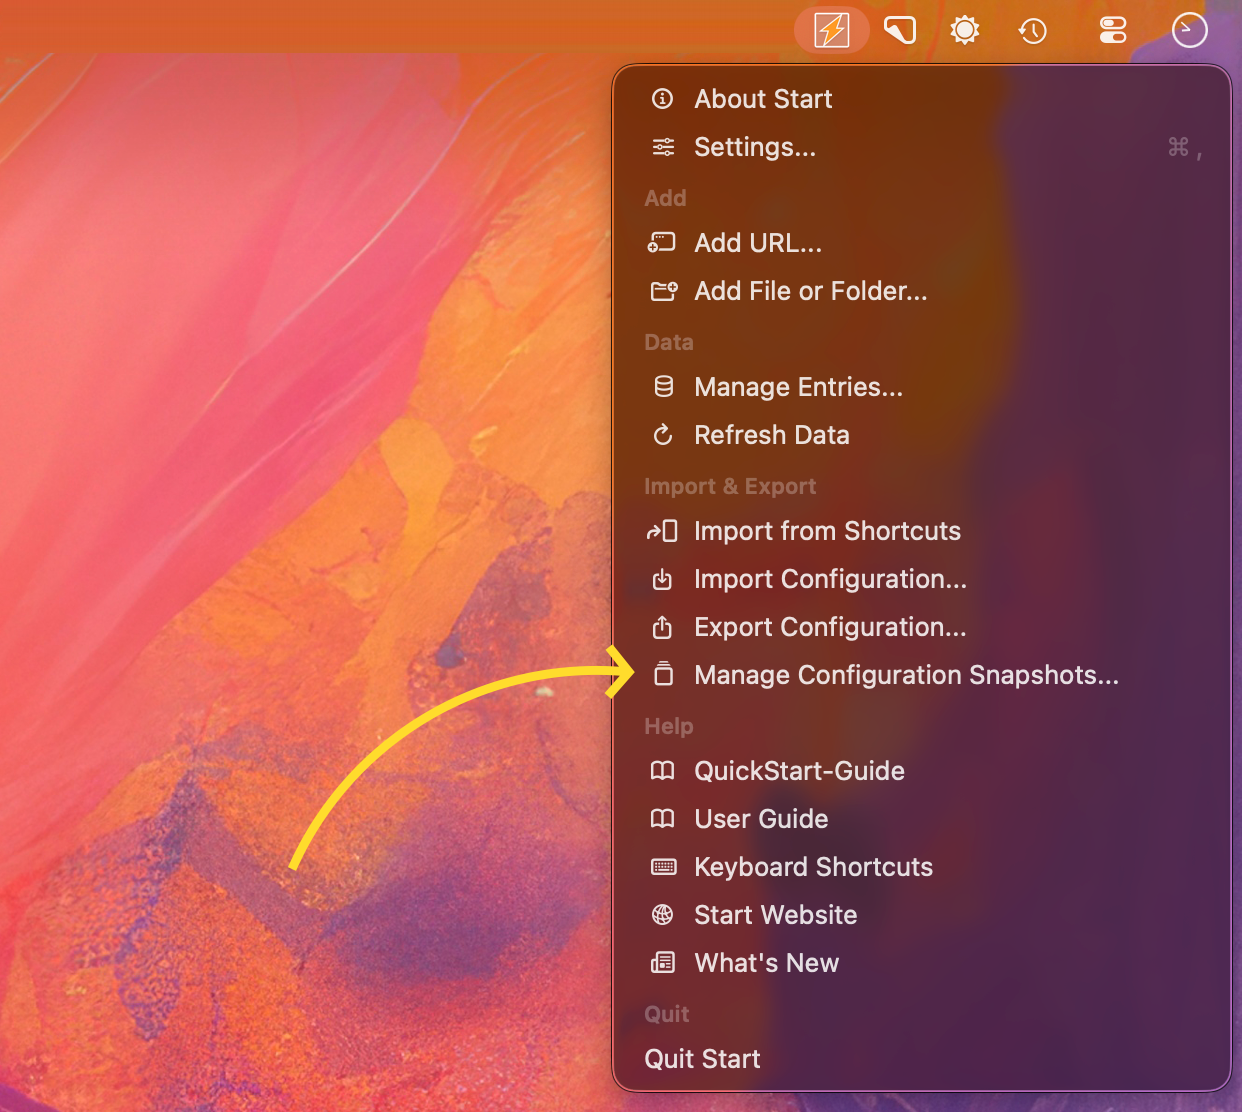
- Manage Configuration Snapshots
-
Start automatically creates a snapshot of the configuration whenever you quit the application. Here you can view and manage these snapshots (see here).
Help
- QuickStart-Guide
-
Opens the quick start guide.
- User Guide
-
Opens the Start user manual.
- Keyboard Shortcuts
-
Displays an overview of the keyboard shortcuts currently configured in Start.
- Start Website
-
Opens the Start website in a browser.
- What’s New
-
Displays a dialog with the version history of Start.
Quit
- Quit Start
-
Quits Start.
Tags
Tags let you group your entries – one of the core features of Start. The following sections explain what tags are, how to create them, and how to get the most out of them.
What are Tags?
Tags gather entries into groups. You could give all word processors the tag "word processing", for example. Topic-based tags work just as well: does a task always need the same programs or files? Then give them a shared tag. A single entry may carry several tags at once.
|
Tags do more than group. With a hotkey you launch all entries of a tag at once. Does a task always need the same programs? Then assign them a shared tag and give that tag a hotkey. From now on, a single keystroke starts everything. |
Using Tags
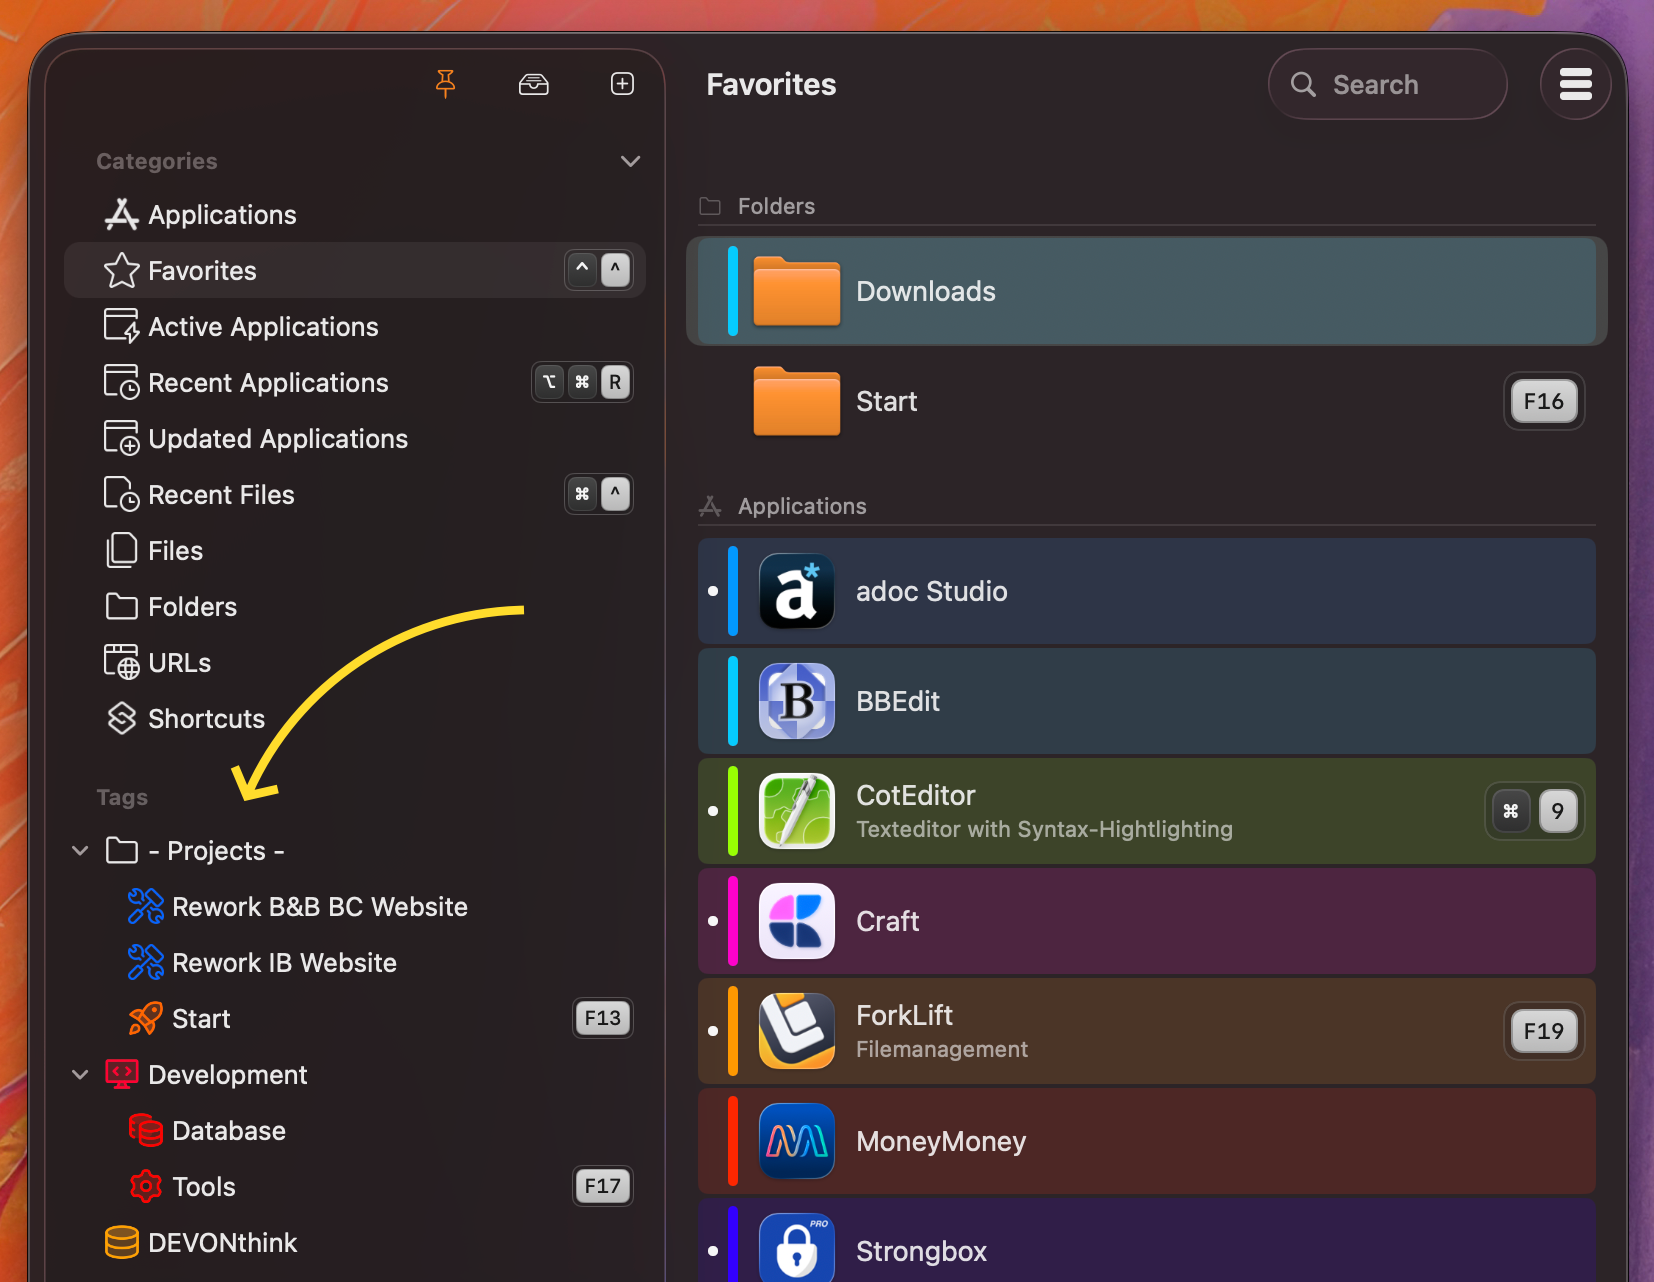
Tags appear as entries in the left-hand pane of the main window. Select a tag there, and the right-hand pane shows every entry carrying that tag.
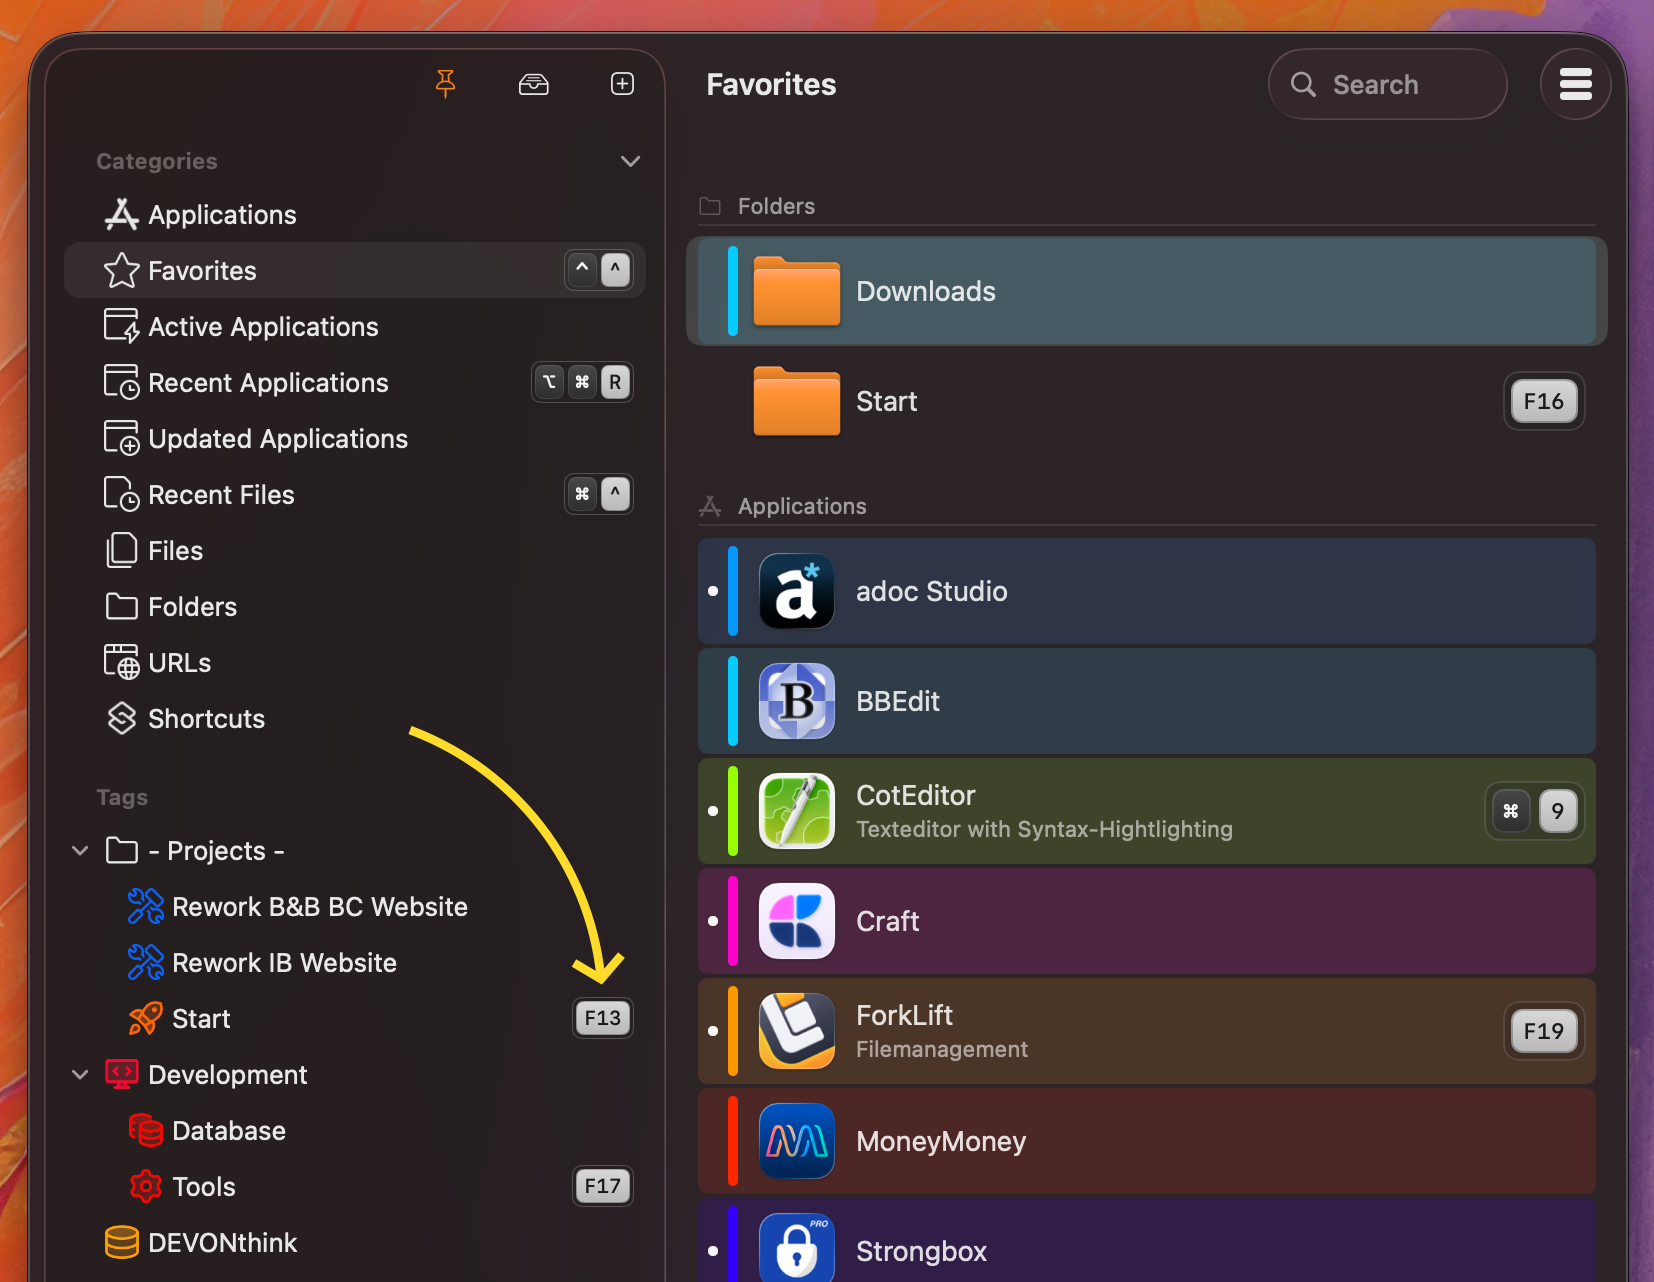
You can assign two keyboard shortcuts to each tag. The first opens Start and jumps straight to the tag. The second launches all entries of the tag at once. You set them in the context menu of the respective tag. Start also shows assigned shortcuts in the left-hand pane of the main window.
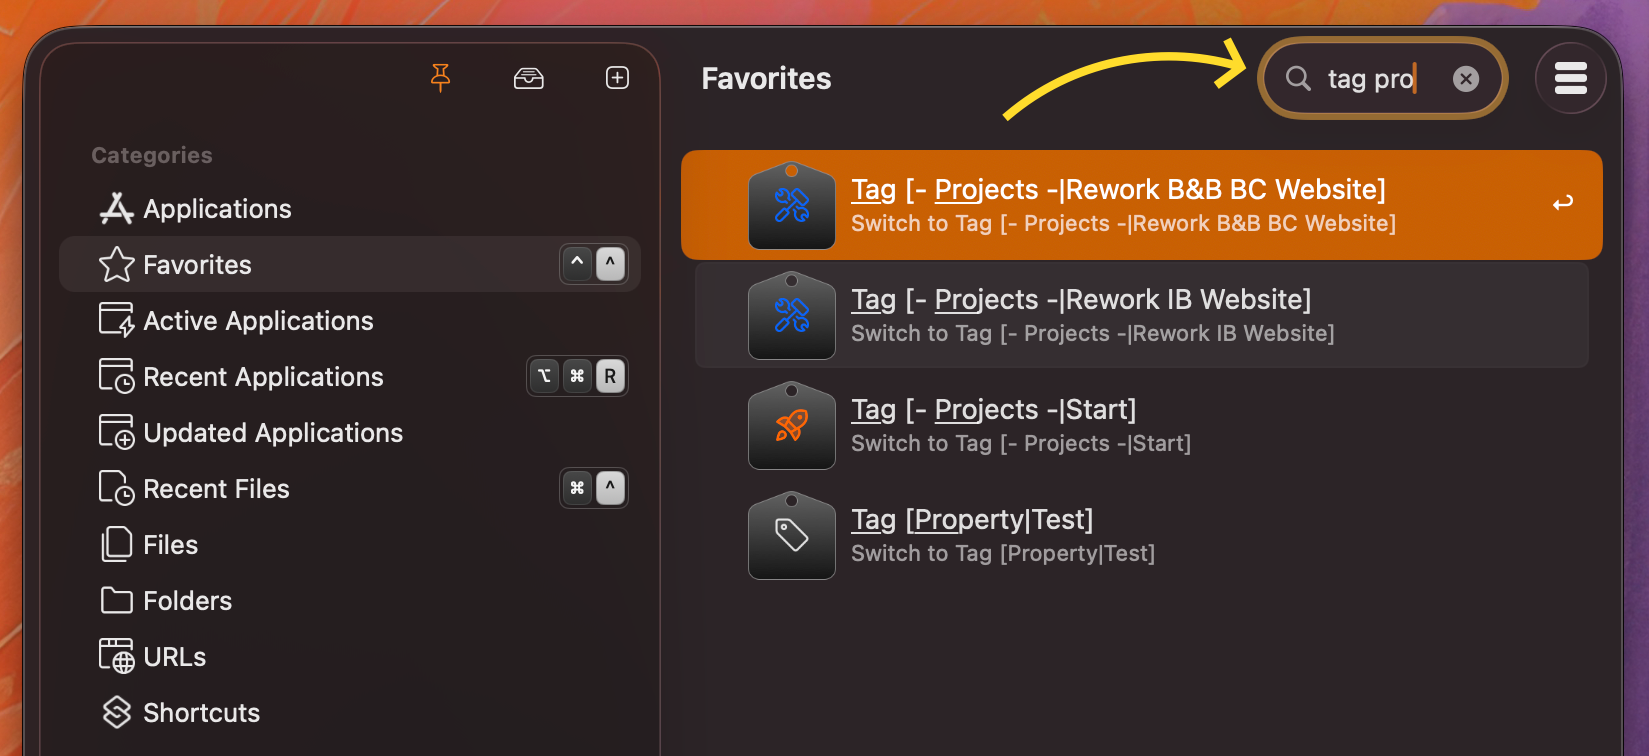
You can also find tags through the search – please enable the matching option in the settings. There you also decide what a click on a tag in the search results does: switch to the tag, or launch all its entries right away.
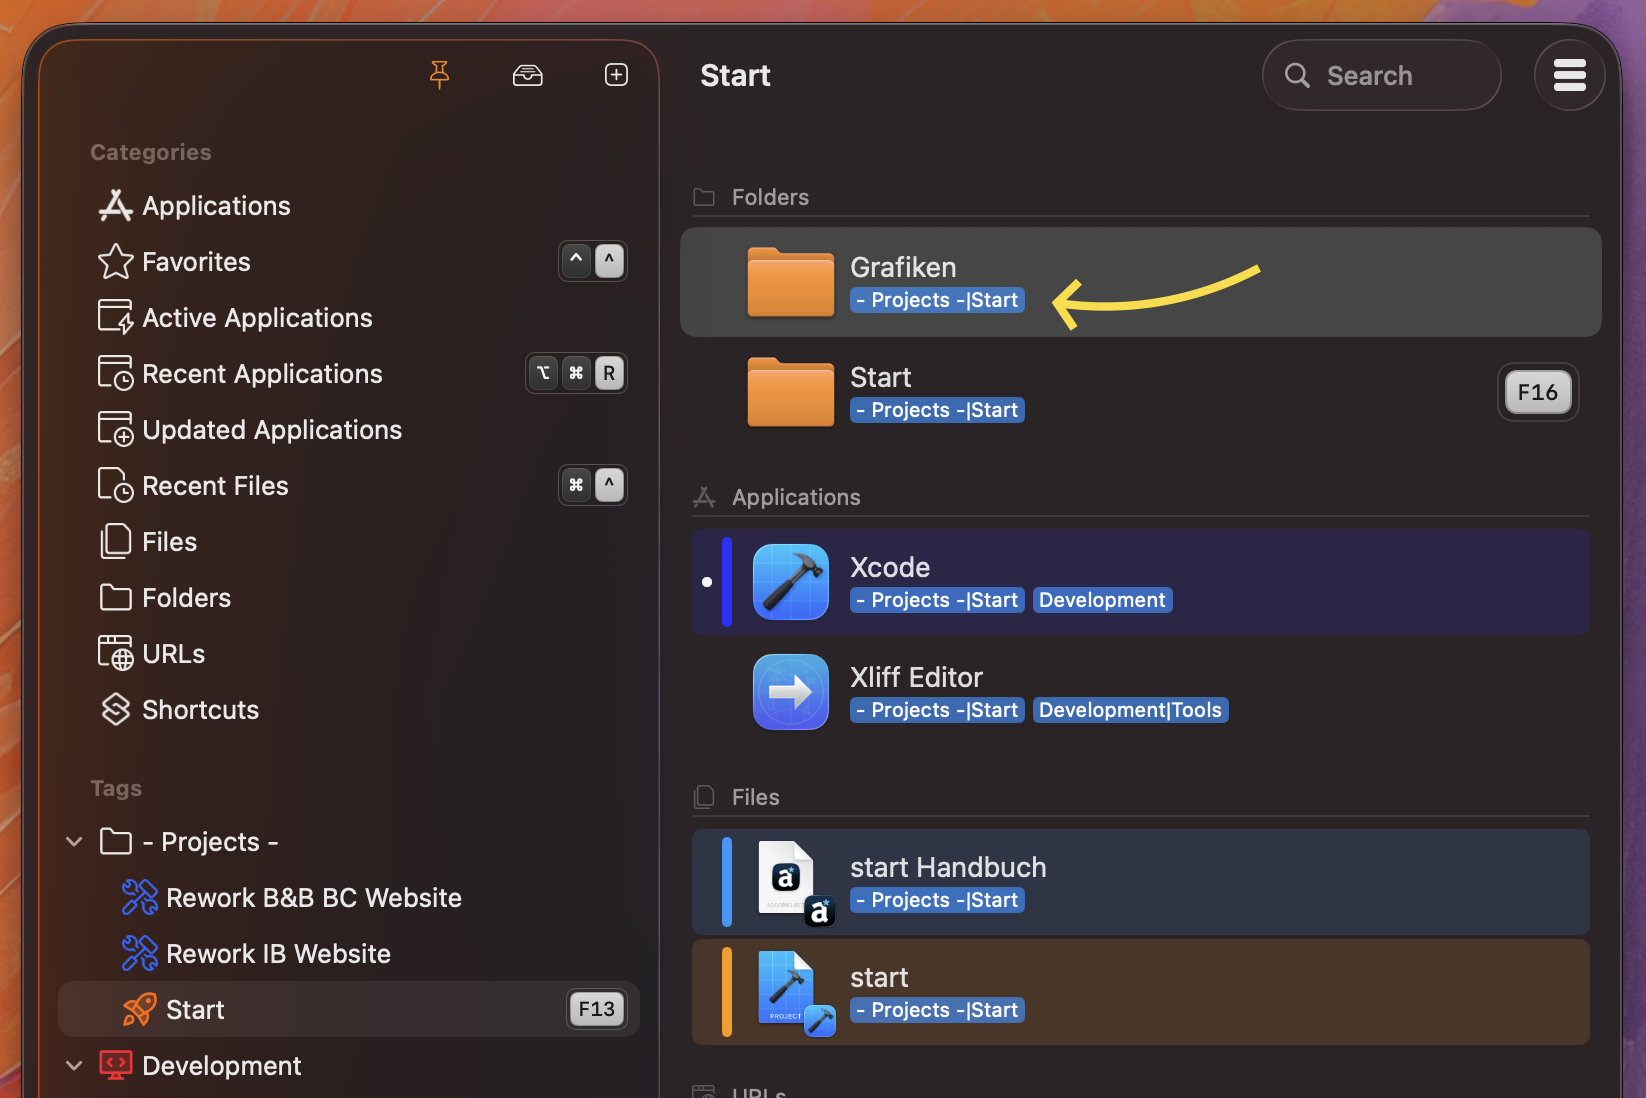
Hold down ⌃+⌥, and Start shows you the tags of each entry.
|
Click a tag below an entry, and Start switches straight to that tag. |
Creating Tags
How do you create a tag in Start and assign entries to it? There are several ways.
The "Add Tag" Button
|
The easiest way is the button below the tag list. A click on it adds a new tag. You can then customize it – its icon or color, for example. Assign entries to the tag using drag and drop. |
|

Context Menu
|
You can also create a tag straight from an entry. Right-click an entry in the main window. A small window with various options appears. In its upper part you find an input field for tags. Type the name of a new tag there, or pick an existing one. You can read more about this window here. |
|
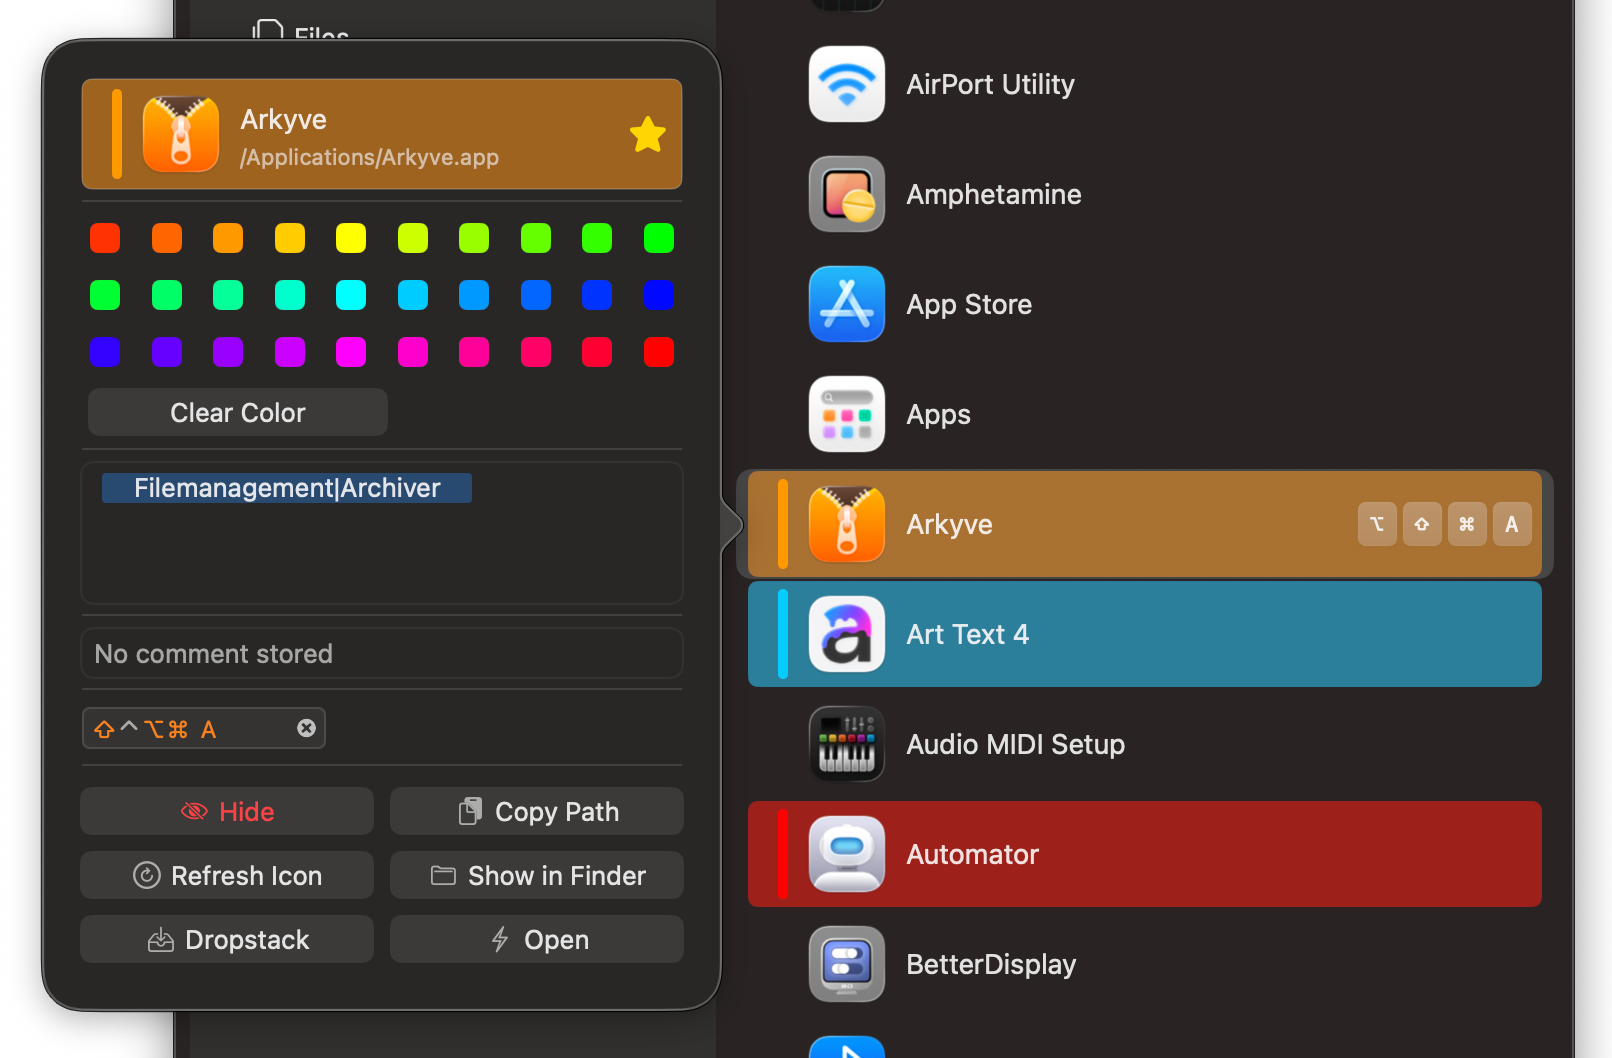
| You can create new tags quickly through the context menu. Assigning an entry to an existing tag is even faster: simply drag the entry in the main window onto it – and it is assigned. |
Managing Entries
The "Manage Entries" dialog shows you every entry and all your tags at the same time. In the "Tags" column you assign tags to entries. The full tag list, including the "Add Tag" button, is available there too – so you can create and customize tags here as well.
| In the "Manage Entries" dialog (see here) you can select several entries at once and assign them to a tag together by drag and drop. |
|
Tags can also be nested. Let’s say you have Apple’s Office programs (Numbers, Pages, and so on) and Microsoft’s. You could create two tags for that: It is even easier with the mouse in the main window: simply drag one tag onto another. |
Renaming Tags
You rename an existing tag by double-clicking it.
Customizing Tags
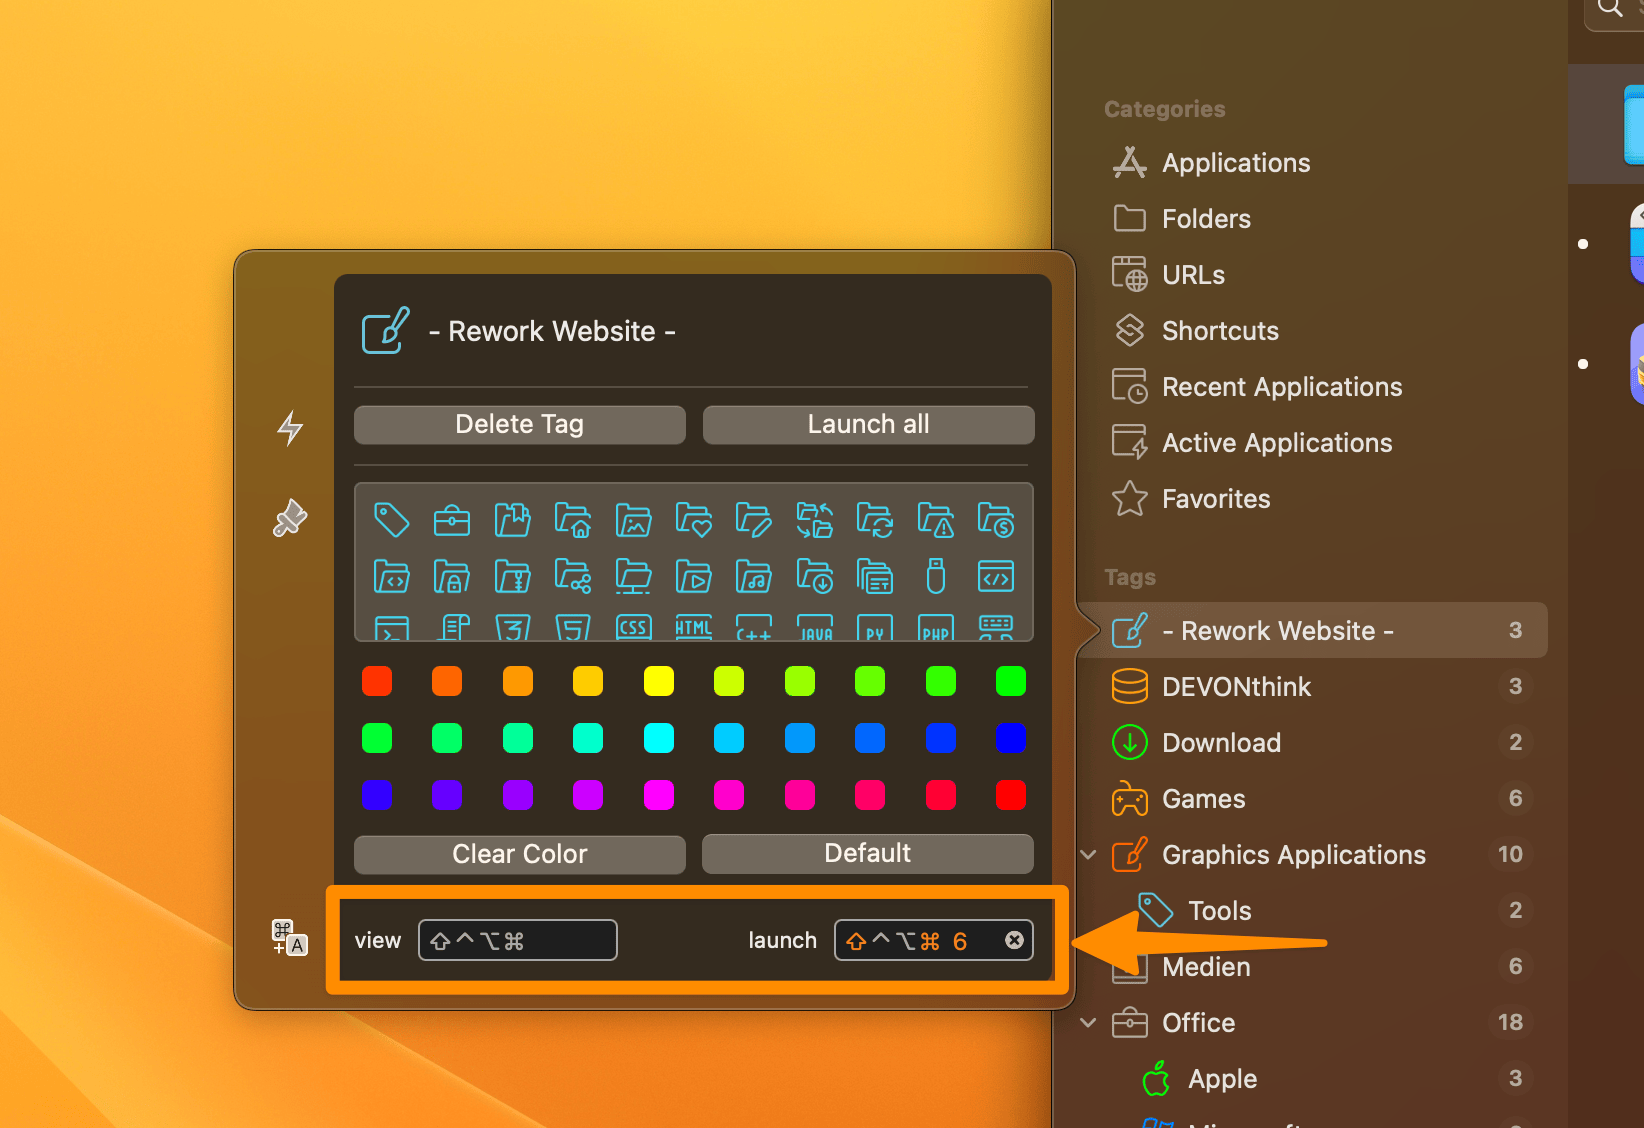
You can customize the appearance of tags. The easiest way is the context menu: right-click a tag. There you give it a different symbol, for example, or highlight it with a color. In the same window, you can assign the tag’s two hotkeys. "View" opens Start and jumps to the tag. "Launch" starts all entries of the tag with a single keystroke.
You can read more about this window here.
Deleting Tags
To delete a tag, right-click it in the main window. In the window that appears, choose the option to delete the selected tag.
Hotkeys
You can assign hotkeys in many places in Start. A hotkey shows and hides the main window, for example. Or it launches individual entries without opening the main window at all. And it starts every entry of a tag in one go. Let us walk through the options one by one.
The Hotkeys You Can Assign
-
Show and hide the main window:
A hotkey shows or hides the main window. This gives you access to Start without clicking through menus. -
Launch individual entries:
A hotkey launches one particular entry directly. It opens applications or files with a single keystroke. -
Launch all entries of a tag:
A hotkey starts every entry of a tag at the same time. This is useful when a task requires several applications or files to be open at once.
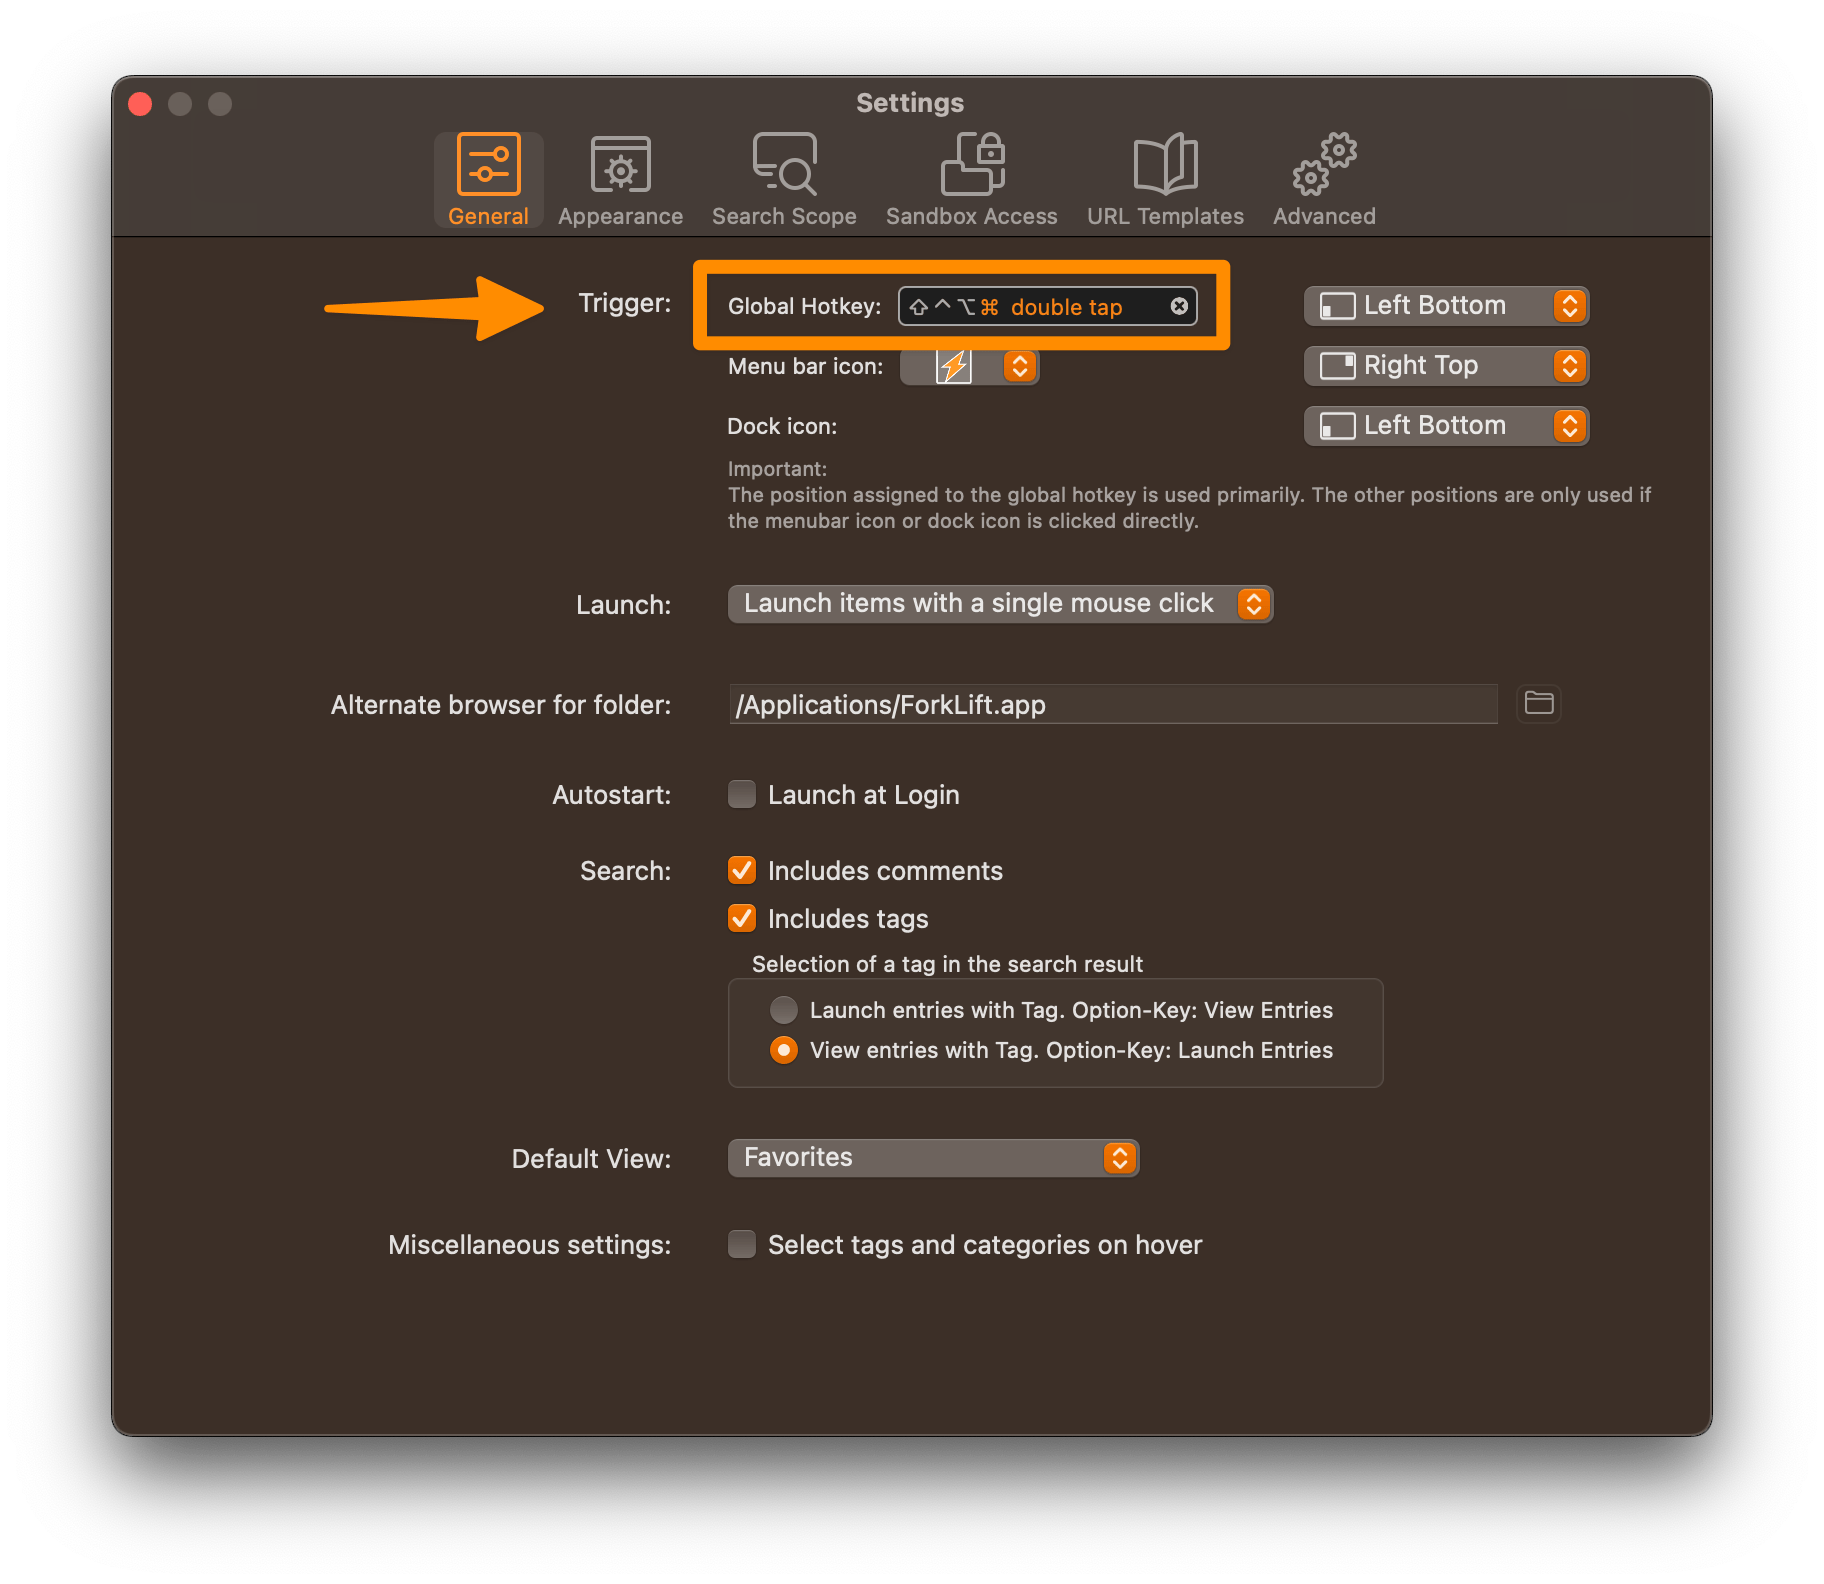
Global Hotkey & Category Hotkeys
|
|
|
|
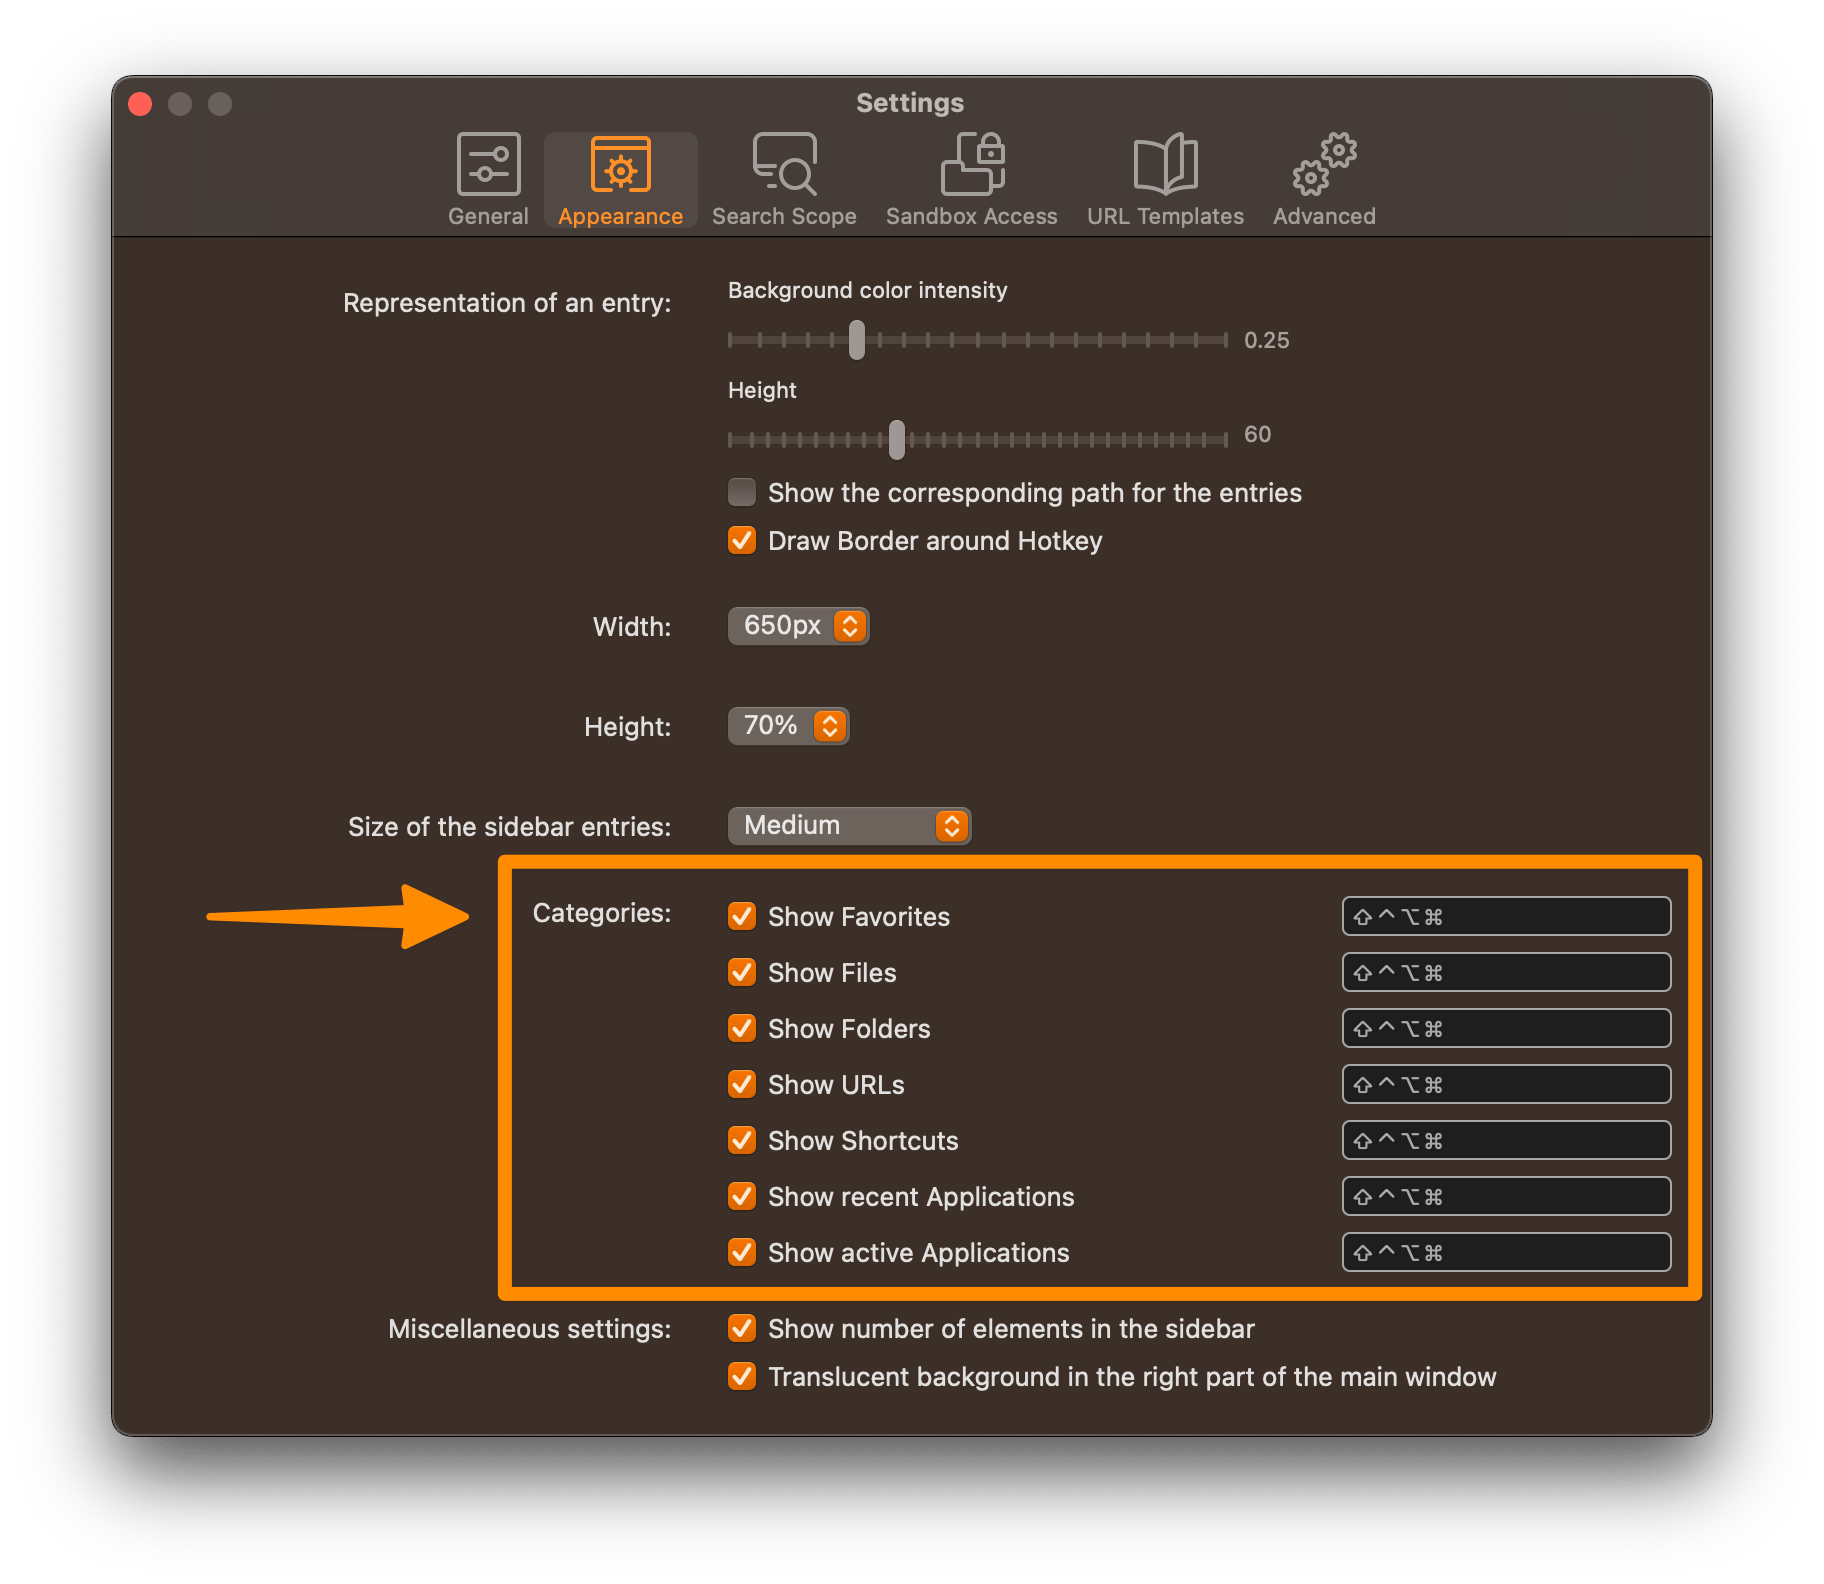
A category hotkey works like the global one, but goes a step further: the main window appears, and Start switches straight to the matching category. This gives you immediate access to a particular group of entries. |
|
|
Give the "Active Applications" category a hotkey. You can then use Start to switch between running programs in an instant. |
Hotkeys for Single Entries
|
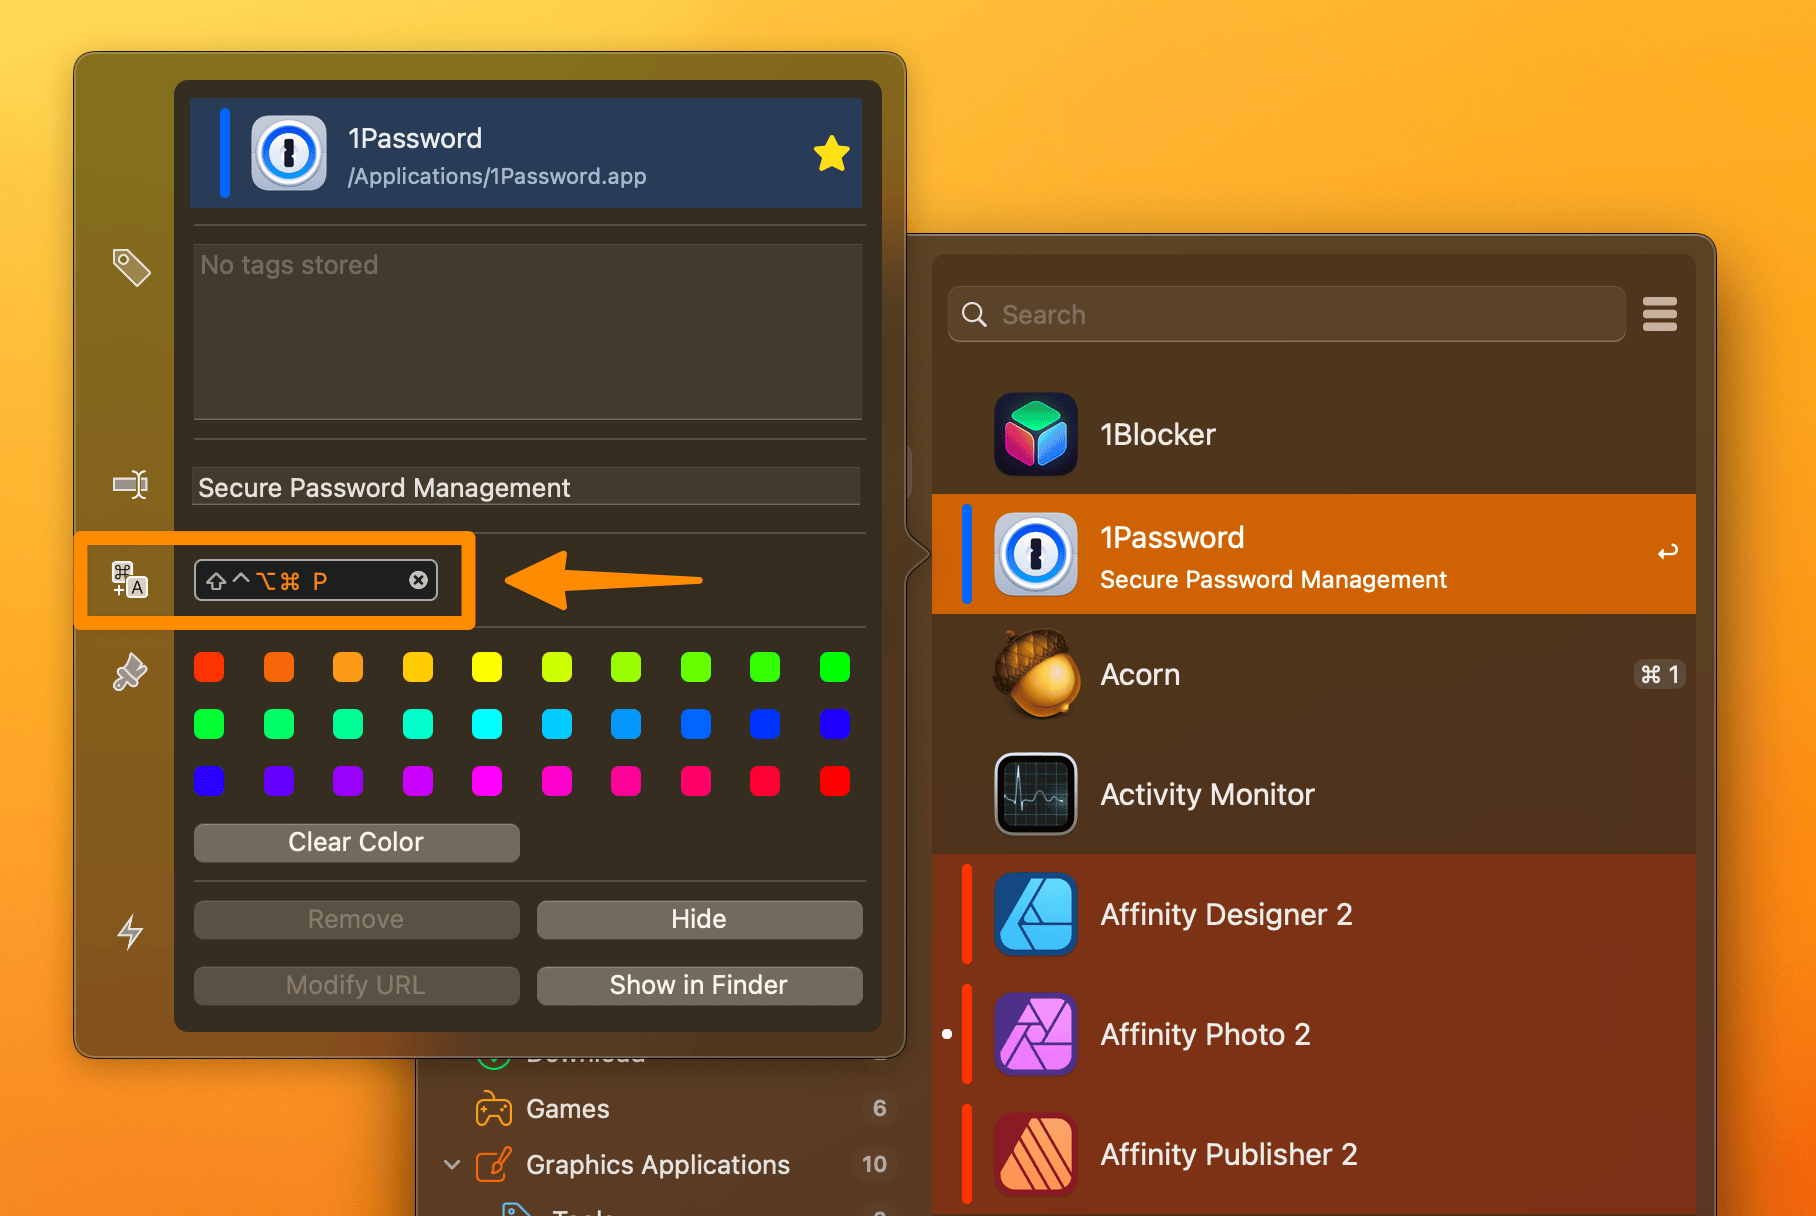
You can give every entry a hotkey – whether it is an application, file, folder, or URL. It launches the entry even when the main window of Start is hidden. Right-click the entry to set one. In the window that opens, you define the hotkey. |
|
Hotkeys for Tags
|
Particularly handy: tags get hotkeys too – two per tag, in fact, one for "View" and one for "Launch". Right-click a tag to set them. In the window that appears, you assign a hotkey for each function. |
|
|
View |
Launch |
|
Choose "Keyboard Shortcuts" from the menu for a quick overview of all assigned hotkeys. |
Active Corners
You can trigger entries not only with a hotkey, but also with the mouse: simply move the pointer into one of the four corners of the screen. This works even when the main window of Start is hidden. Active Corners offer a quick alternative to hotkeys – no keyboard required.
How Active Corners work
You assign each entry to one of the four screen corners: top-left, top-right, bottom-left, or bottom-right. Move the mouse pointer into that corner, and Start launches the entry – just as if you had clicked it in the main window.
|
There are only four corners. That is why you can combine each corner with one or more modifier keys: ⌘, ⌥, or ⌃. A single corner can therefore trigger several entries. Which one starts depends on the modifier keys you hold down. |
Assigning an Active Corner
You assign Active Corners in two places:
Context menu of an entry
Right-click an entry in the main window and choose Active Corner (see here).
"Manage Entries" dialog
You can also assign Active Corners directly in the Manage Entries dialog. This is useful when you want to assign or review Active Corners for several entries in one place.
Context Menus
Entry
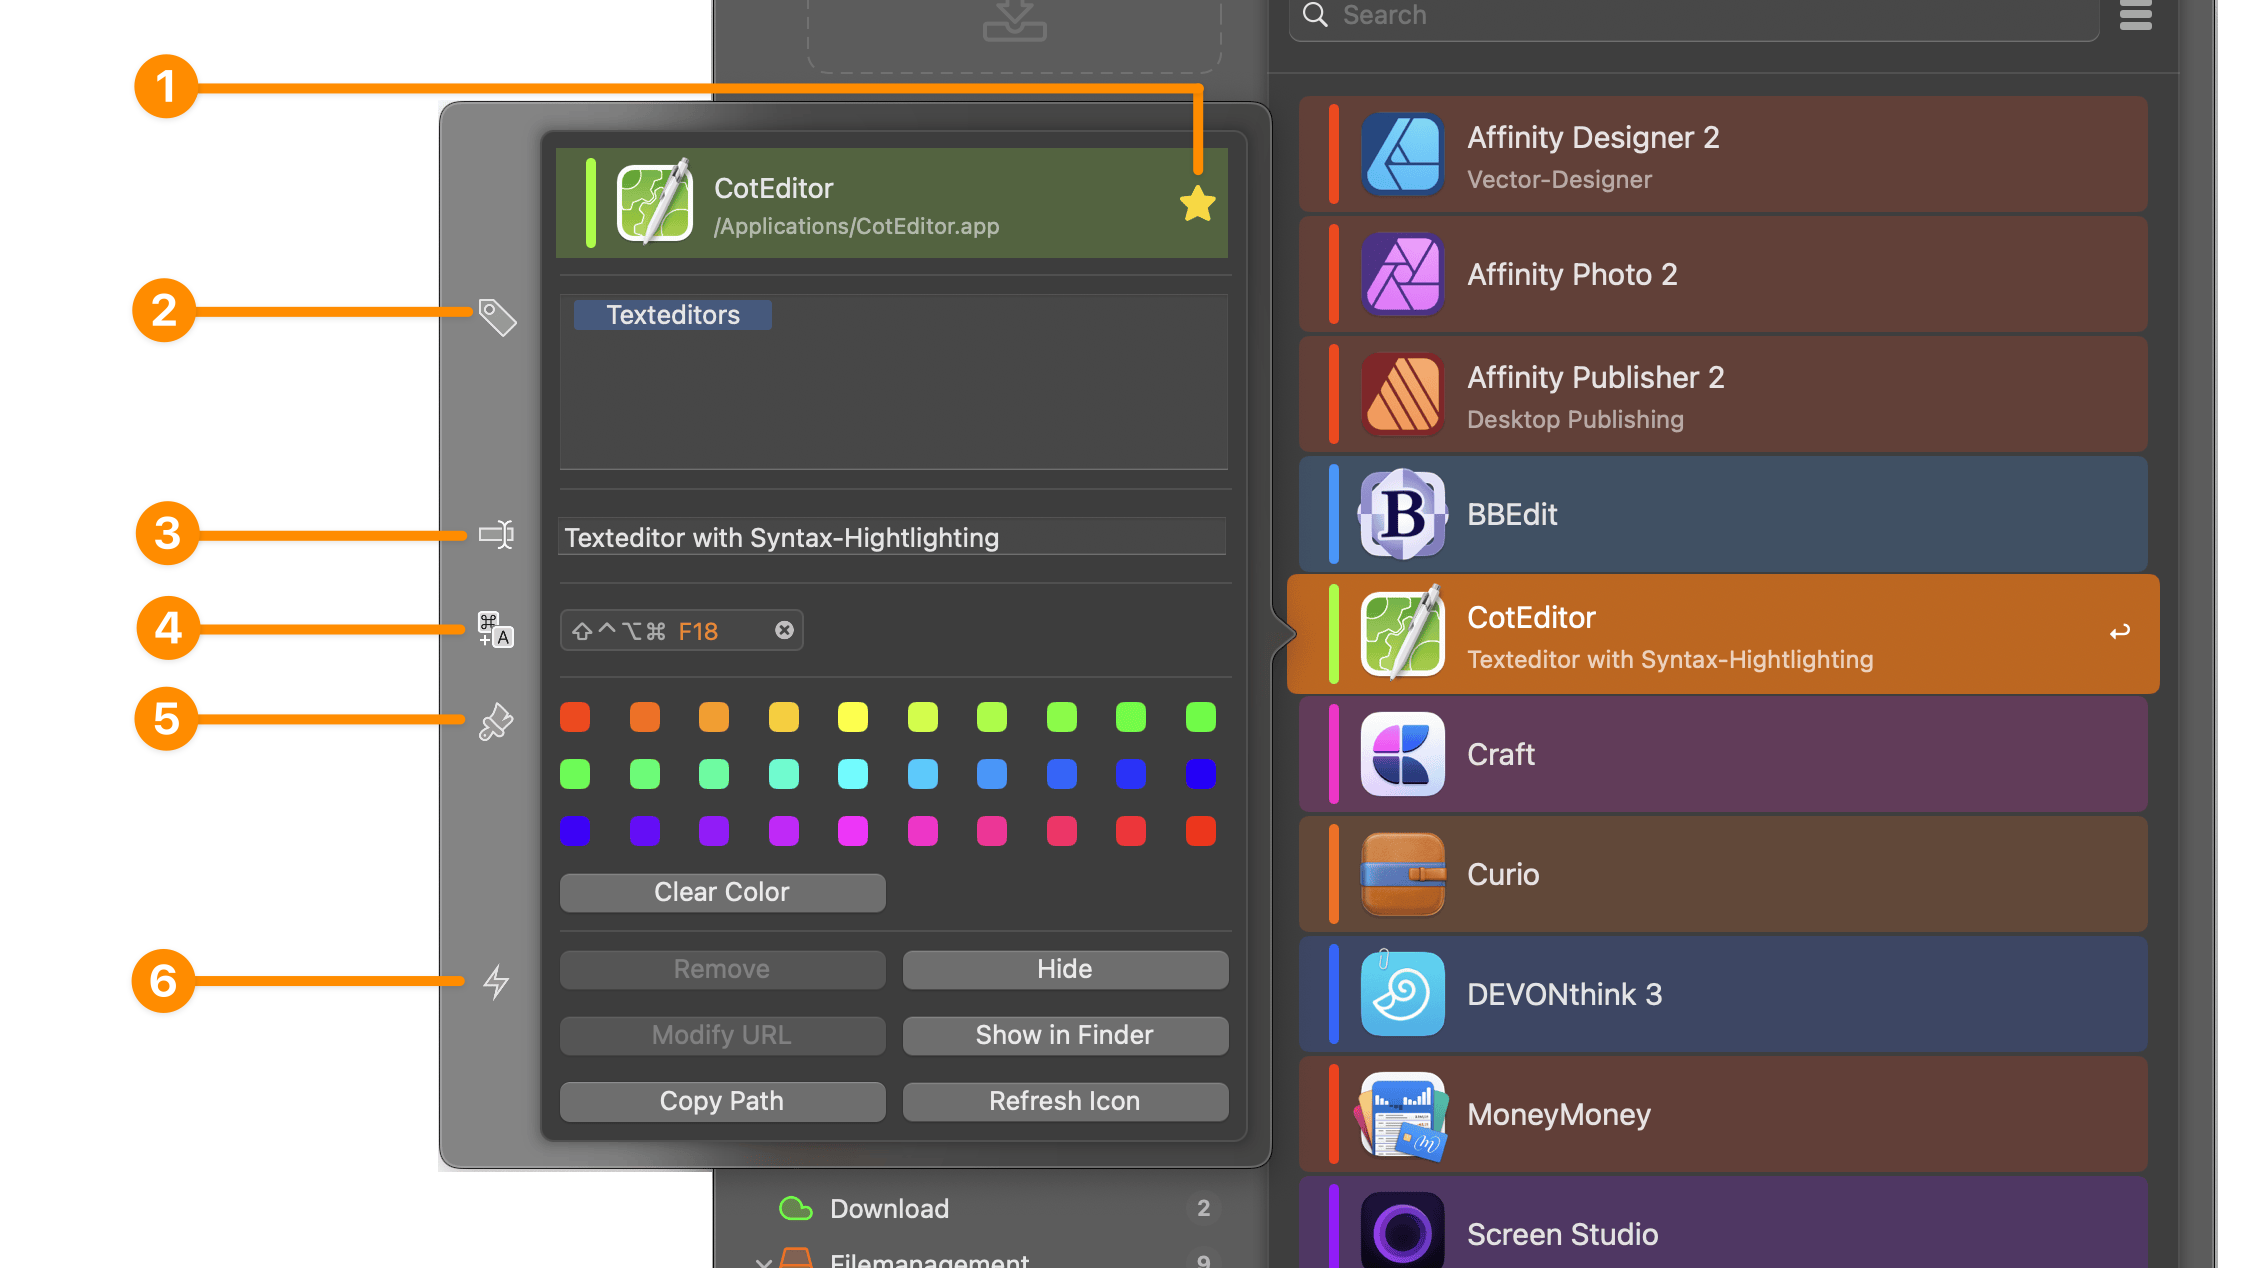
 Mark as Favorite
Favorites appear in the "Favorites" category.
 Tags
Tags
Here you see all tags assigned to the entry. You add and remove them in the same place.
 Comment
You can add a comment to any entry. The comment appears below the entry. In the settings you also decide whether the search takes the comment into account (see here).
 Hotkey
Here you can assign a hotkey to launch the entry.
 Active Corner
You can assign an Active Corner to any entry. Move the mouse pointer into that corner, and the entry launches (more on this here).
 Actions
You can apply various actions to an entry. Which ones appear depends on the entry you selected. "Show in Finder" does not show up for URLs, for example – a URL is simply not a file.
- Hide
-
Hides an entry detected by Spotlight. For manually added entries this button is disabled.
You bring hidden entries back through the "Manage Entries" dialog – more on this here. - Remove
-
Removes manually added entries from Start. For entries detected by Spotlight this button is disabled.
- Show in Finder
-
Shows files and folders at their location in the Finder. For URLs this button is disabled.
- Modify URL
-
Changes the URL of the current entry. For all other entry types this button is disabled.
- Copy Path
-
Copies the path of the entry to the clipboard.
- Refresh Icon
-
Refreshes the icon of the entry – the favicon in the case of a web URL.
- DropStack
-
Puts the current entry on the DropStack.
- Remove Tag
-
Removes the currently selected tag from the entry. This action only appears if you have selected a tag in the sidebar and are viewing its contents.
- Open
-
Opens or launches the currently selected entry.
 Color
Color
You can assign a color to any entry or remove its assigned color.
Tag
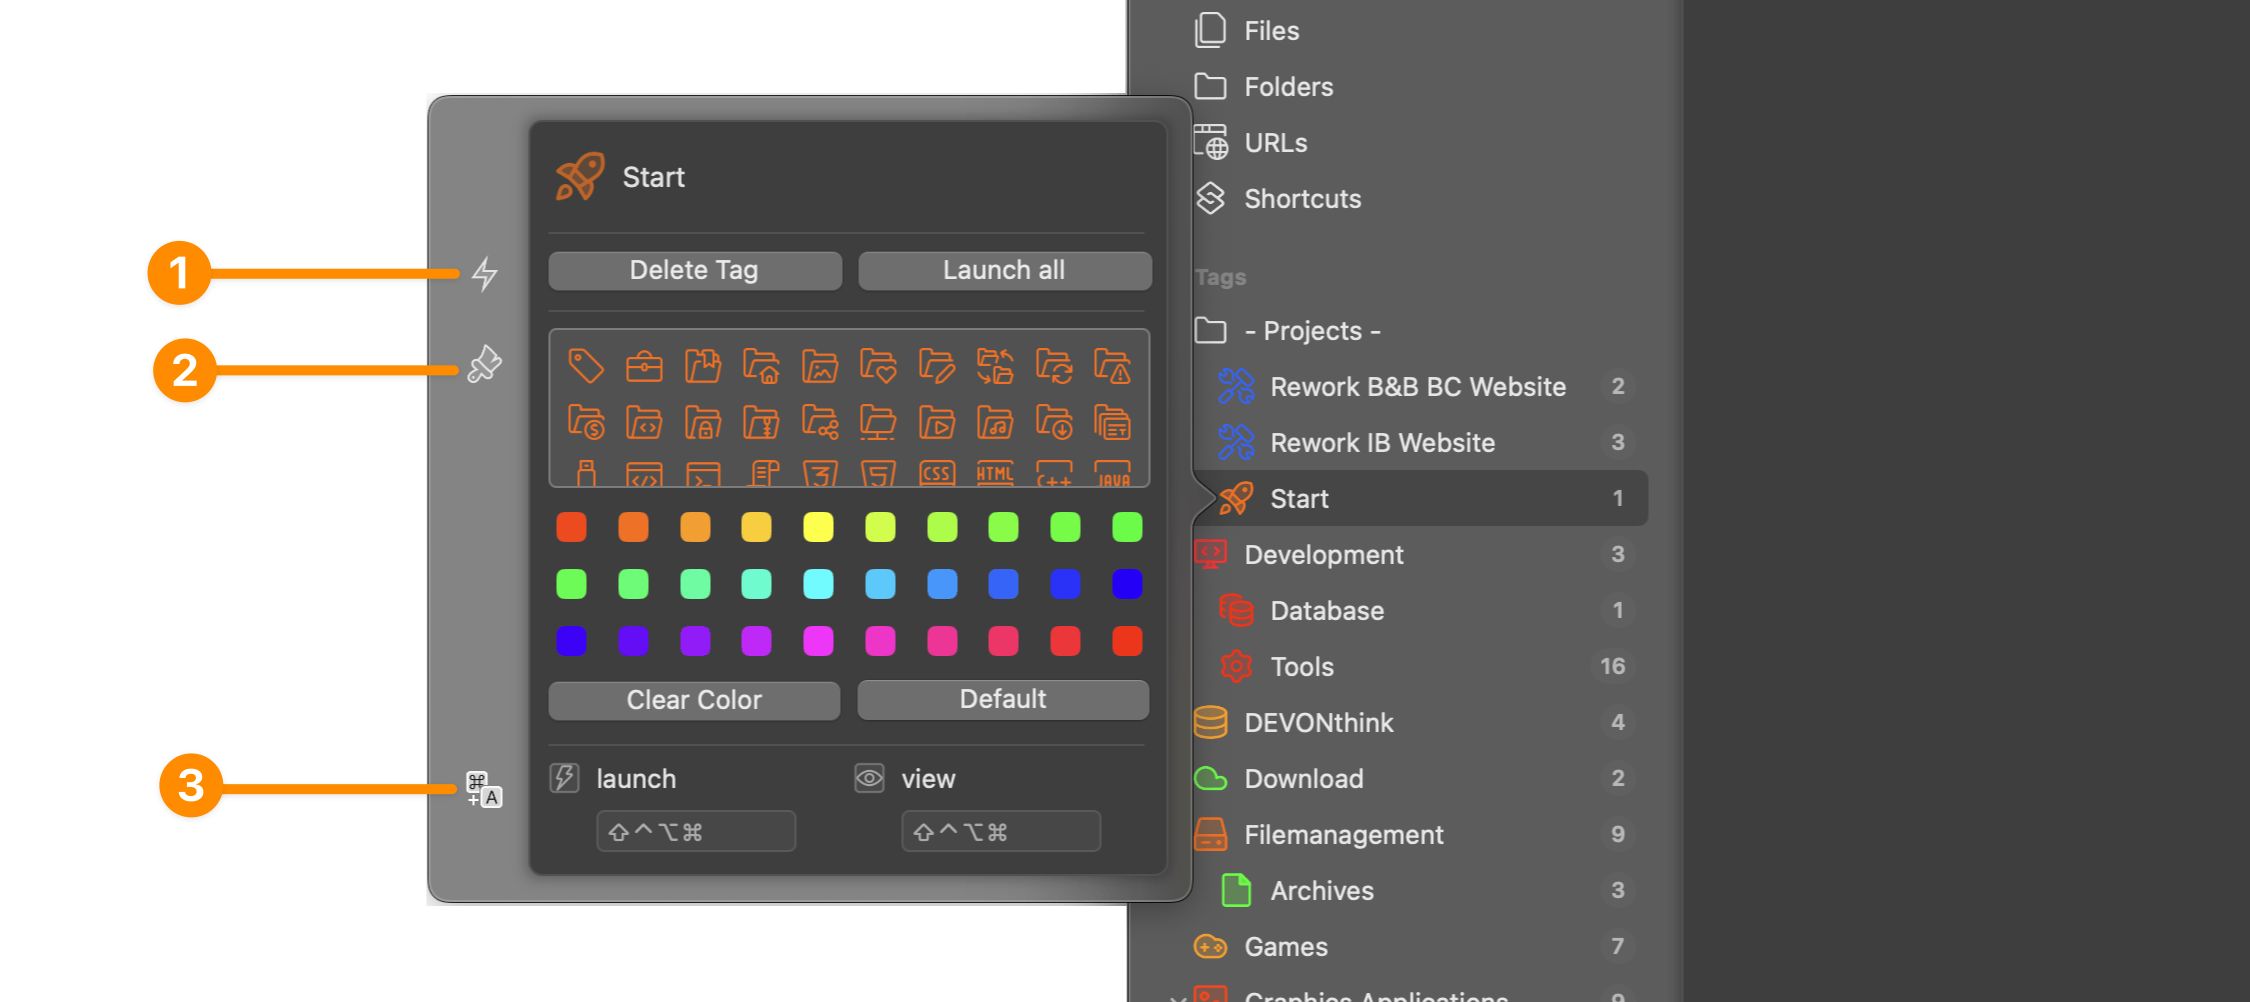
Actions
You can apply various actions to a tag:
- Open All
-
Launches all entries of the tag. The behavior depends on the number of entries:
-
For 1 to 15 entries, Start launches them all without asking for confirmation.
-
For 16 to 30 entries, a warning dialog appears first.
-
For more than 30 entries, Start does not launch any of them. A dialog appears explaining that the action has been canceled.
-
- Delete Tag
-
Removes the tag.
Change Icon
Here you give the tag a custom icon or a different color. A click on "Default Icon" resets both.
Hotkeys
You can give a tag two hotkeys:
- View
-
Opens Start and switches straight to the matching tag – so you can immediately see its entries.
- Launch
-
Launches all entries of the tag at once, just like the "Open All" action. The same limits apply.
Using the Keyboard
Below you will find an overview of the most important keyboard shortcuts for operating Start.
|
⌘+f |
Switch the focus to the search field |
|
⌘+, |
Show settings |
|
⌘+p |
Pin/unpin the main window |
|
← or → |
Switch between Tags/Categories and Entries |
|
tab |
Switch between Tags/Categories and Entries |
|
⏎ |
Launch the currently selected entry |
|
⌘+1…9 |
Launch the corresponding entry from 1 to 9 |
|
⇧+⏎ |
Show the currently selected entry in the Finder |
|
␣ |
Preview the currently selected entry with Quick Look |
|
⌥ |
Show paths |
|
⌃+⌥ |
Show assigned tags |
|
⌃+⏎ |
Launch all entries of the selected tag |
|
⌘+f |
Switch the search scope |
|
esc |
Exit the search field |
A quick note on the search scope: the search field covers either the entire data set or only the current view. Which one applies depends on what Start is showing. The icon in the search field tells you at a glance:
|
|
Start searches the entire data set. This is the default. |
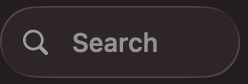
|
|
Start searches only the data currently displayed. This setting applies automatically in Recent Files and inside a folder. |
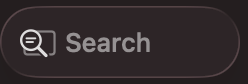
|
← or ⌘+↑ |
Go up one level to the parent folder |
|
→ or ⌘+↓ or ⏎ |
Navigate into the selected folder |
|
esc |
Exit the folder view |
|
⇧+⏎ |
Show the currently selected entry in the Finder |
|
␣ |
Preview the currently selected entry with Quick Look |
|
⌥ |
Show paths |
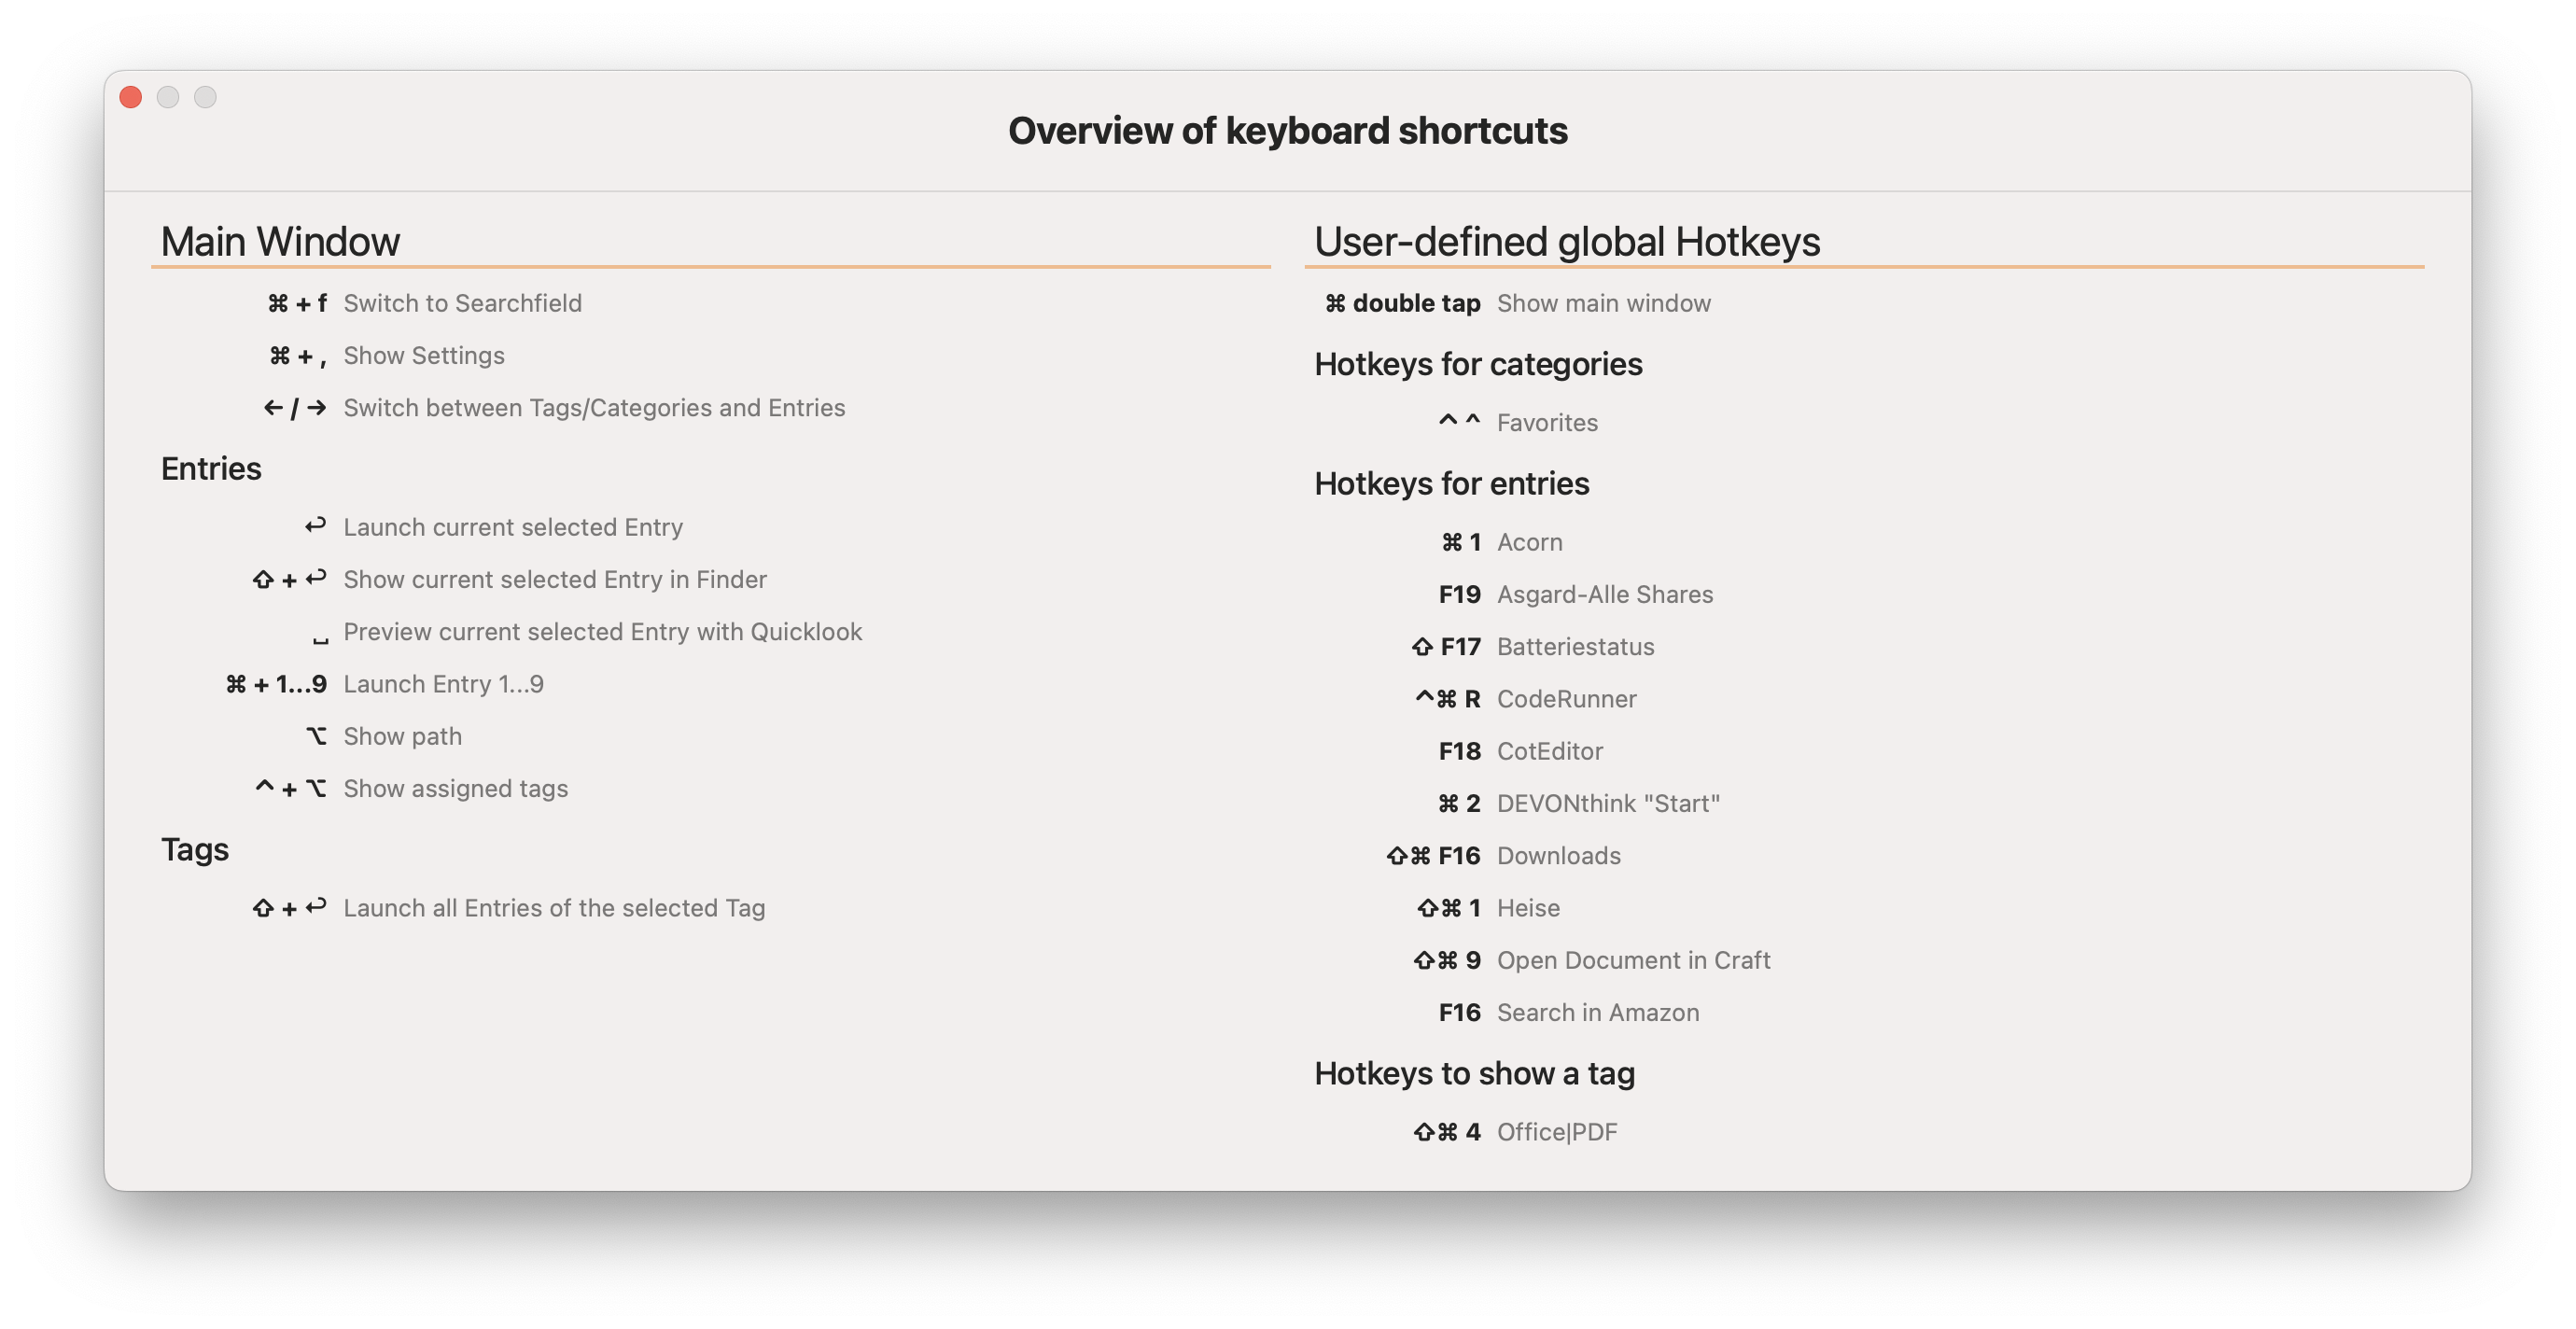
The "Keyboard Shortcuts" Dialog
You can define your own keyboard shortcuts for many functions – to show the main window, for example, or to launch all entries of a tag. You do not have to memorize them: Start comes with its own overview.
Choose the menu entry "Keyboard Shortcuts". It shows both the predefined shortcuts and your custom shortcuts at a glance.
Drag & Drop
Start supports drag and drop in various places. The most common ways are shown below:
- Drop a file or folder from the Finder onto an application entry
-
Start launches the application and passes the file or folder to it.
- Drop a file or folder from the Finder onto a tag
-
Start adds the Finder object to that tag.
- Drop an address from Safari onto a tag
-
Start adds the URL to that tag.
- Drop an entry from the right side of the main window onto a tag
-
Start adds the entry to that tag.
- Drop one or more files or folders from the Finder onto the icon in the menu bar
-
The main window of Start appears. The next application you launch receives the dropped items.
|
Start also supports "spring-loading". Drag a file from the Finder onto a tag, for example, and wait there briefly – without releasing the mouse button. Start then switches to that tag and shows its contents. Now drop the file onto an application in that tag. |
DropStack
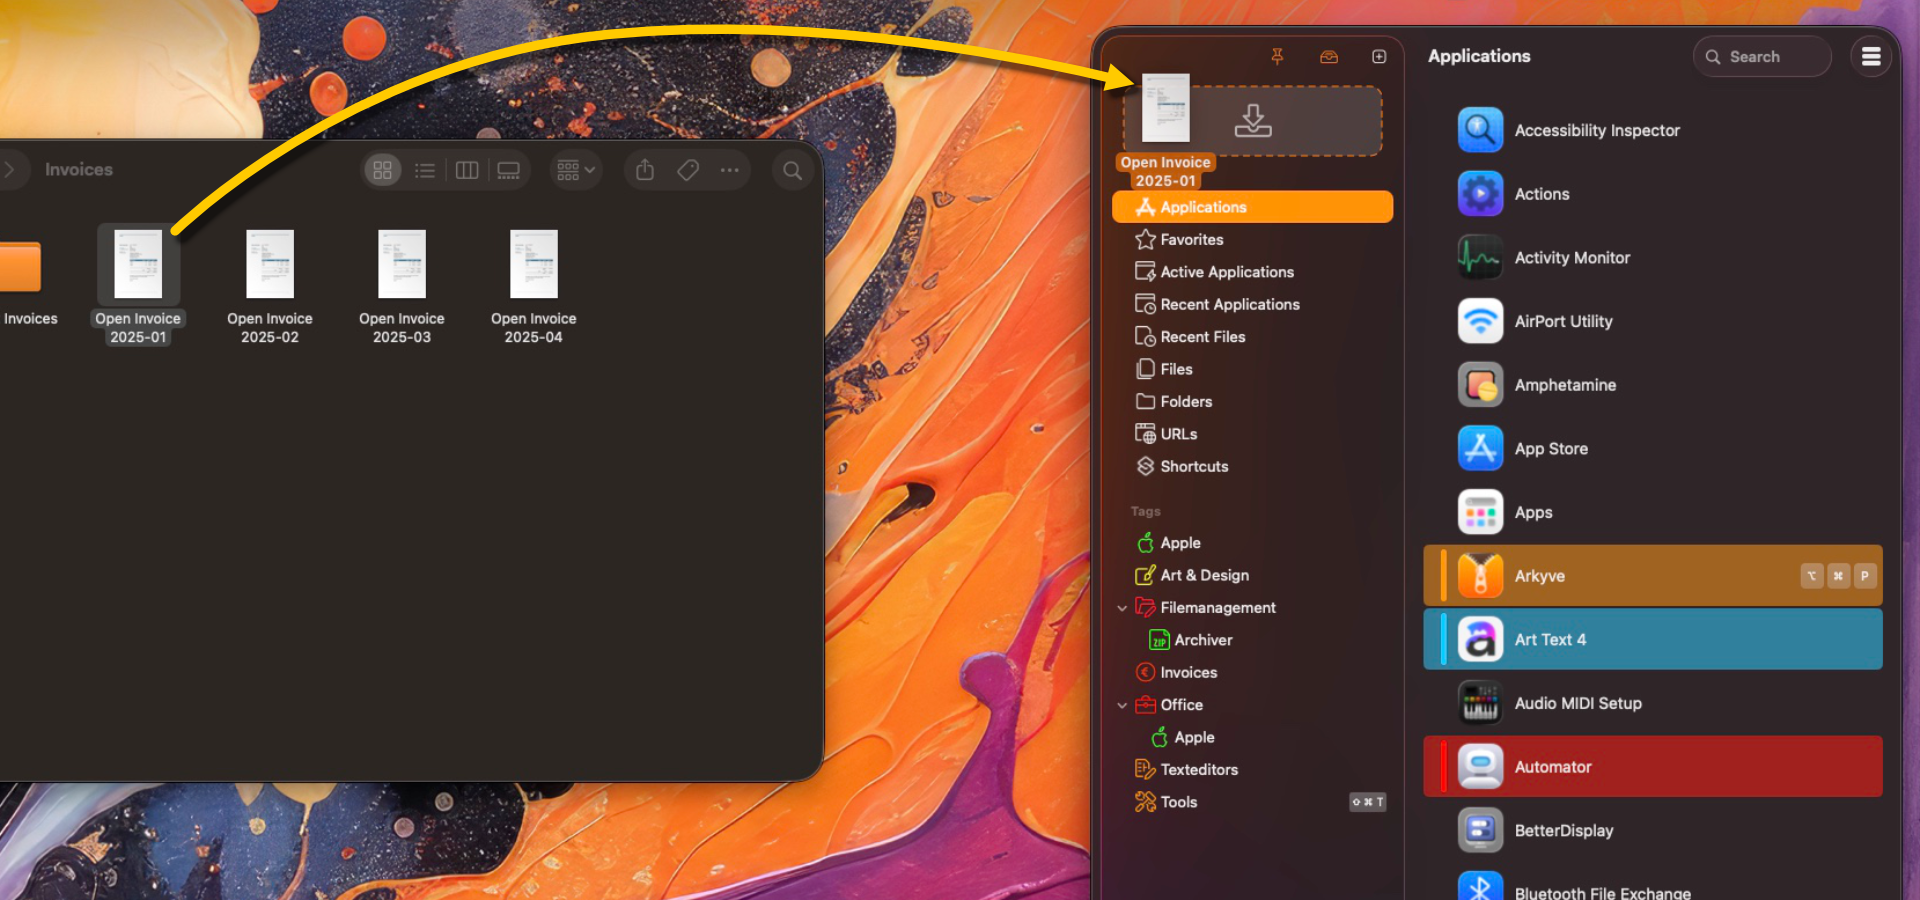
Use the DropStack to collect files and folders so you can process them together later. Think of it as a basket: you drop in whatever belongs together and hand it all to one program at the end.
How to use the DropStack
Step 1: Add Files and Folders
Drag the files or folders you want from the Finder straight into the DropStack area of the main window. There is no limit to how many you collect.
Step 2: Launch an Application with the DropStack
Once your files and folders are in the DropStack, simply select an application in Start. Start opens the collected items with that program automatically.
Practical Examples
-
Compress files:
Collect files in the DropStack, then launch your compression tool. It opens and processes all items automatically. -
Batch image editing:
Put images in the DropStack, then launch an image editor. It opens every image at once. -
Convert documents:
Gather documents in the DropStack and launch a converter. It converts them to another format in one batch.
|
Entry Types
Start manages not only applications, but a whole range of other entry types as well.
You can also show these entry types as separate categories in the sidebar. Use the settings to choose which categories appear. You can read more about it here.
The following chapters look at each entry type in turn and cover what makes it special.
Applications
Start detects and organizes your installed applications automatically, so you launch them in an instant. You decide how they appear, give them hotkeys, and group them with tags.
How Applications are added
Start finds the applications on your Mac through the Spotlight index. By default it scans the usual program folders. You add further search paths under Settings → Search Scope (see here).
Opening Applications in Start
There are several ways to launch an application from Start:
Using the Search Field
-
Click the Start icon in the menu bar, or use your global hotkey to open Start.
-
Type the name of the application into the search field.
-
Press Return to launch it.
Using Tags
-
Give frequently used applications a shared tag (“Work” or “Development”, for example).
-
Click the tag to see the grouped applications.
-
(Optional) Assign a hotkey to the tag to launch all of them at once.
Using Hotkeys for Individual Apps
-
Right-click an application and enter a custom keyboard shortcut.
-
This shortcut now launches the application straight away – even when the main window of Start is closed.
|
Example: |
Managing Applications in Start
Once Start has detected an application, you can adjust the appearance and behavior of its entry:
-
Assign tags: Group applications into meaningful sets.
-
Set a hotkey: Launch applications with a single key combination.
-
Add a comment: Note down hints or a short description.
-
Use colors: Highlight important apps.
Hiding Applications
-
To hide an application: right-click it and select “Hide”.
-
To bring it back: open "Manage Entries", choose the category "Disabled Entries", and enable the entry again.
Grouping Applications with Tags
With tags you launch several applications with one command.
|
Example:
|
In Brief
✅ Start detects applications automatically through Spotlight.
✅ Find and launch apps in an instant – by search, tag, or hotkey.
✅ Customize application entries with tags, comments, and colors.
✅ Use hotkeys and tags to work faster.
Files
You add individual files to Start to reach them quickly. Applications are added automatically through Spotlight, while you add files yourself. After that you give them tags, hotkeys, and colors, and keep everything tidy.
Adding Files to Start
There are two ways to add a file to Start:
Using the “Add File or Folder” Option
-
Open Start and choose “Add File or Folder” from the menu.
-
Pick the file you want to add.
-
(Optional) Give it a tag or hotkey so you reach it even faster later.
Using Drag & Drop
-
Pin Start with the "Pin" button at the top left so the window stays open. Can’t find the button? Then take a look here.
-
Drag a file from the Finder into the Start window.
-
(Optional) Drag the file straight onto a tag to assign it right away.
|
Files are neither moved nor copied – Start only creates a reference to them. |
Managing File Entries
Once you have added a file to Start, you can adjust the appearance and behavior of its entry:
-
Assign tags: Group files that belong together.
-
Set a hotkey: Open the file with your own shortcut.
-
Add a comment: Note down a short description.
-
Use colors: Color-code files by priority or type.
Revealing a File in the Finder
Right-click the file in Start and choose “Show in Finder” to reveal it at its location.
Removing a File from Start
Right-click and choose “Remove”. This does not delete the file from your system.
Using Files with Tags
You can assign tags to files and open them in groups, just as you can launch applications in groups. That is particularly handy for project work.
|
Example: |
In Brief
✅ Reach important files without clicking through the Finder.
✅ Organize files with tags and colors, and open them with hotkeys.
✅ Drag files into Start and they are added.
✅ Open whole groups of files at once.
Folders
You add folders to Start to reach them quickly. Unlike applications, you add them yourself. After that you give them tags, hotkeys, and colors. You also decide how folders behave when you open them.
Adding Folders to Start
Using the “Add File or Folder” Option
-
Open Start and choose “Add File or Folder” from the menu.
-
Pick the folder you want to add.
Using Drag & Drop
-
Pin Start with the "Pin" button at the top left so the window stays open. Can’t find the button? Then take a look here.
-
Drag a folder from the Finder into the Start window.
-
(Optional) Drag the folder straight onto a tag to assign it right away.
|
Folders are neither moved nor copied – Start only creates a reference to them. |
Opening Folders in Start
Start opens files in external programs and launches applications directly. You can browse folders directly inside Start: you step into them, see their contents, and open individual files from there.
In the settings, you choose how Start handles folders. You can read more about it here.
Displaying Folder Contents in Start
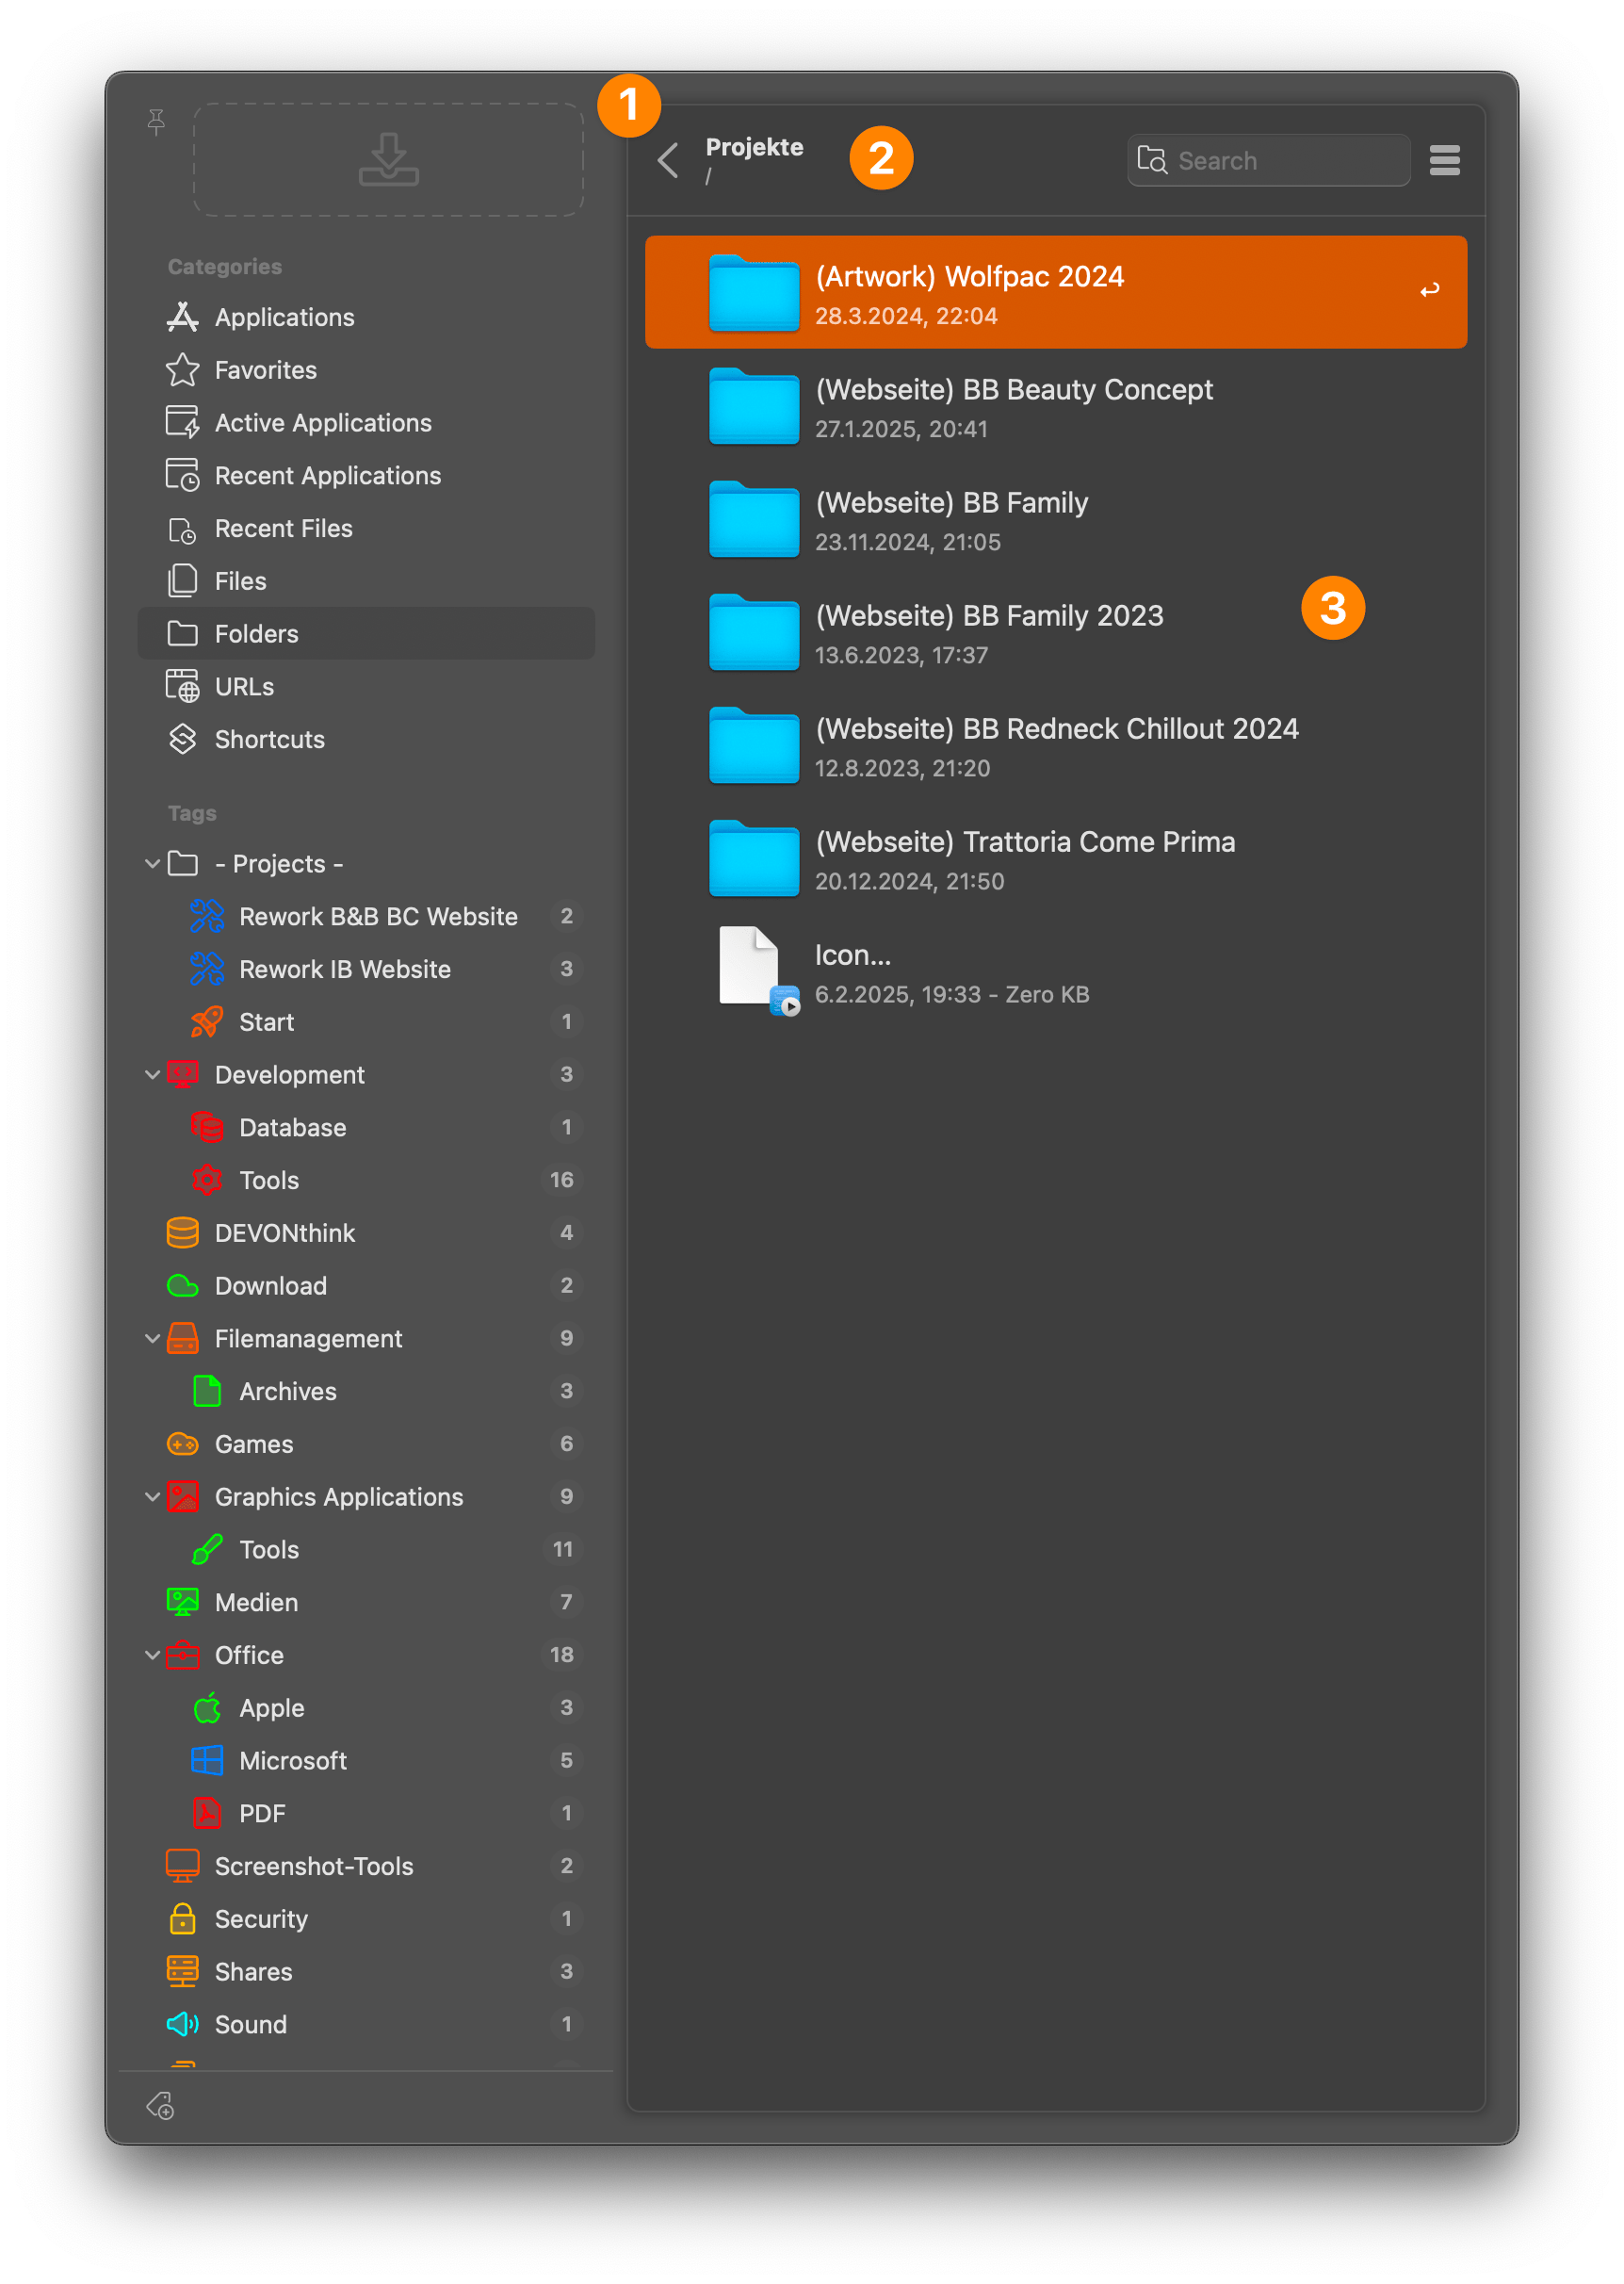
Have you set up Start to show folder contents in the app? Then it looks like this:
|
|
|
|
Start reads the contents of a folder from the file system each time you open it. The displayed items are not saved as entries in Start, so tags are not shown in this view. The context menu looks different too – but it does let you copy a path to the clipboard. |
|
You can navigate the folder view with the keyboard as well. You can read more about the shortcuts here. |
In Brief
✅ Reach frequently used folders without clicking through the Finder.
✅ Organize folders with tags and colors, and open them with hotkeys.
✅ Decide for yourself whether a folder opens in the Finder or in Start.
URL Schemes
With URL schemes you control applications through special links. A URL with a defined structure, such as app://parameter, triggers an action in an app and passes parameters to it. That is handy for automating routines, jumping straight into a certain part of an app, or making several tools work together.
How URL Schemes Work
A URL like this has two parts:
-
Scheme identifier — names the target application (mailto:, things:, or devonthink:, for example).
-
Action and parameters — define what should happen (mailto:support@example.com?subject=Help, for example).
The following URL creates a new email with the recipient and subject already filled in:
mailto:support.com?subject=Support%20RequestYou find a short overview of various URL schemes here.
Using URL entries in Start
In Start you create your own URL entries and manage them. With them you open web pages, control applications, and automate whole routines.
|
Start manages your URL entries and runs them. What actually happens depends entirely on the target application. We therefore cannot support you in creating or using a particular URL entry. Please turn to the developers of that application. |
Adding a new URL entry
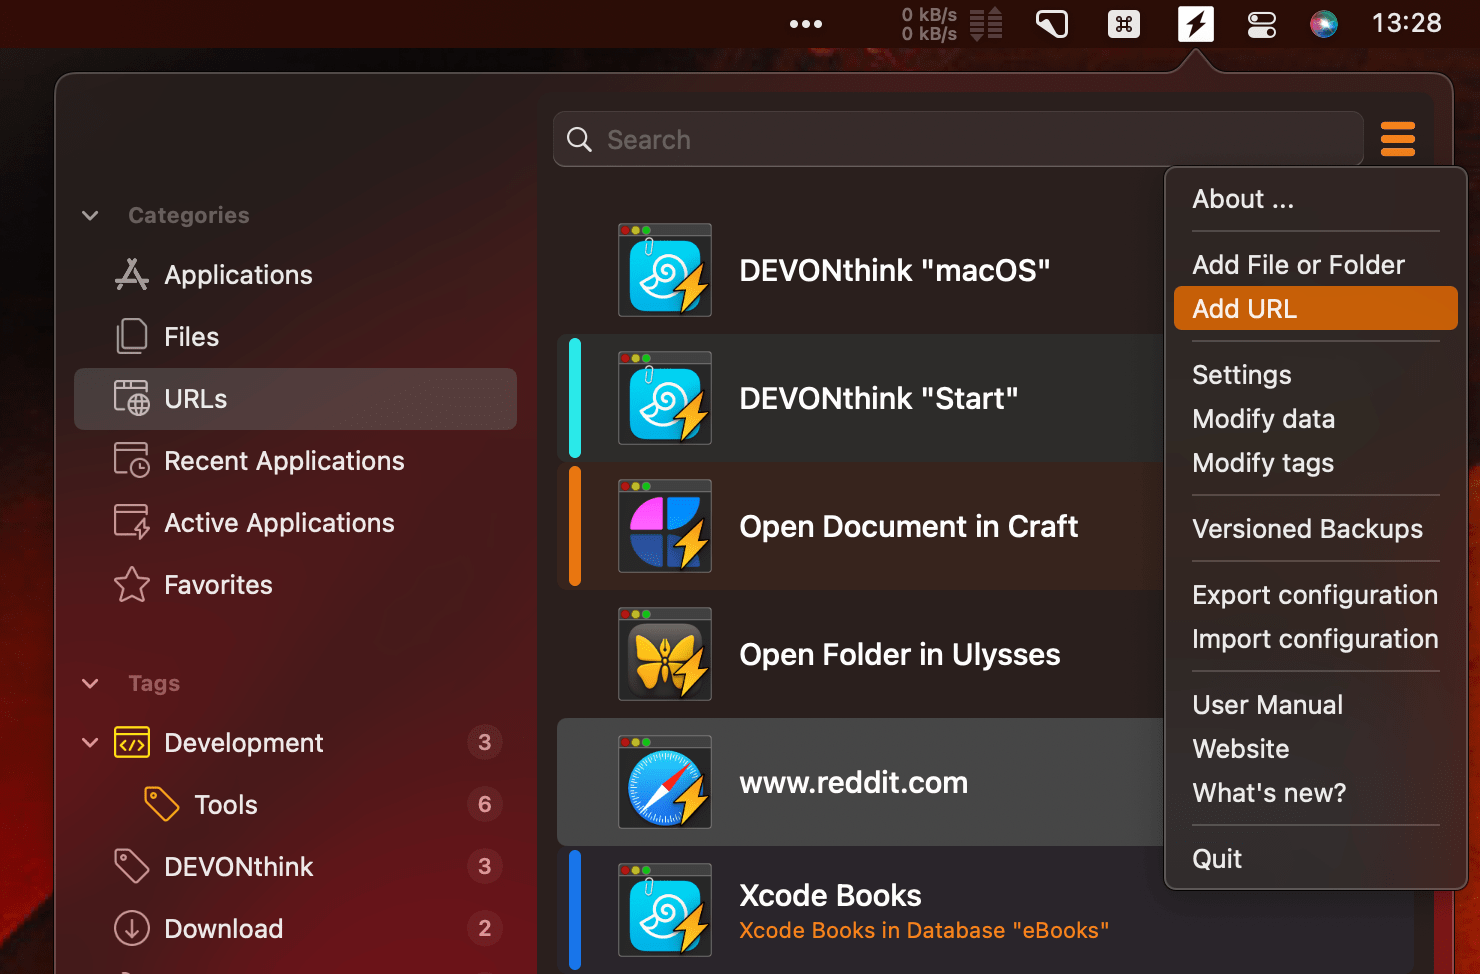
-
Choose “Add URL” in the Start menu to open the URL dialog.
-
Enter the title – the name that appears in Start later.
-
Enter the URL and make sure it includes a valid scheme (https://, mailto:, or things://, for example).
-
(Optional) Add a comment describing what the URL does.
-
Click Save to store the URL entry.
|
You can also create URL entries by dragging a web address over from Safari. |
How a URL entry is built
Every URL entry follows the same pattern. First comes the scheme – "https", for example – followed by a colon. After that comes the scheme-specific part, which looks different for every scheme and target application.
Changing existing URL entries
You edit an existing URL entry by double-clicking it in the "Manage Entries" dialog, or through the context menu in the main window.
Restrictions
Two things are worth knowing when you use URLs in Start:
-
A URL may not exceed 3,000 characters. Beyond that, Start truncates it – and it will most likely no longer work as intended.
-
Every URL entry needs a title. A comment is optional.
Add/Edit URL Dialog
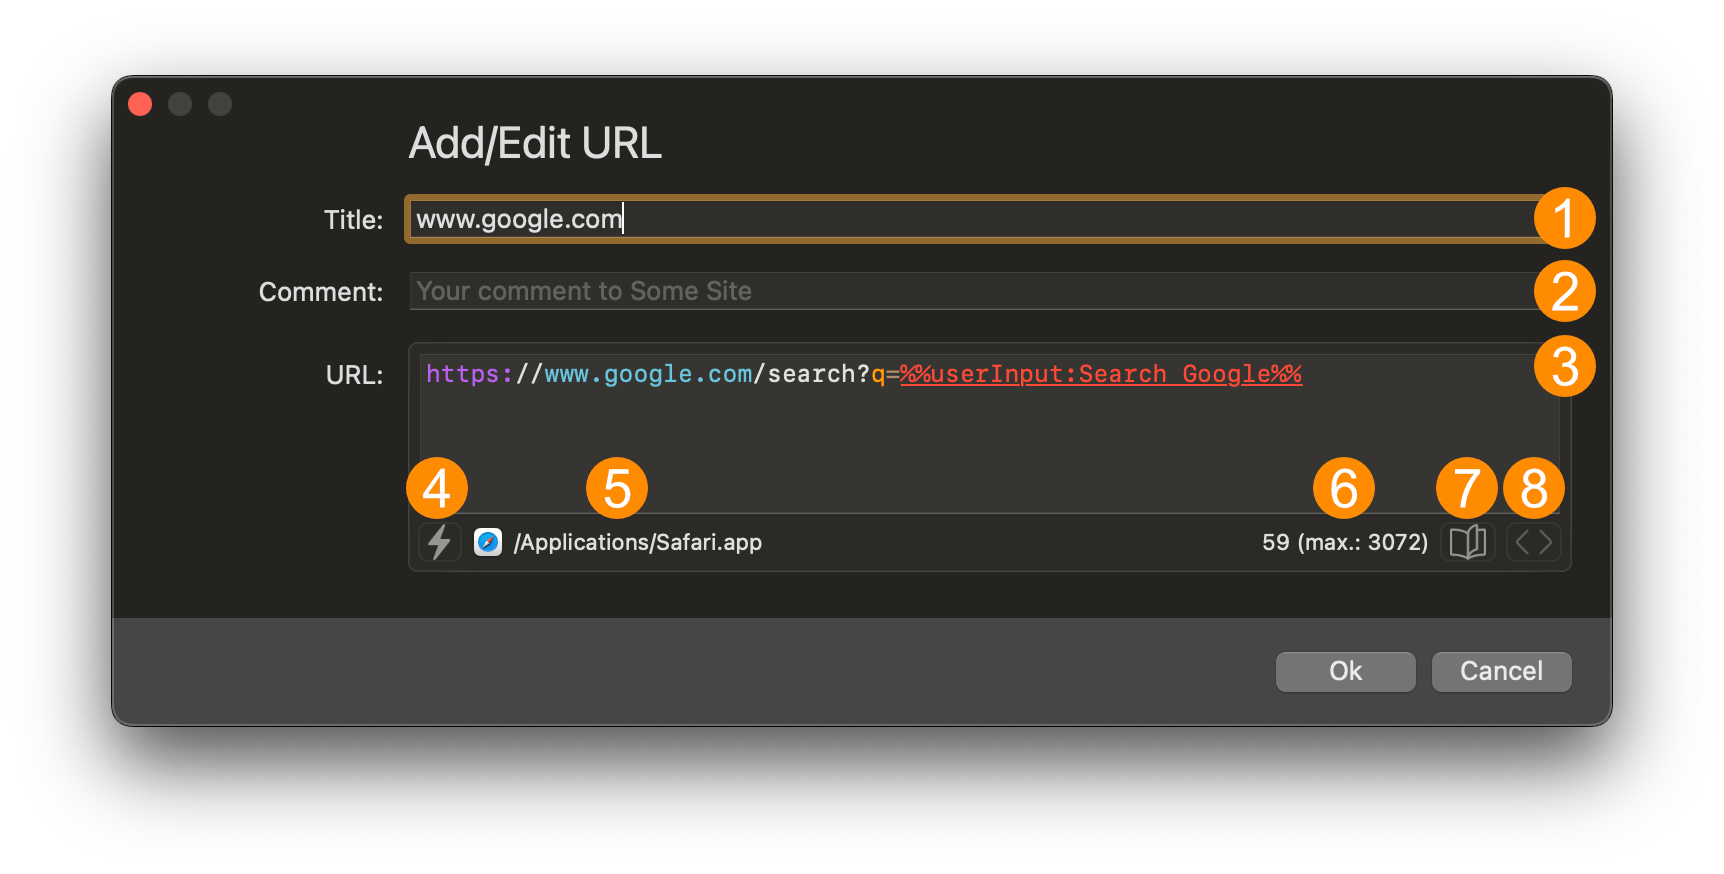
|
|
|
|
|
|
|
|
|
|
|
|
Let us take a closer look at the "Open with" section:
|
|
|
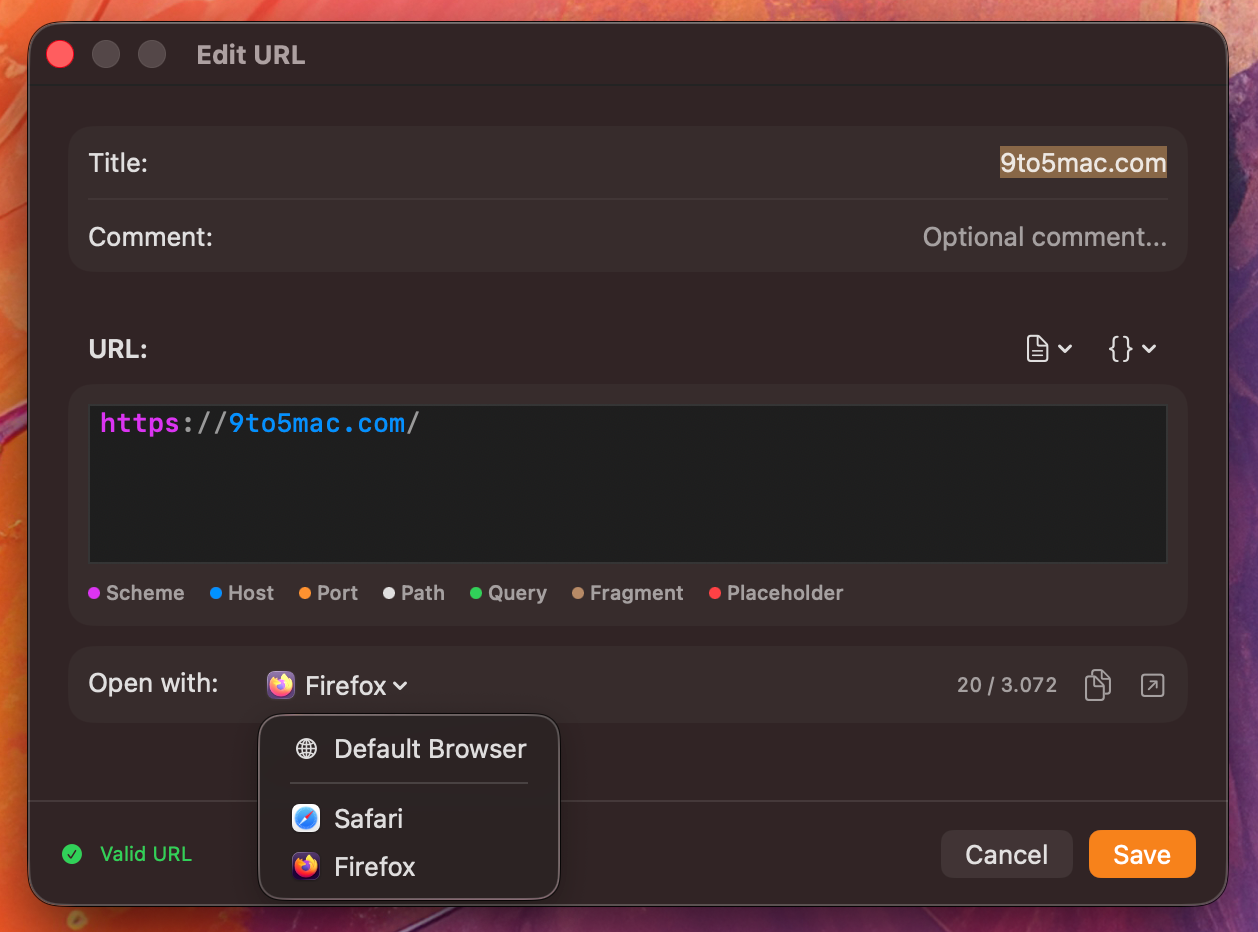
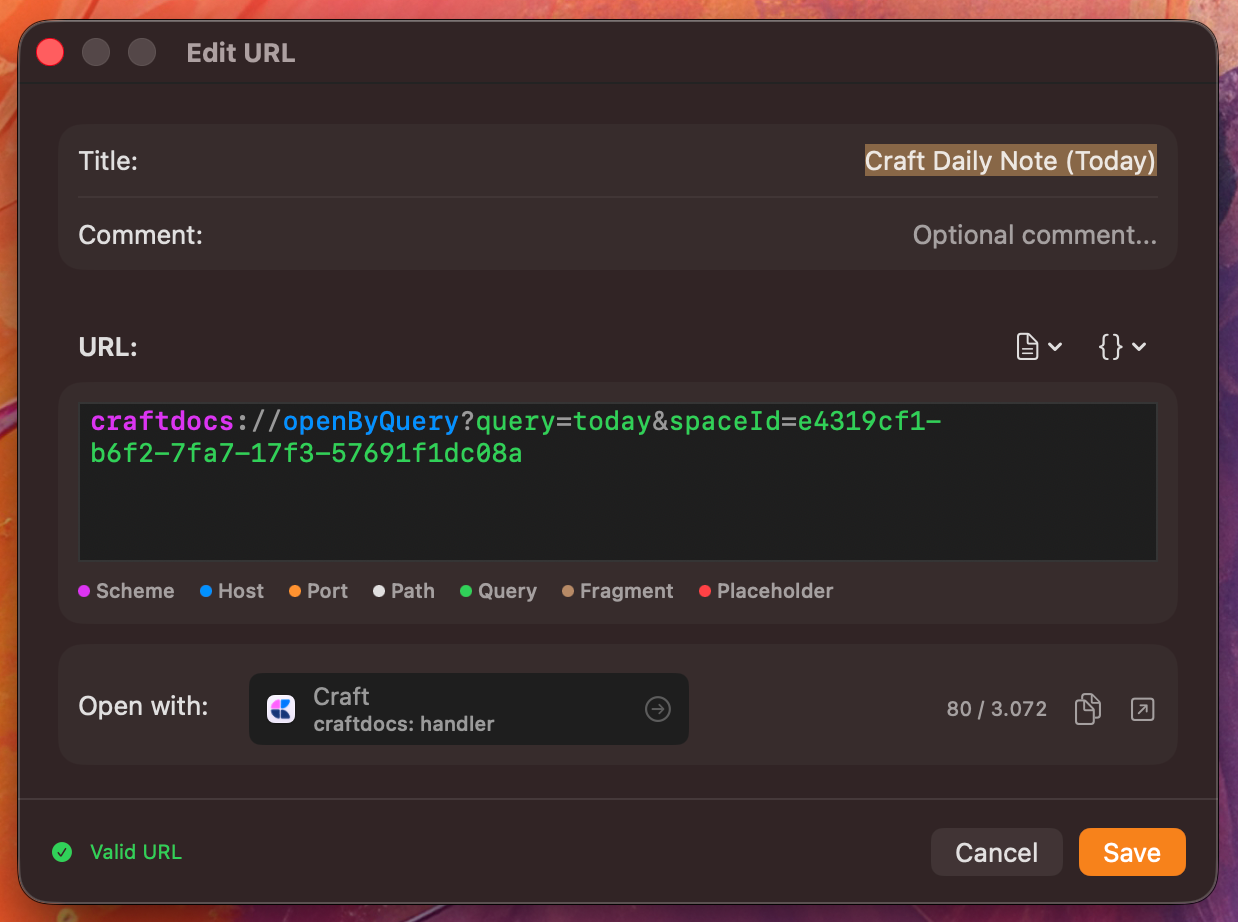
Placeholders in URL Schemes
Besides fixed URLs you can also work with placeholders. Start fills in the appropriate values when you launch the URL. That sounds more complicated than it is – let us go through the supported placeholders one by one.
|
Placeholders are case-sensitive! |
userInput
Syntax: %%userInput:Question%%
When Start finds this placeholder in a URL, it displays a dialog where you enter the value you want. That value replaces the placeholder in the URL.
Example: Say you want to open Safari and start a Google search on a particular topic. Then use a URL like this one:
https://www.google.com/search?q=%%userInput:Search Google%%Launch this URL in Start, and a dialog appears asking “Search Google”. Type something in, and Start replaces the whole placeholder %%userInput:Search Google%% with your text.
clipboard
Syntax: %%clipboard%%
When Start finds this placeholder in a URL, it inserts the current clipboard contents, using text only.
selectedFileObjects
Syntax: %%selectedFileObjects%%
This placeholder is for more specialized cases. As described elsewhere in this manual, you can hand the files and folders currently selected in the Finder over to Start and pick an application there to process them. With this placeholder you pass those items on through a URL instead. That helps, for example, when a URL launches a Keyboard Maestro macro that then works on the files and folders.
URL Scheme Examples
HTTPS
HTTP and HTTPS are the best-known URL schemes – almost everyone has come across them. With them you open web pages from Start in your default browser.
https://start.innovative-bytes.net|
HTTPS URLs can also be added to Start very easily using drag and drop. Just drag the address from Safari onto Start. This automatically creates the URL entry. |
MailTo
Create an email in the default email client with a recipient and subject line
mailto:support@innovative-bytes.net?subject=Support%20QuestionCreate an email in the default email client with To and CC recipients, a subject line, and a message body
mailto:someone@mail.com?subject=Download%20the%20Start%
20app&cc=someone_else@mail.com&body=I%20recommend%20the
%20Start%20app
Opening this URL creates a message in your default email client with the following details:
-
To: someone@mail.com
-
Subject: Download the Start app
-
Body: I recommend the Start app
All fields are filled in, so you only need to review and send the message.
|
subject |
Subject line (%20 represents a space in URL encoding). |
|
cc (optional) |
Additional recipient in CC. |
|
body |
Email body (again, spaces are encoded as %20). |
DEVONthink
DEVONthink is a document and information manager for macOS, made by DEVONtechnologies, LLC.
Every database, group, and individual item in DEVONthink has its own URL. These DEVONthink-specific URLs always begin with x-devonthink-item:// followed by an alphanumeric identifier that uniquely identifies the respective element.
Opening a DEVONthink database
Finding the URL of a database is easy:
Right-click a database in DEVONthink and choose "Copy Database Link" from the context menu. The URL of the database is copied to the clipboard.
Now create a new URL entry in Start, paste the URL from the clipboard, and give the entry a suitable title:
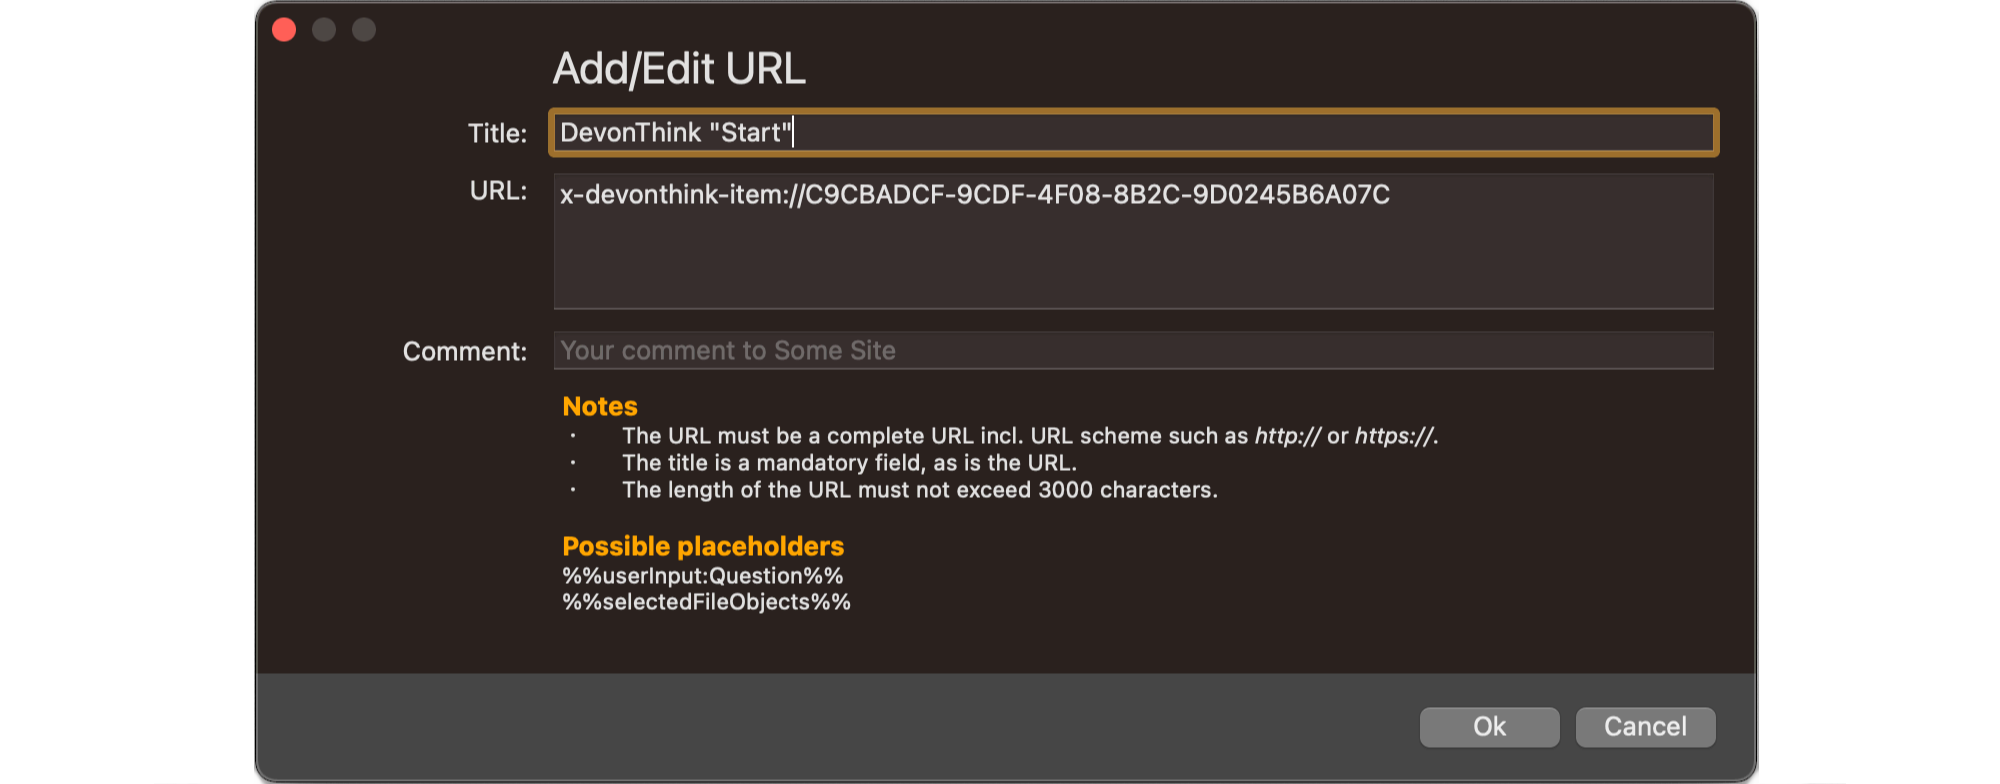
Opening other DEVONthink items in Start
These URLs are just as easy to find: right-click an item in DEVONthink and choose "Copy Item Link" from the context menu. The URL is copied to the clipboard, and you add it to Start exactly as described above.
Craft
Craft by Craft Docs Limited supports several URL schemes as well.
Example URL schemes for Craft:
Open a specific page in Craft
craftdocs://open?spaceId=<spaceId>&blockId=<blockId>|
blockId |
You can obtain it by choosing "Copy Deeplink" in a document; the resulting link contains a blockId parameter. |
|
spaceId |
Usually your user ID (a random GUID). |
|
To get the URL for a document, open it in Craft and use the menu command . |
Open the Daily Notes
craftdocs://openByQuery?query=yesterday&spaceId=<spaceId>craftdocs://openByQuery?query=today&spaceId=<spaceId>craftdocs://openByQuery?query=tomorrow&spaceId=<spaceId>|
spaceId |
Usually your user ID (a random GUID). |
|
The spaceId is just as easy to find: open any document in the space you want and use . The resulting URL contains the spaceId parameter. |
Drafts
Drafts is a quick-capture notes app and Markdown editor from Agile Tortoise, Inc.
Example URL schemes for Drafts:
Open Drafts in a workspace called “Blogging”
drafts5://x-callback-url/workspace?name=BloggingCreate a new draft tagged “post idea”
drafts5://x-callback-url/create?tag=post%20ideaThings
Things is a personal task manager from Cultured Code GmbH & Co. KG.
Example URL schemes for Things:
Open Things and display the Quick Entry window
things:///add?show-quick-entry=trueCleanShot X
CleanShot X is a screenshot app from Make The Web Oślizło & Magiera s.c.
Example URL schemes for CleanShot X:
Start a screen recording
cleanshot://record-screenOpen a file in Annotate
cleanshot://open-annotate?filepath=/Users/john/Desktop/my%20screenshot.pngShow or hide the desktop icons
cleanshot://toggle-desktop-iconsOpen the capture history
cleanshot://open-historyMore on this: https://cleanshot.com/docs-api
Shottr
Shottr is a screenshot app from Electric Endeavors LLC.
Example URL schemes for Shottr:
Take an area screenshot
shottr://grab/areaTake a window screenshot
shottr://grab/windowLoad an image from the clipboard
shottr://load/clipboardMore on this: https://shottr.cc/kb/urlschemes
Shortcuts
Start also supports the shortcuts you have built in the Shortcuts app. It does not detect them on its own, though: you import and update them through the menu entry “Import from Shortcuts”. After that you can give them tags, colors, and comments, just like any other entry.
|
Imported shortcuts also use a URL scheme. The following URL launches a shortcut: shortcuts://run-shortcut?name= |
Settings
General
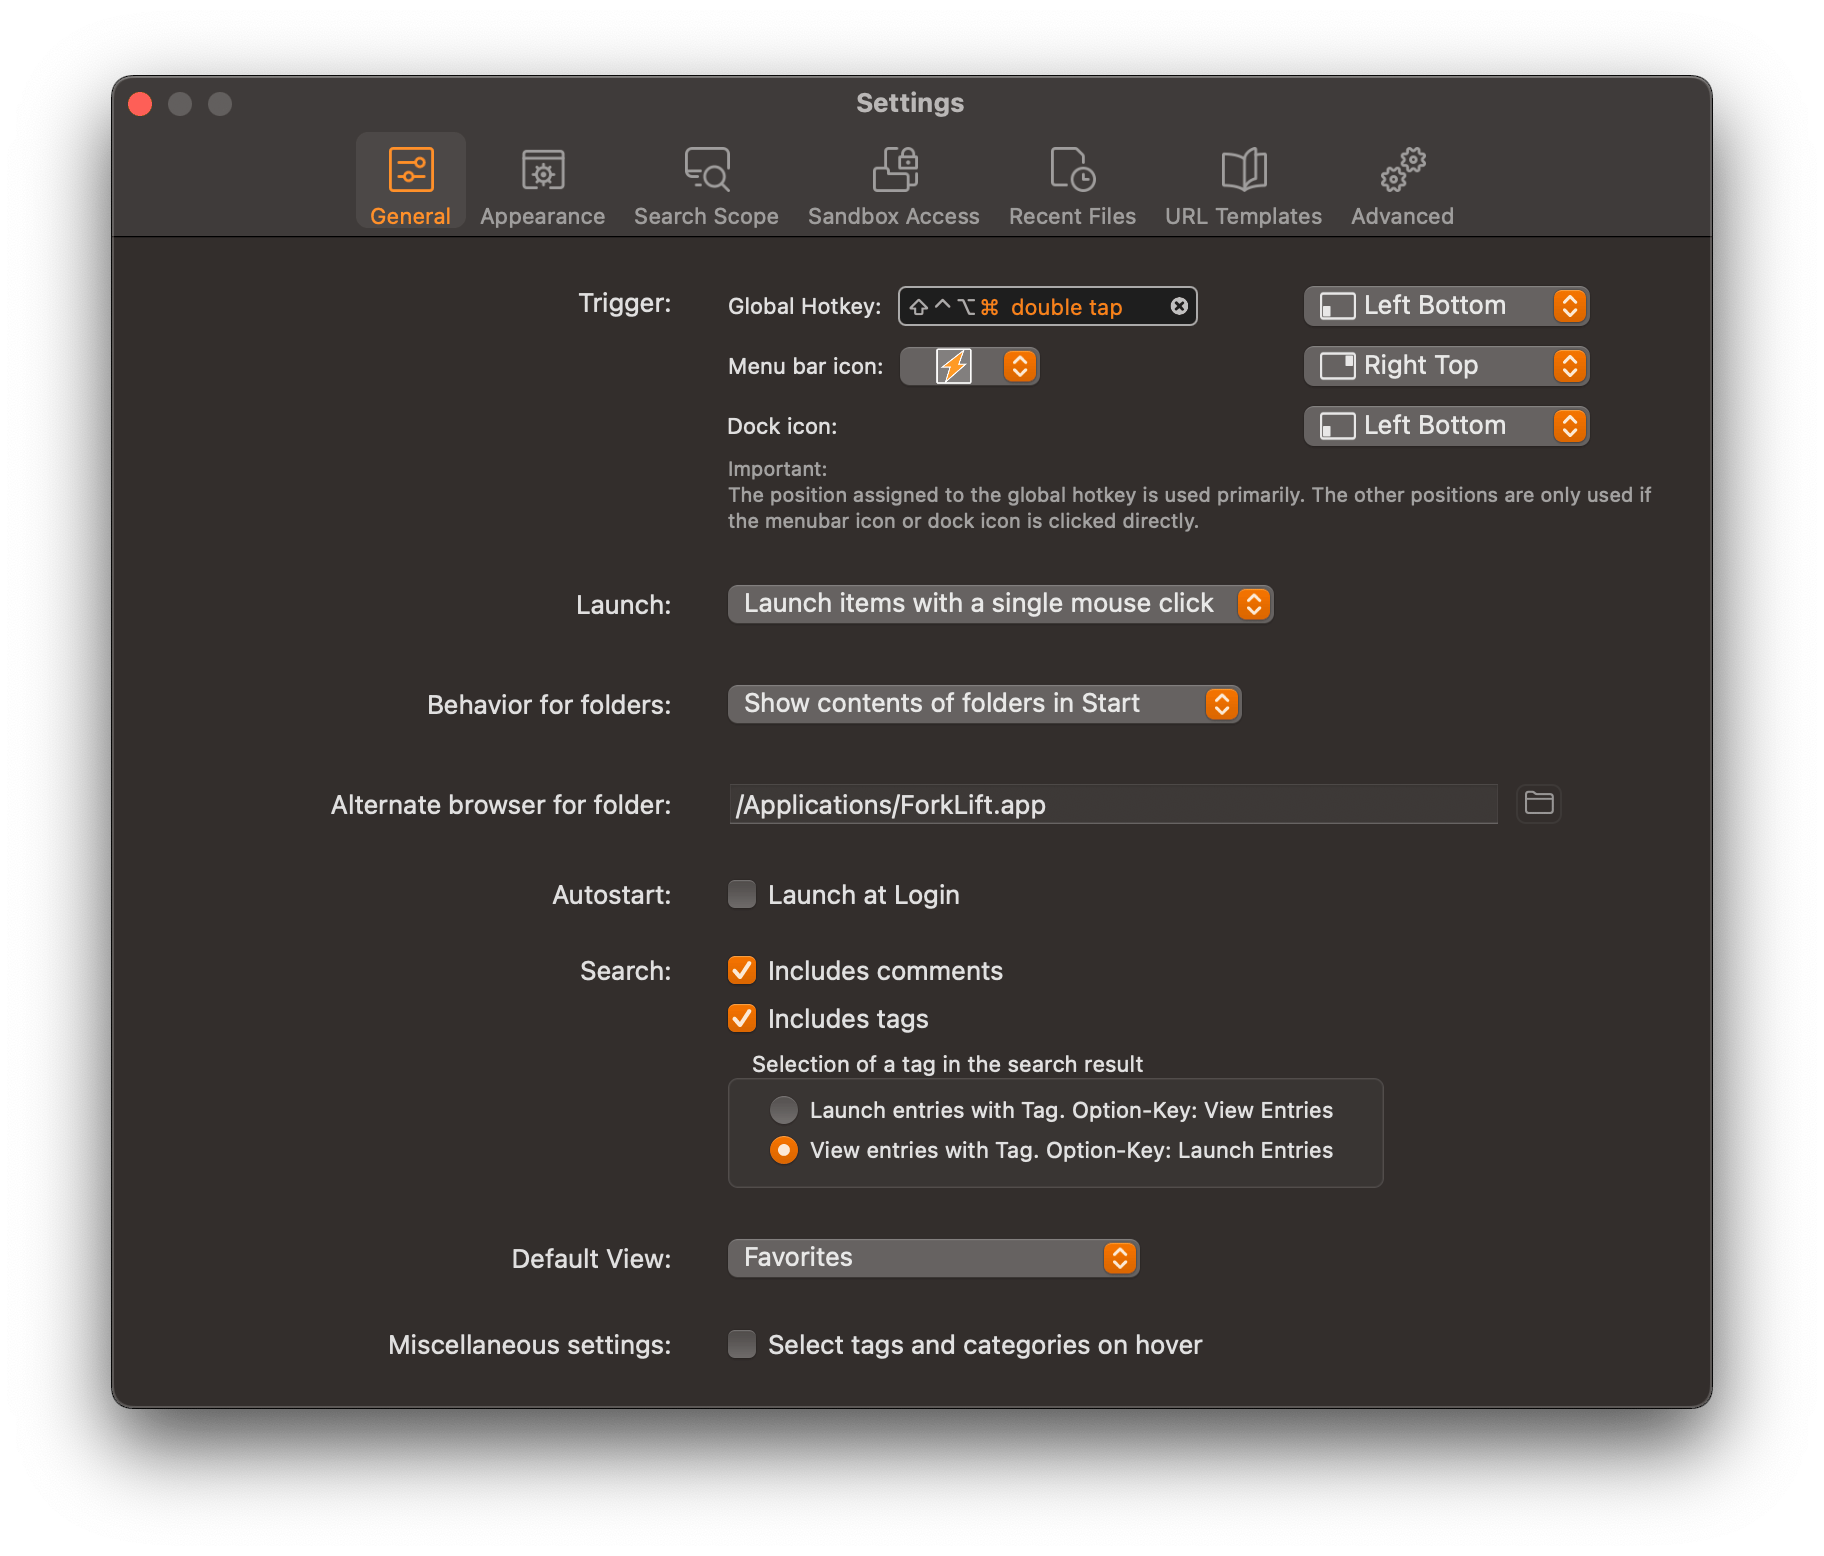
Trigger to show the main window
Four triggers can bring up the main window: a global hotkey, a click on the menu bar icon, a click on the Dock icon, or moving the mouse pointer into a screen corner. For each trigger you also set where the main window appears.
In the screenshot above, the main window appears at the bottom left when you press the Command key twice, at the top right when you click the menu icon, and at the bottom left again when you click the Dock icon.
|
As a menu bar app, Start shows no Dock icon by default. You can either add Start to the Dock yourself, or switch the Dock icon on in the "Advanced" section of the settings. |
Behavior
Launch Entries
Do you want to launch entries with a single click or a double click?
Default view
Here you set which view Start opens with.
Behavior for folders
Since version 7.5, Start has been able to display folder contents directly. Here you decide what happens when you open a folder with Return or a click.
- Open in the Finder or an alternative file manager
-
Start opens the folder in the Finder – or in an alternative file manager, if you have set one up.
- Show contents of folders in Start
-
Press Return or click to display the folder contents directly in Start.
|
This setting only applies when you open the folder directly in Start. If you open the folder using its hotkey or launch it with the other entries of a tag, it always opens in the Finder or your alternative file manager. |
Opening folders with
Do you want to open folders with a different application? Then enter the path to that program here. If the path is invalid or empty, Start simply uses the Finder.
Display Hover-Effect on Entries
Start subtly highlights the entry under the mouse pointer.
Select Tags and Categories on hover
Normally you select entries in the sidebar with a click. Switch this option on, and hovering the mouse pointer over an entry briefly is enough.
Autostart / Launch at Login
With this option Start starts automatically as soon as you log in.
Search
Includes Comments
Here you decide what the search in the main window covers: only the title – the application name, for example – or existing comments as well.
Includes Tags
With this option the search in the main window also turns up matching tags. You also decide what a click on such a tag does.
Appearance
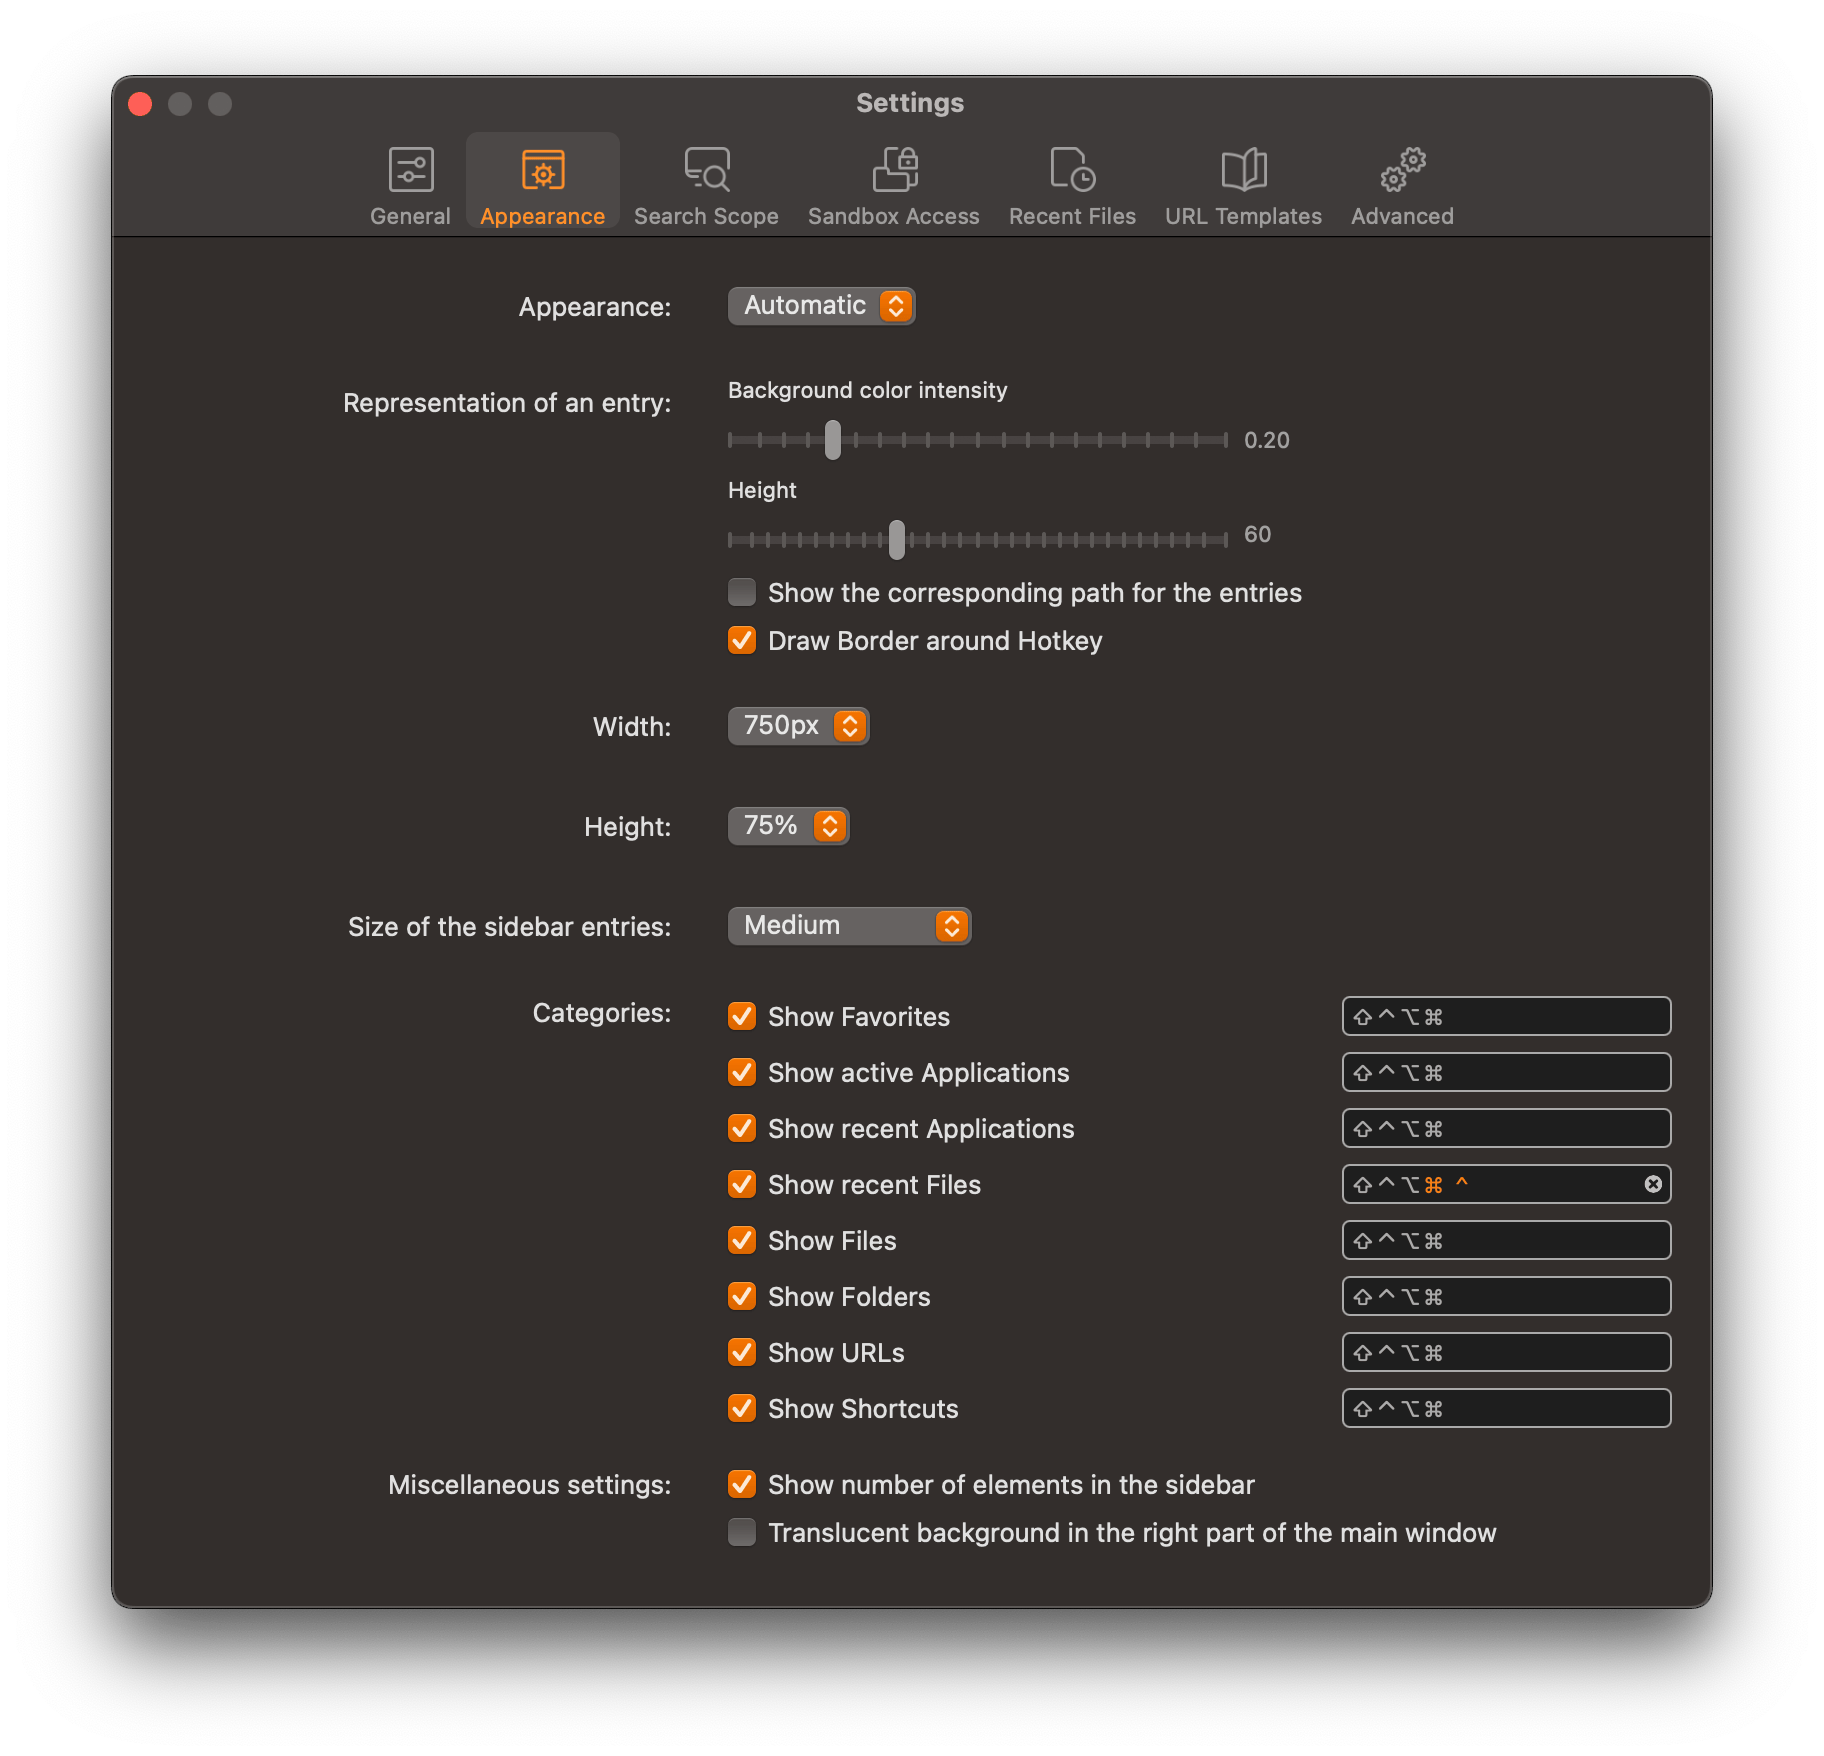
You can adapt the look of Start to the way you work. You decide how entries appear, how big the window is, how the sidebar looks, and how intense the colors are.
General
Appearance
Here you set the general look of Start. It can follow the macOS setting automatically, or always use a light or dark appearance.
Menu Icon
Here you choose which icon Start shows in the macOS menu bar.
Window
This section sets the size of the main window.
|
You cannot resize the main window freely – dragging it larger or smaller with the mouse is not possible. There is a practical reason: multi-monitor setups. |
Width
Here you set how wide the main window of Start is.
Height
Here you set how tall it is. The height is given as a percentage of the screen height.
Entries
These settings govern how an entry appears in Start.
Background color intensity
Give an entry a color, and it shows up as a bar on the left. The row itself is tinted as well. This setting decides how strong that tint is.
Height
This value sets how large the entries in the main window appear.
Show the corresponding path for the entries
Start can show the path or URL of an entry below its title. This option switches that display on or off.
Sidebar
This section covers the sidebar – the left pane of the main window. You can adjust the size of entries, the display of hotkeys, and which categories appear.
Size of sidebar entries
Here you set how large the sidebar entries should be.
Hotkeys
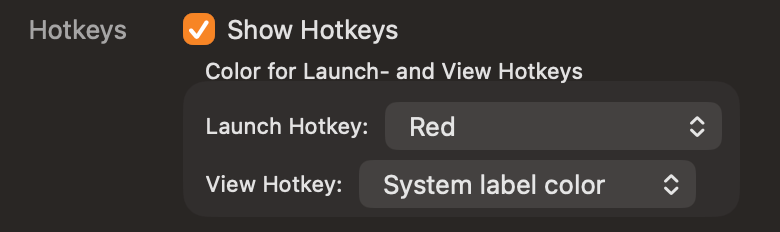
In Start you can give hotkeys to individual tags as well as to categories. So that you do not have to memorize them all, you can show or hide them in the sidebar here.
|
Start supports two separate hotkeys per tag – one to show its entries and one to launch them. You can give them different colors here. In the screenshot above, hotkeys that launch all entries of a tag appear in red. Hotkeys that show the contents of a tag keep the normal text color. |
Categories
The sidebar of the main window holds not only tags, but “categories” as well. Categories filter Start’s data, and some also provide additional functions. Let us go through them one by one.
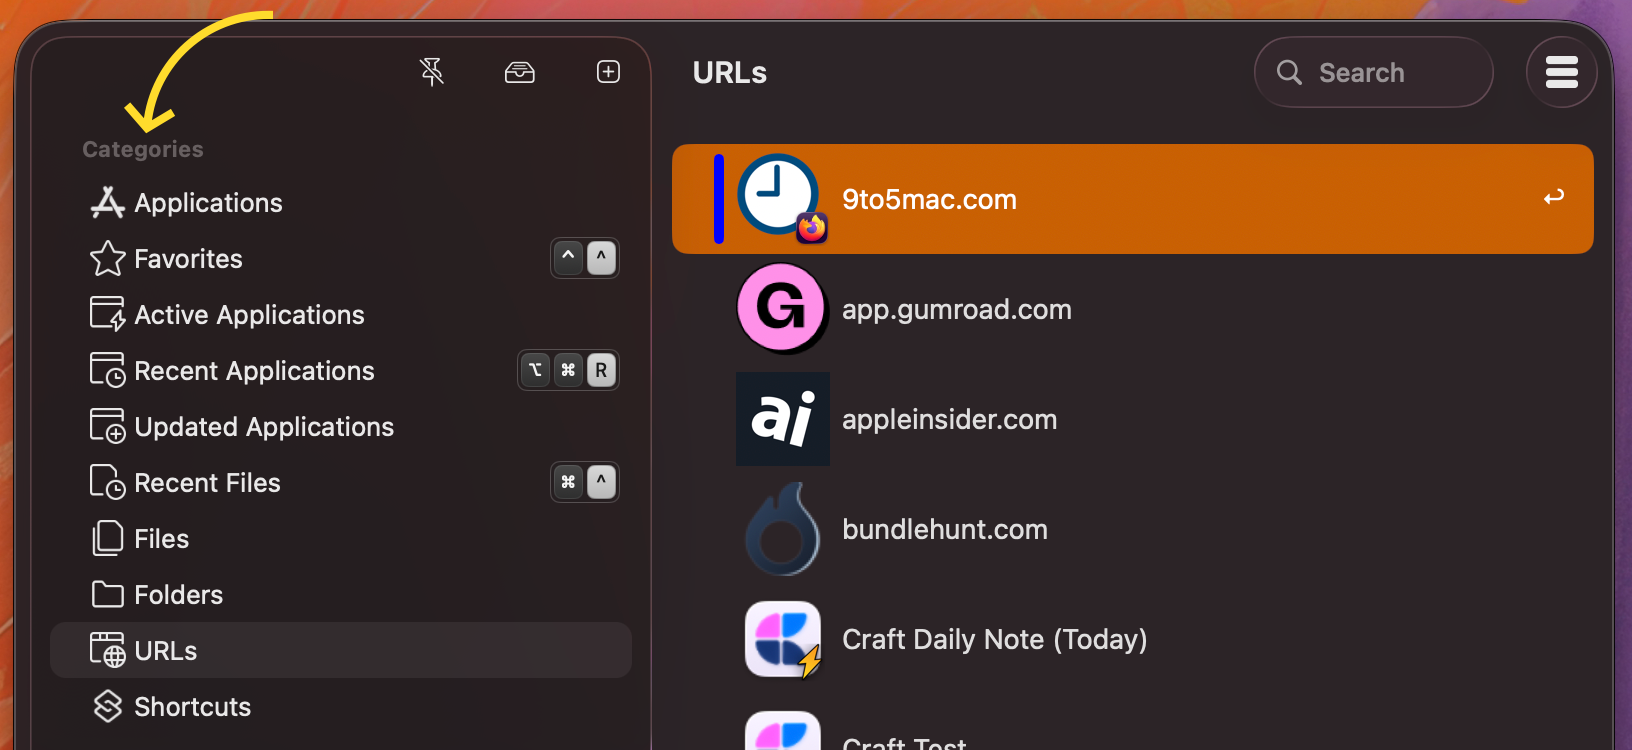
- Applications
-
This category shows all your applications.
- Favorites
-
You can mark entries in Start as favorites – which puts your most-used apps within easy reach. This category collects everything you marked that way.
- Active Applications
-
Start keeps track of which applications are open. This category lists exactly those. Pick a running application, and Start brings it to the front – so you can use Start to switch between programs.
- Recent Applications
-
This category lists the applications you used most recently. They are sorted by when you last used them, rather than alphabetically.
- Updated Applications
-
Start watches in the background for applications that are added or changed. The last 25 newly installed or updated applications appear here. For each application, the sort order uses whichever date is more recent: the date added or the date modified.
- Recent Files
-
This category shows the files you changed or opened most recently. Before you can use it, you set it up in the settings. You can read more in the matching section of this manual.
- Files
-
A simple filter showing every file you added to Start yourself.
- Folders
-
A filter as well – it shows every folder you added yourself.
- URLs
-
Shows every URL you added yourself, such as websites or URL schemes.
- Shortcuts
-
This category shows all shortcuts from the Shortcuts app. Start does not detect them on its own – you import them yourself through the matching menu entry.
|
You can also give every enabled category a hotkey or an Active Corner. Either option opens Start and takes you directly to that category. Want quick access to "Recent Files"? Then assign a hotkey here, and your latest files are one keystroke away. |
Search Scope
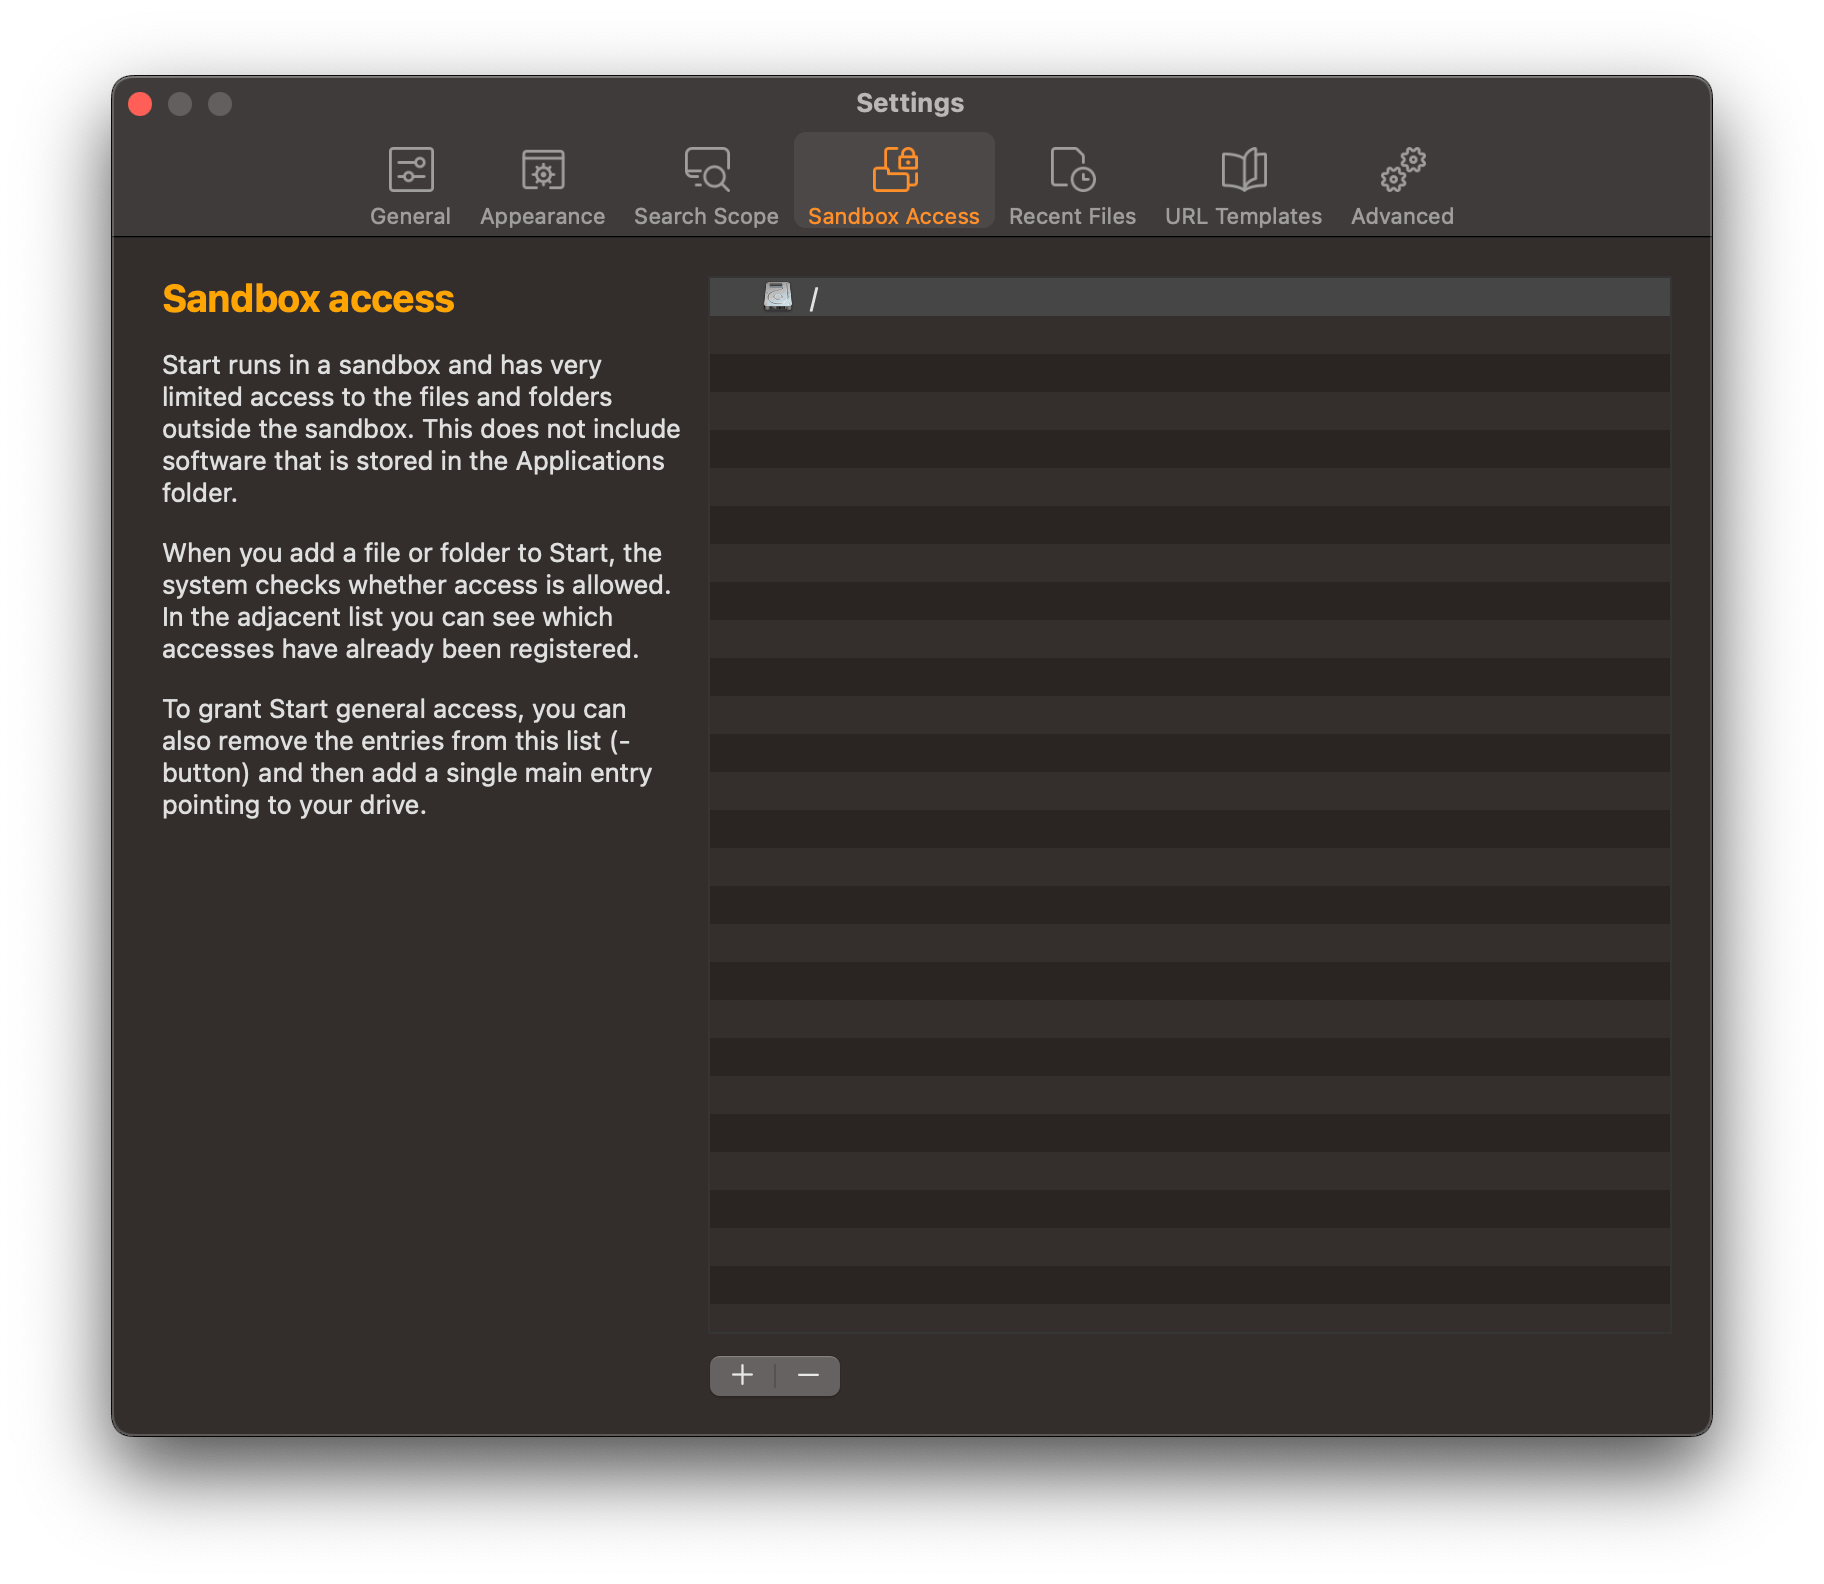
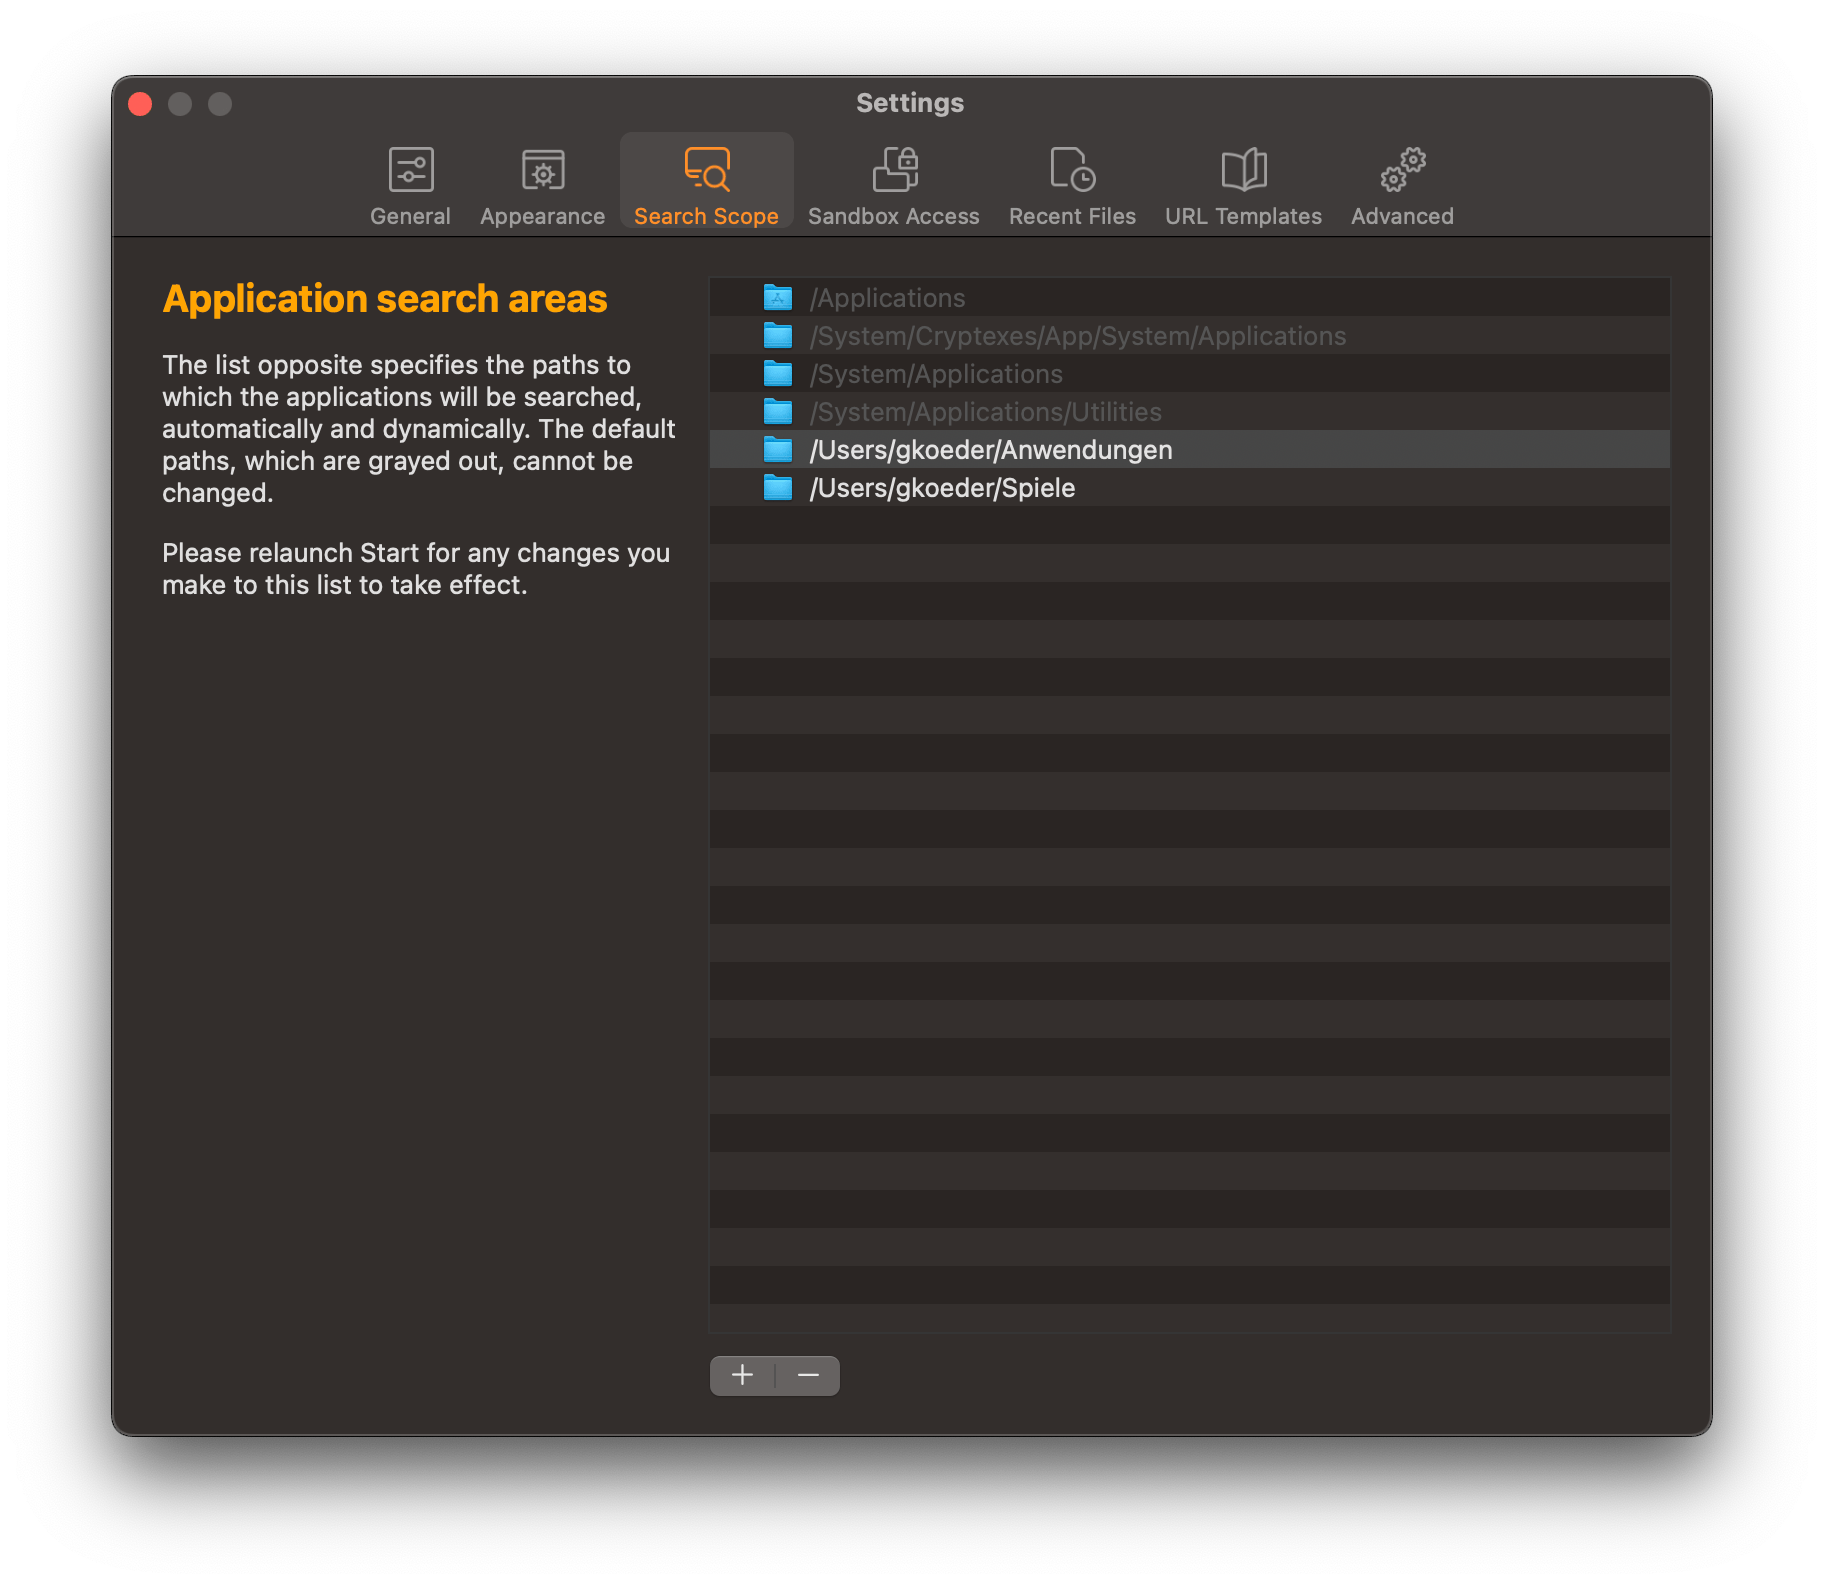
This list shows where Start uses Spotlight to look for applications. You can add your own folders to it at any time.
Sandbox Access
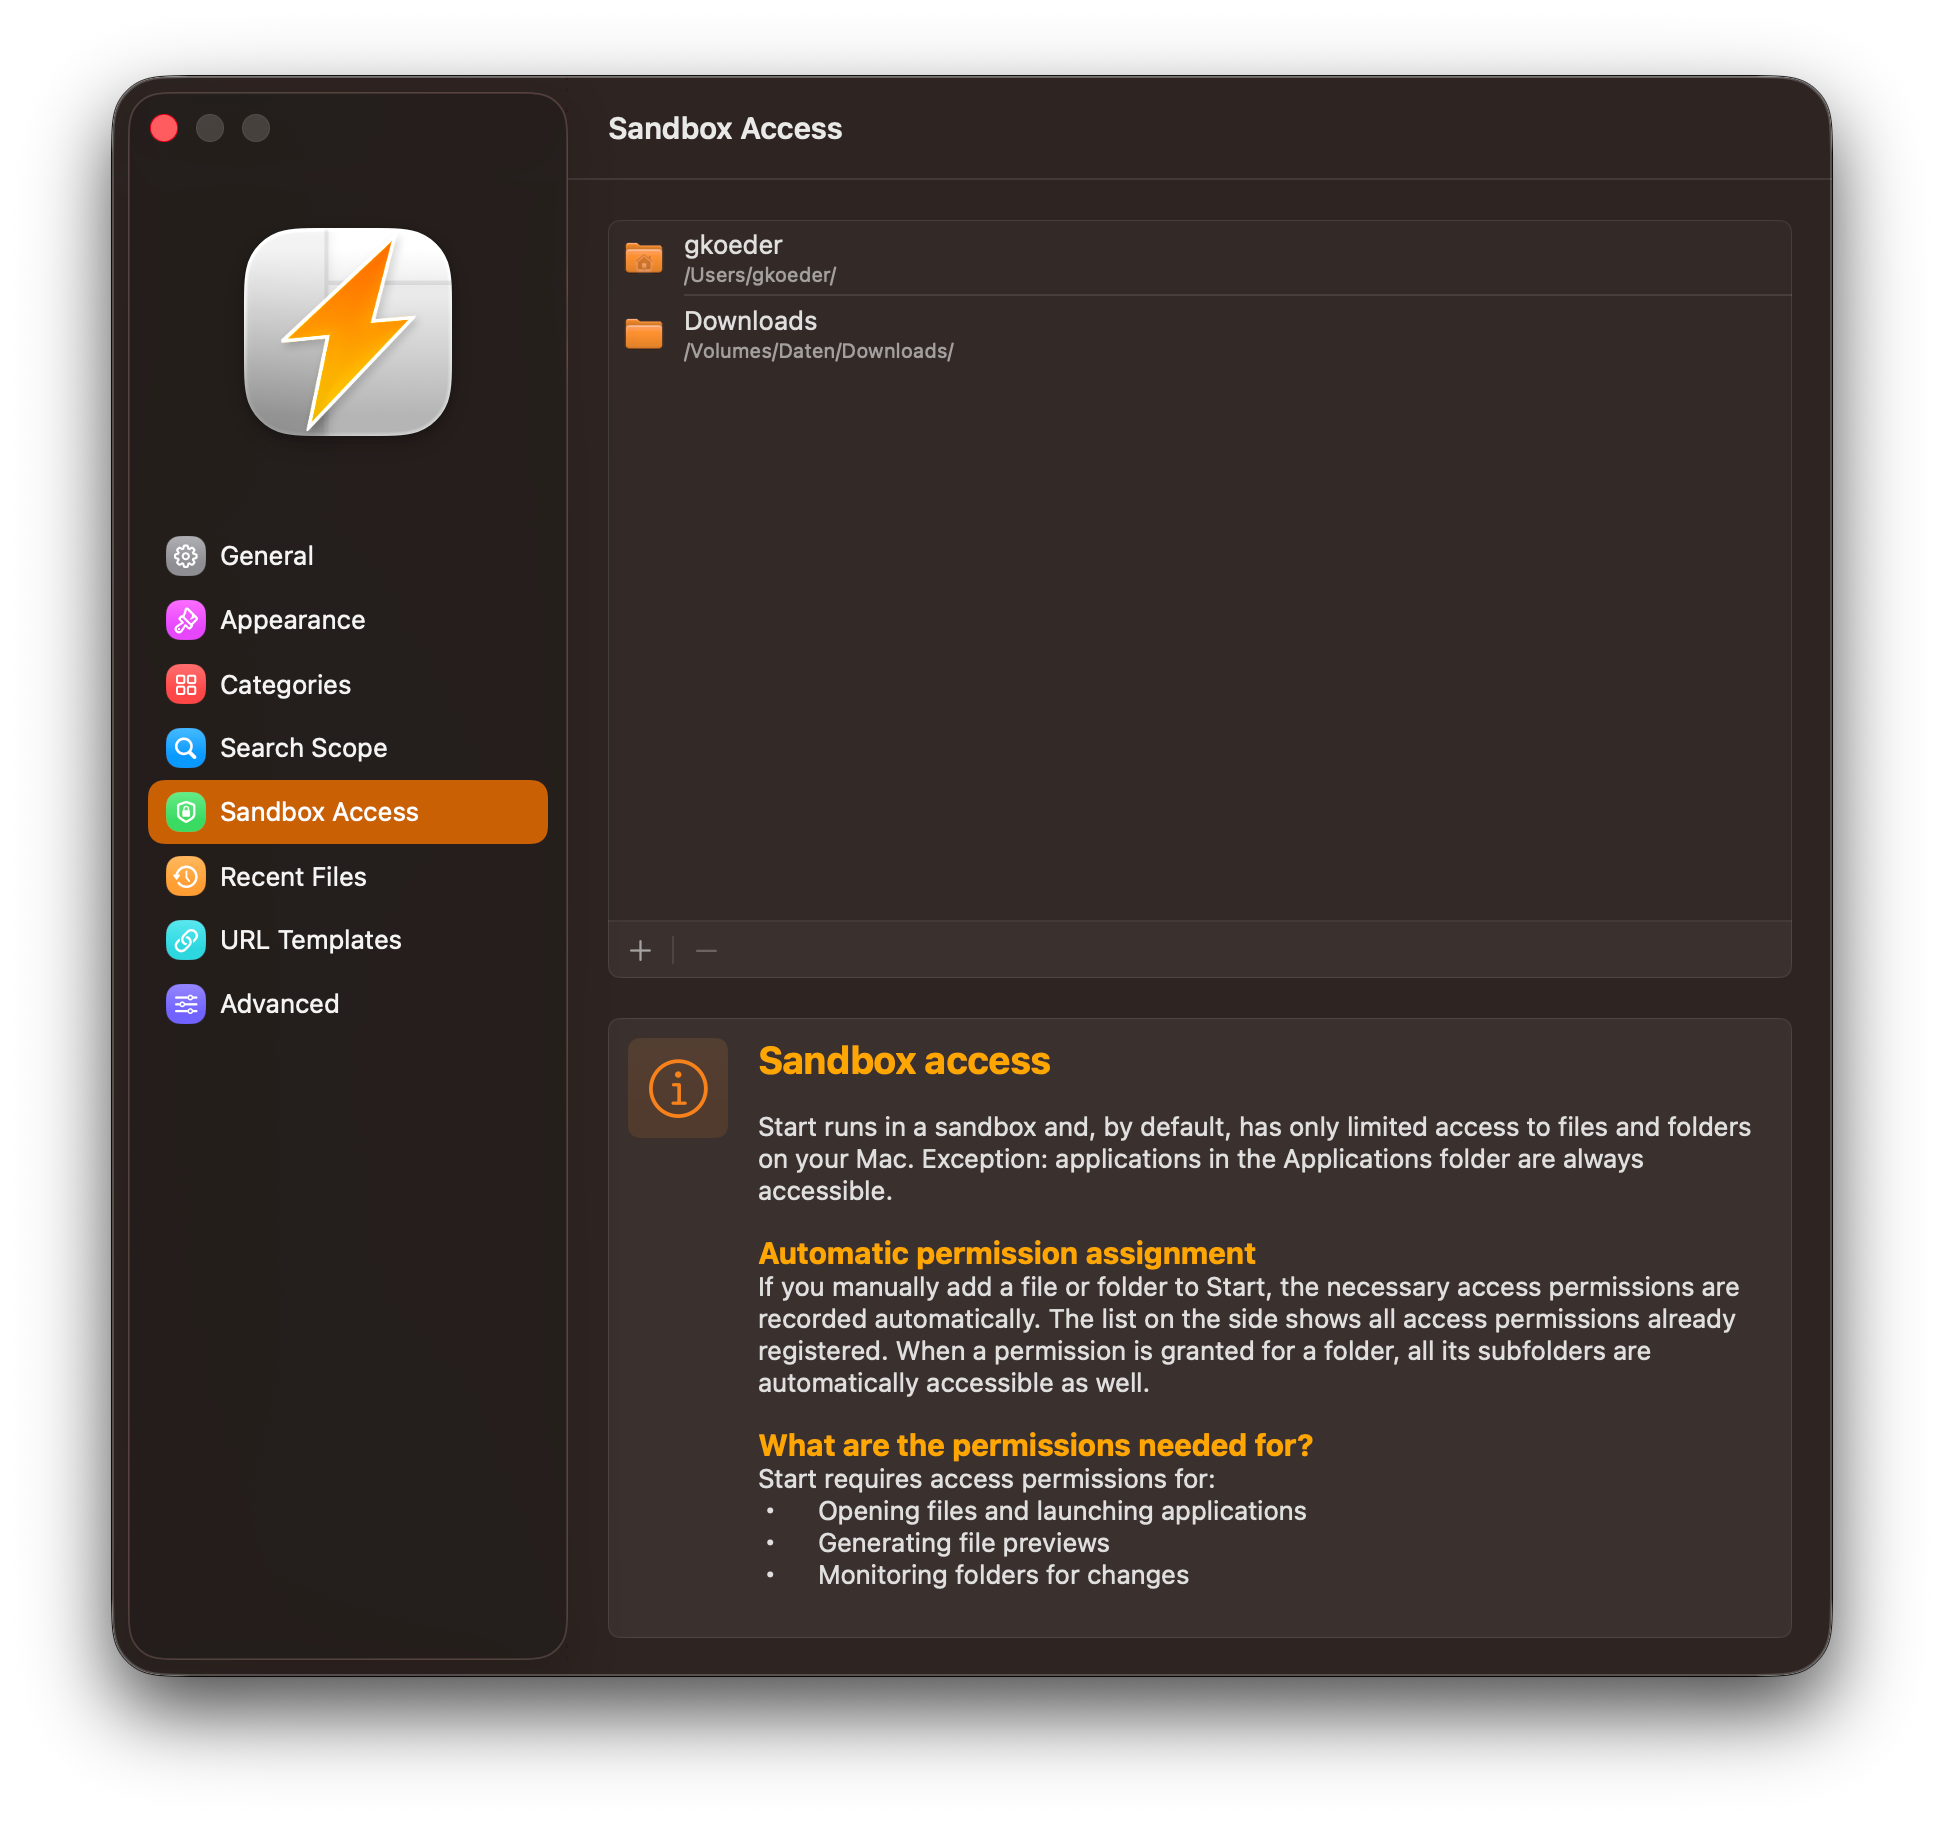
To meet Apple’s security requirements, Start runs in a sandbox. By default, the app therefore has access to only a limited set of files and folders. You need to grant access to other locations before the app can use them.
What is Sandbox Access?
The macOS sandbox prevents applications from accessing files outside certain system folders. That makes your Mac safer – and it means the following for Start:
-
Applications launch without any extra permission.
-
Access to files, folders, and external locations requires your explicit permission.
-
Start stores the permissions you grant as security tokens.
|
Can’t Start open a file or folder? The required access permission is most likely missing. |
Managing Sandbox Access
You can view and manage all the permissions you have granted under Start → Settings → Sandbox Access.
Granting Access to a Folder or File
-
Open Start → Settings → Sandbox Access.
-
Click "+" and select the folder Start should be able to access.
-
Start can now open files from that location without asking again.
Viewing and Removing Permissions
-
The Sandbox Access settings list every permission you granted.
-
To remove one, select the entry and click "-".
|
Grant access to a parent folder such as ~/Documents, and the permission covers all its subfolders too. |
When Do You Need Full Disk Access?
macOS applies additional protections to some folders, including Desktop, Documents, and Downloads. Full Disk Access helps Start reliably find recently opened or changed files in these folders.
Enabling Full Disk Access for Start
-
Open System Settings → Privacy & Security → Full Disk Access.
-
Find Start in the list, or add it yourself with "+".
-
Switch Full Disk Access on.
-
Restart Start so the change takes effect.
|
Full Disk Access is optional. It helps Start reliably find recent files and files in protected locations. |
In Brief
✅ Start follows Apple’s sandbox model, which keeps your files safer.
✅ You must grant access to certain folders yourself.
✅ With Full Disk Access, Start also picks up files in protected locations.
✅ You manage every permission under Settings → Sandbox Access.
Recent Files
"Recent Files" gives you quick access to the files you opened or changed most recently. Your current documents, spreadsheets, and project files are available directly in Start.
How Recent Files Work
Start finds these files through the Spotlight index and watches particular folders. Two dates matter:
-
Last opened – files you opened recently.
-
Last modified (optional) – files whose content changed recently.
Start looks at the last 15 days.
|
Start does not store your files – it only gives you a fast way to reach them. |
Setting up Recent Files
A few settings are needed before the feature works.
In brief:
-
Open Start → Settings.
-
Go to Recent Files.
-
Choose the folders Start should watch (see "Search Scope" below).
-
(Optional) Define exclusions if you need them.
-
Exclude Folders – hides files in the specified folders.
-
Exclude Extensions – filters out file types such as .log or .tmp.
-
Exclude Text – hides files whose path or name contains the specified text, such as "Backup".
-
-
Go to Appearance and switch on the “Recent Files” category.
-
(Optional) Assign a hotkey for instant access.
Let us look at the remaining settings and a few tips in detail …
Search Scope: which folders Start watches
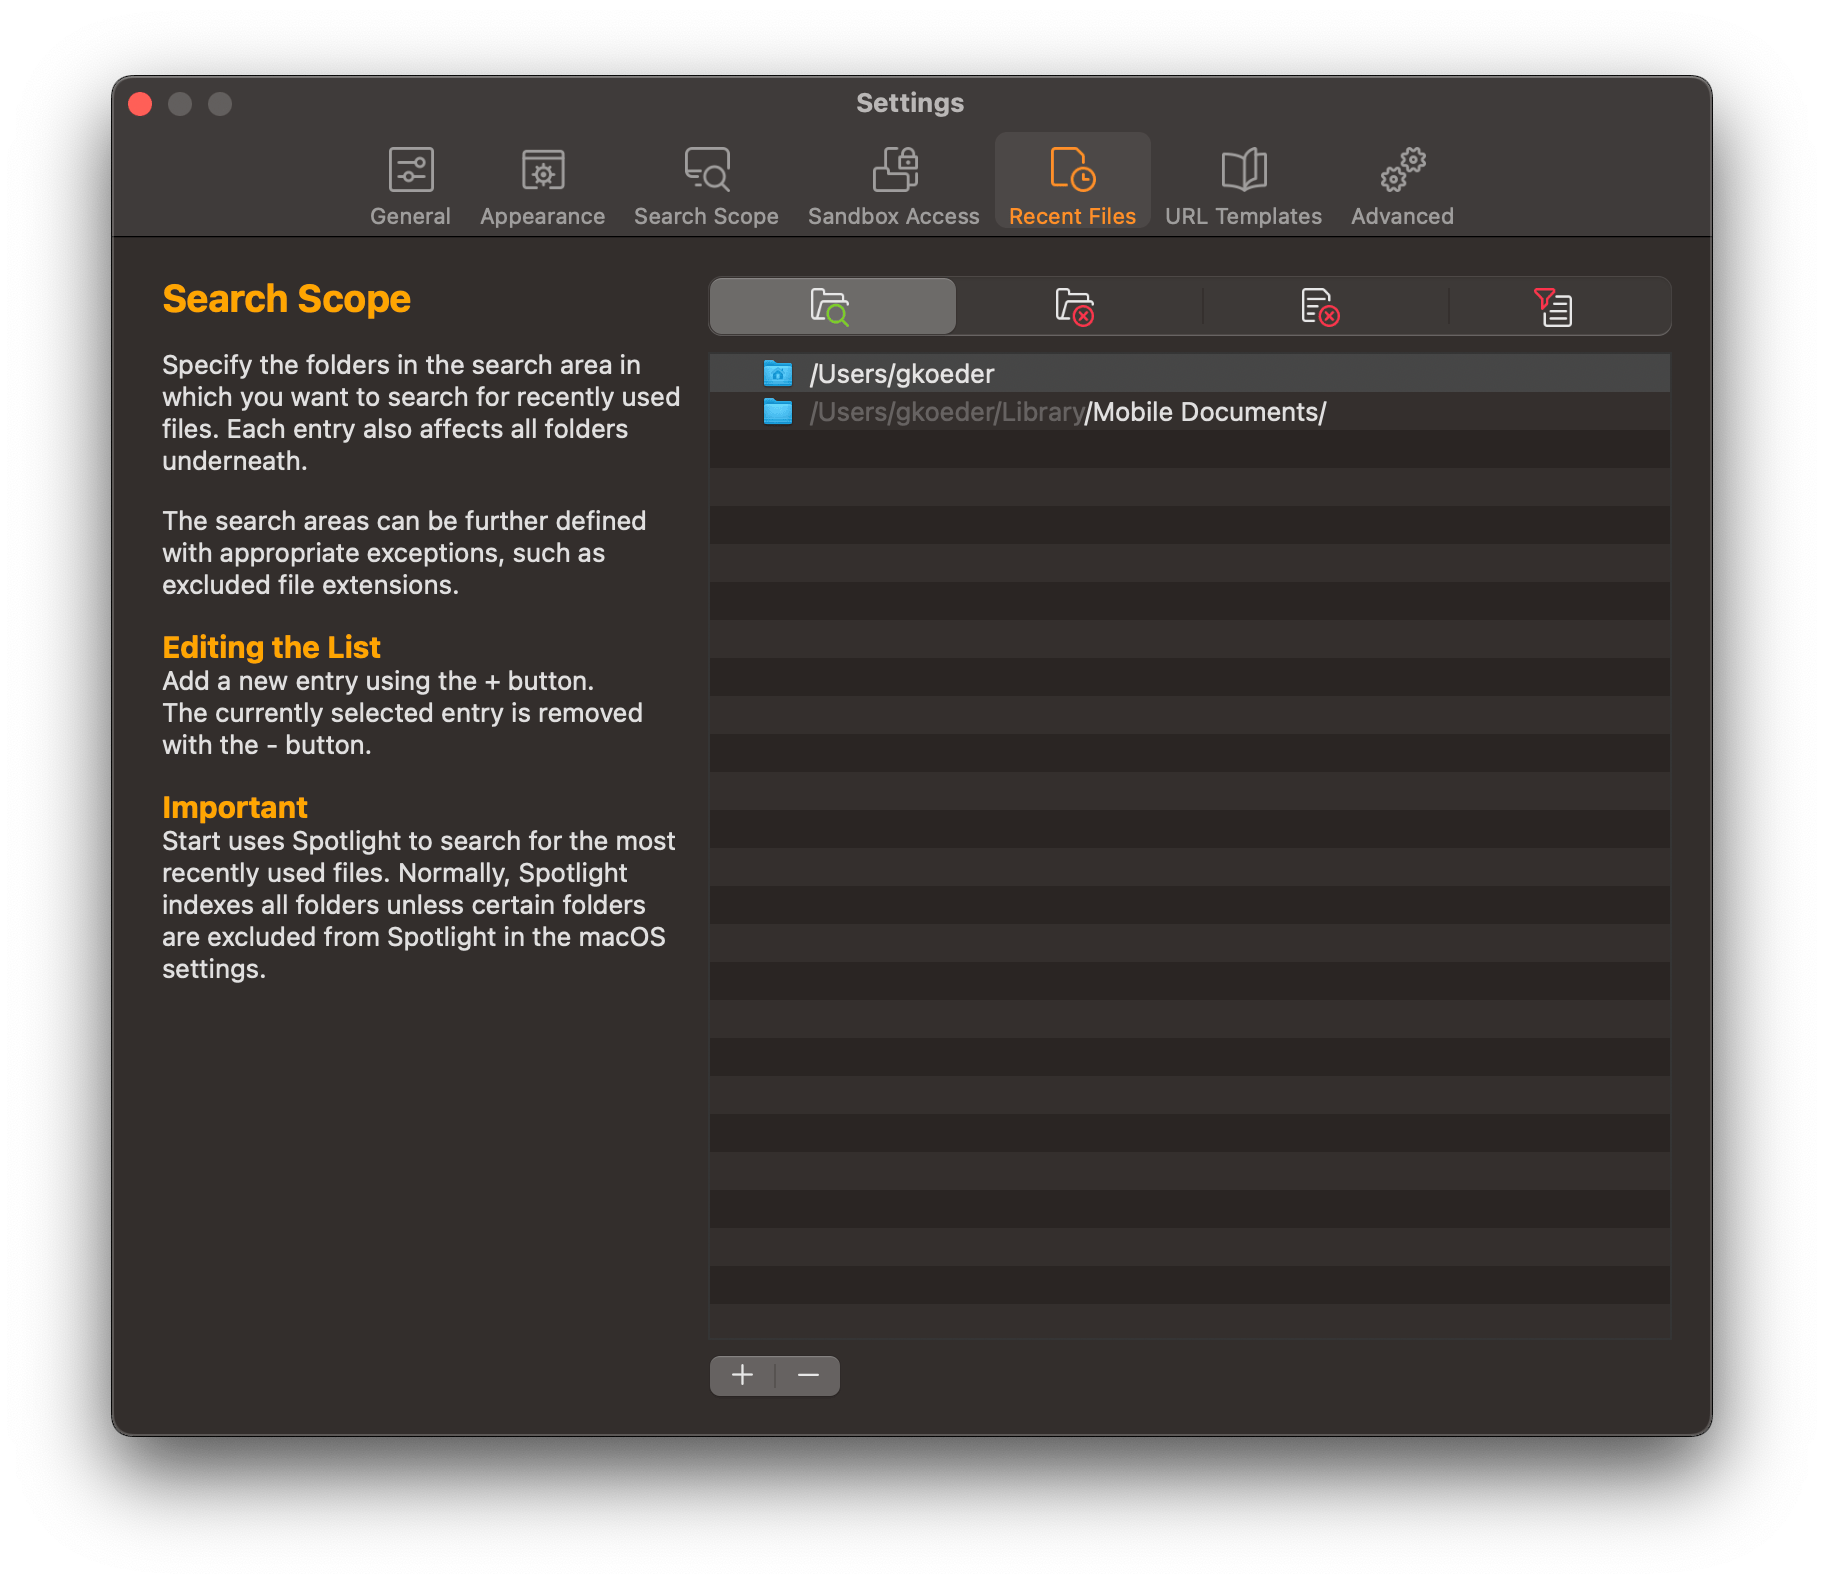
The search scopes are the most important settings. Here you define where Start looks for recently opened or changed files. Each folder you add automatically includes all its subfolders.
|
You can add any folder on your system – as long as Spotlight indexes it and you have access rights. In practice it pays to stick to the folders where your files actually live. If you add the root directory, the search covers changed files throughout the file system. But that turns up an overwhelming number of hits, including files macOS opened or changed by itself. Processing that many results in the background takes longer: Start shows only the last 50 files, yet has to sift through everything. |
|
macOS applies additional protections to some folders, including Desktop, Downloads, and Documents. In these folders, Start may miss changes – even when you have added the folders to the search paths. The fix: grant Start Full Disk Access in System Settings. This affects Recent Files only, because Start watches those folders for changes. If you merely added the Downloads folder to jump into it quickly, no extra permission is needed. |
Excluded Folders (optional)
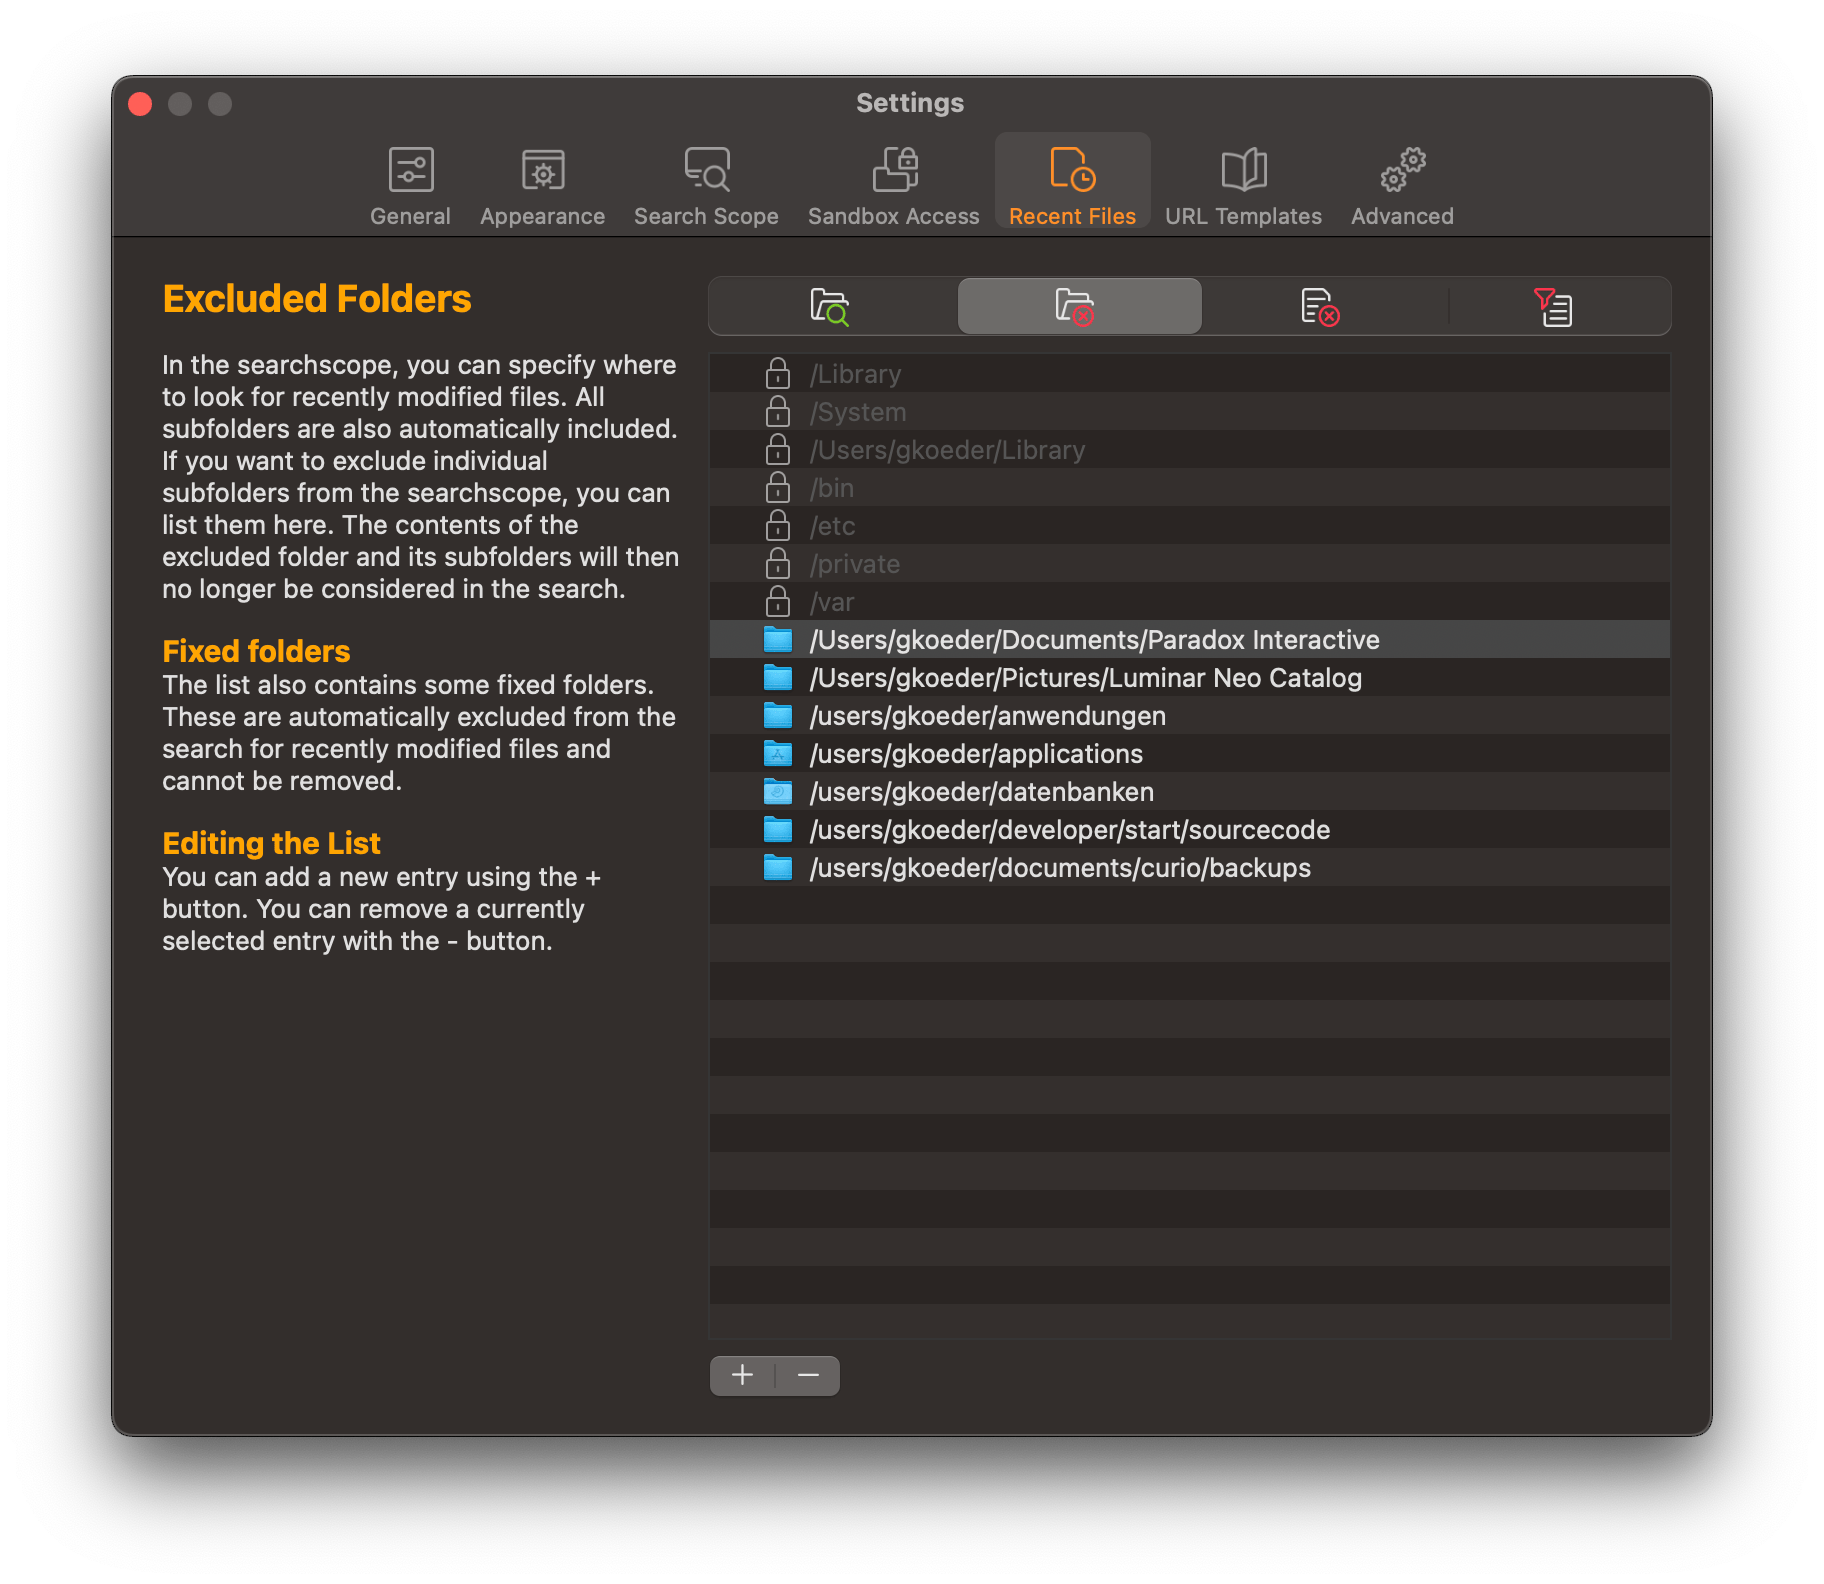
A folder in the search scopes is searched together with all its subfolders. Enter any subfolders you want to exclude here.
|
Start excludes some system folders such as /Library or /System automatically. You recognize them by the small lock next to the folder path. These entries can be neither changed nor deleted. |
Excluded Extensions (optional)
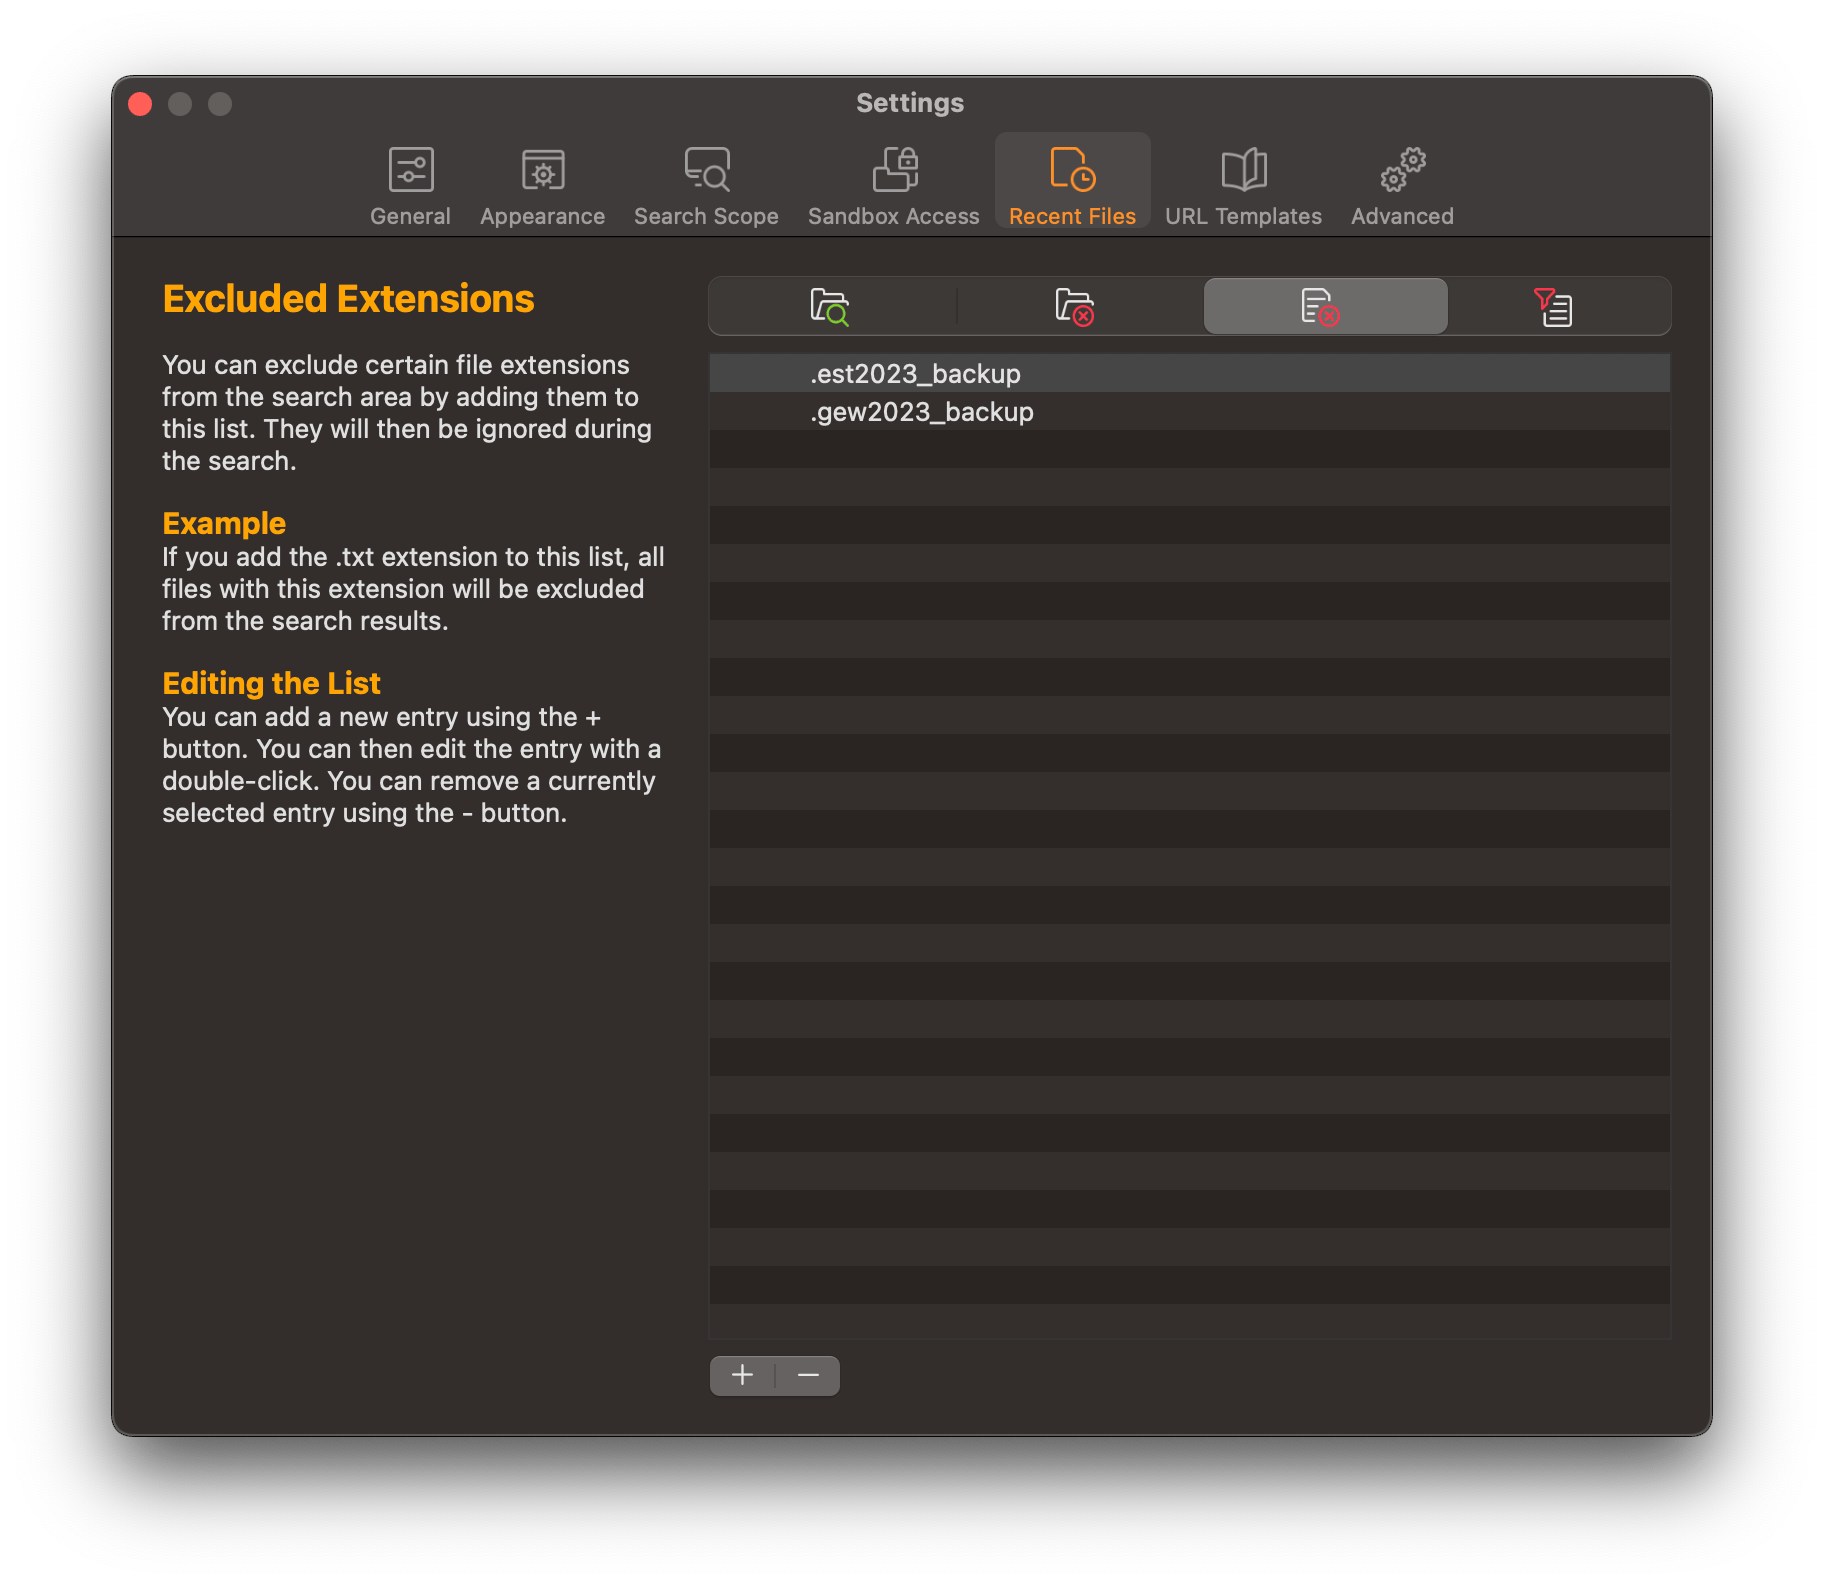
Enter file extensions here to exclude files with those extensions from the recent files list. Handy for keeping backup files and the like out of sight from the start.
Excluded Text (optional)
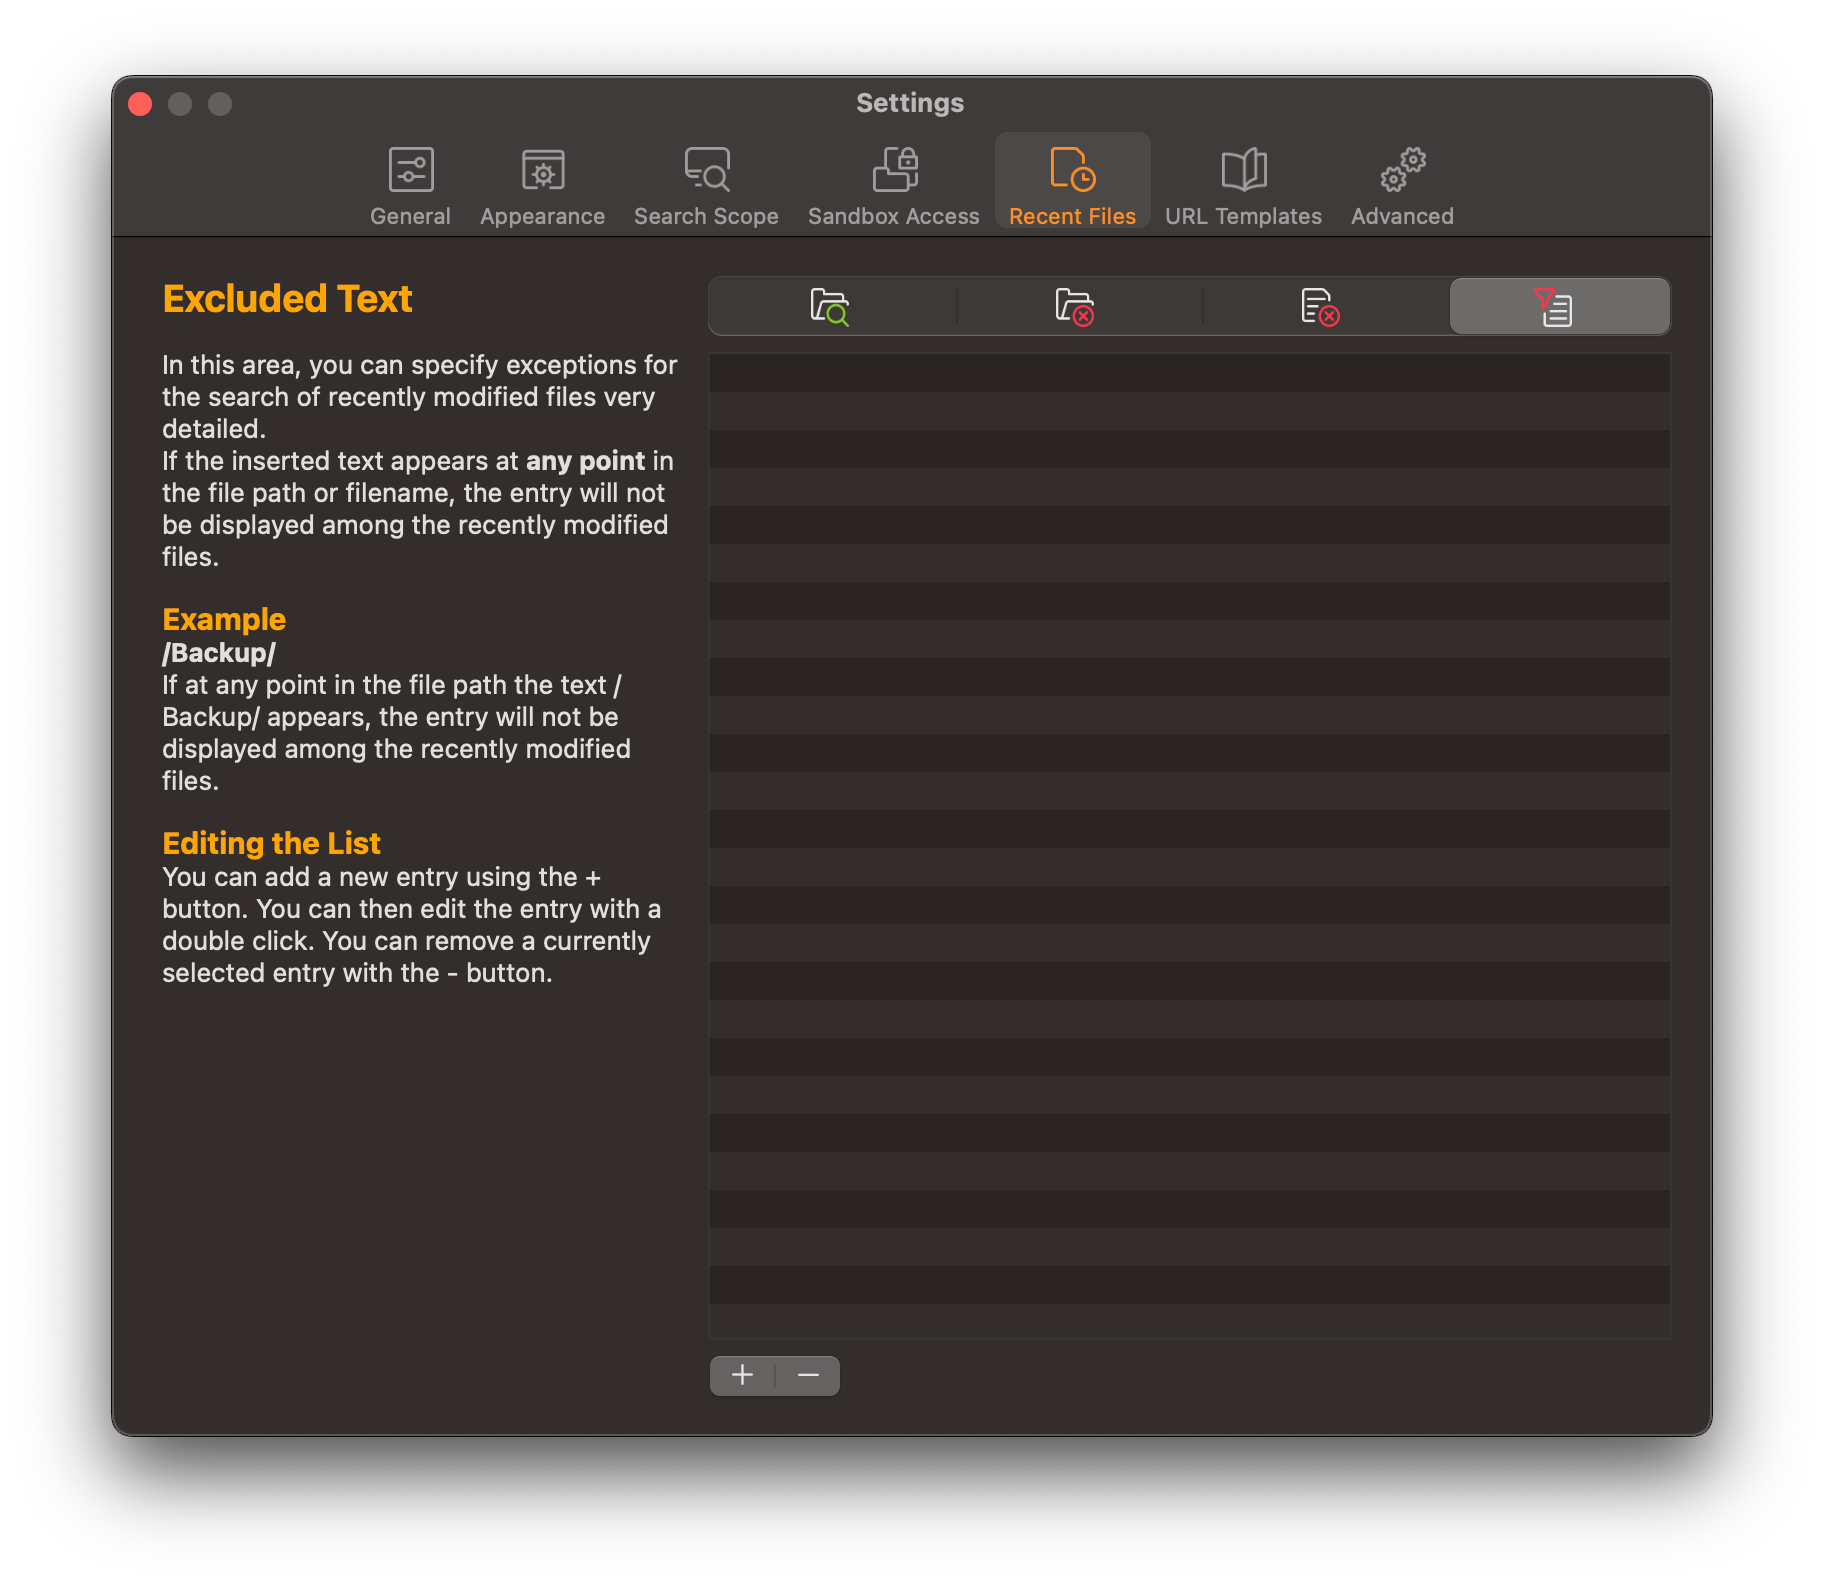
You will rarely need this one: it filters files by a piece of text. Does that text appear anywhere in the path or file name? Then the file is left out.
|
Example: Does /Backup/ appear anywhere in the path? Then Start ignores the file, and it never shows up in Recent Files. |
Activate the Category
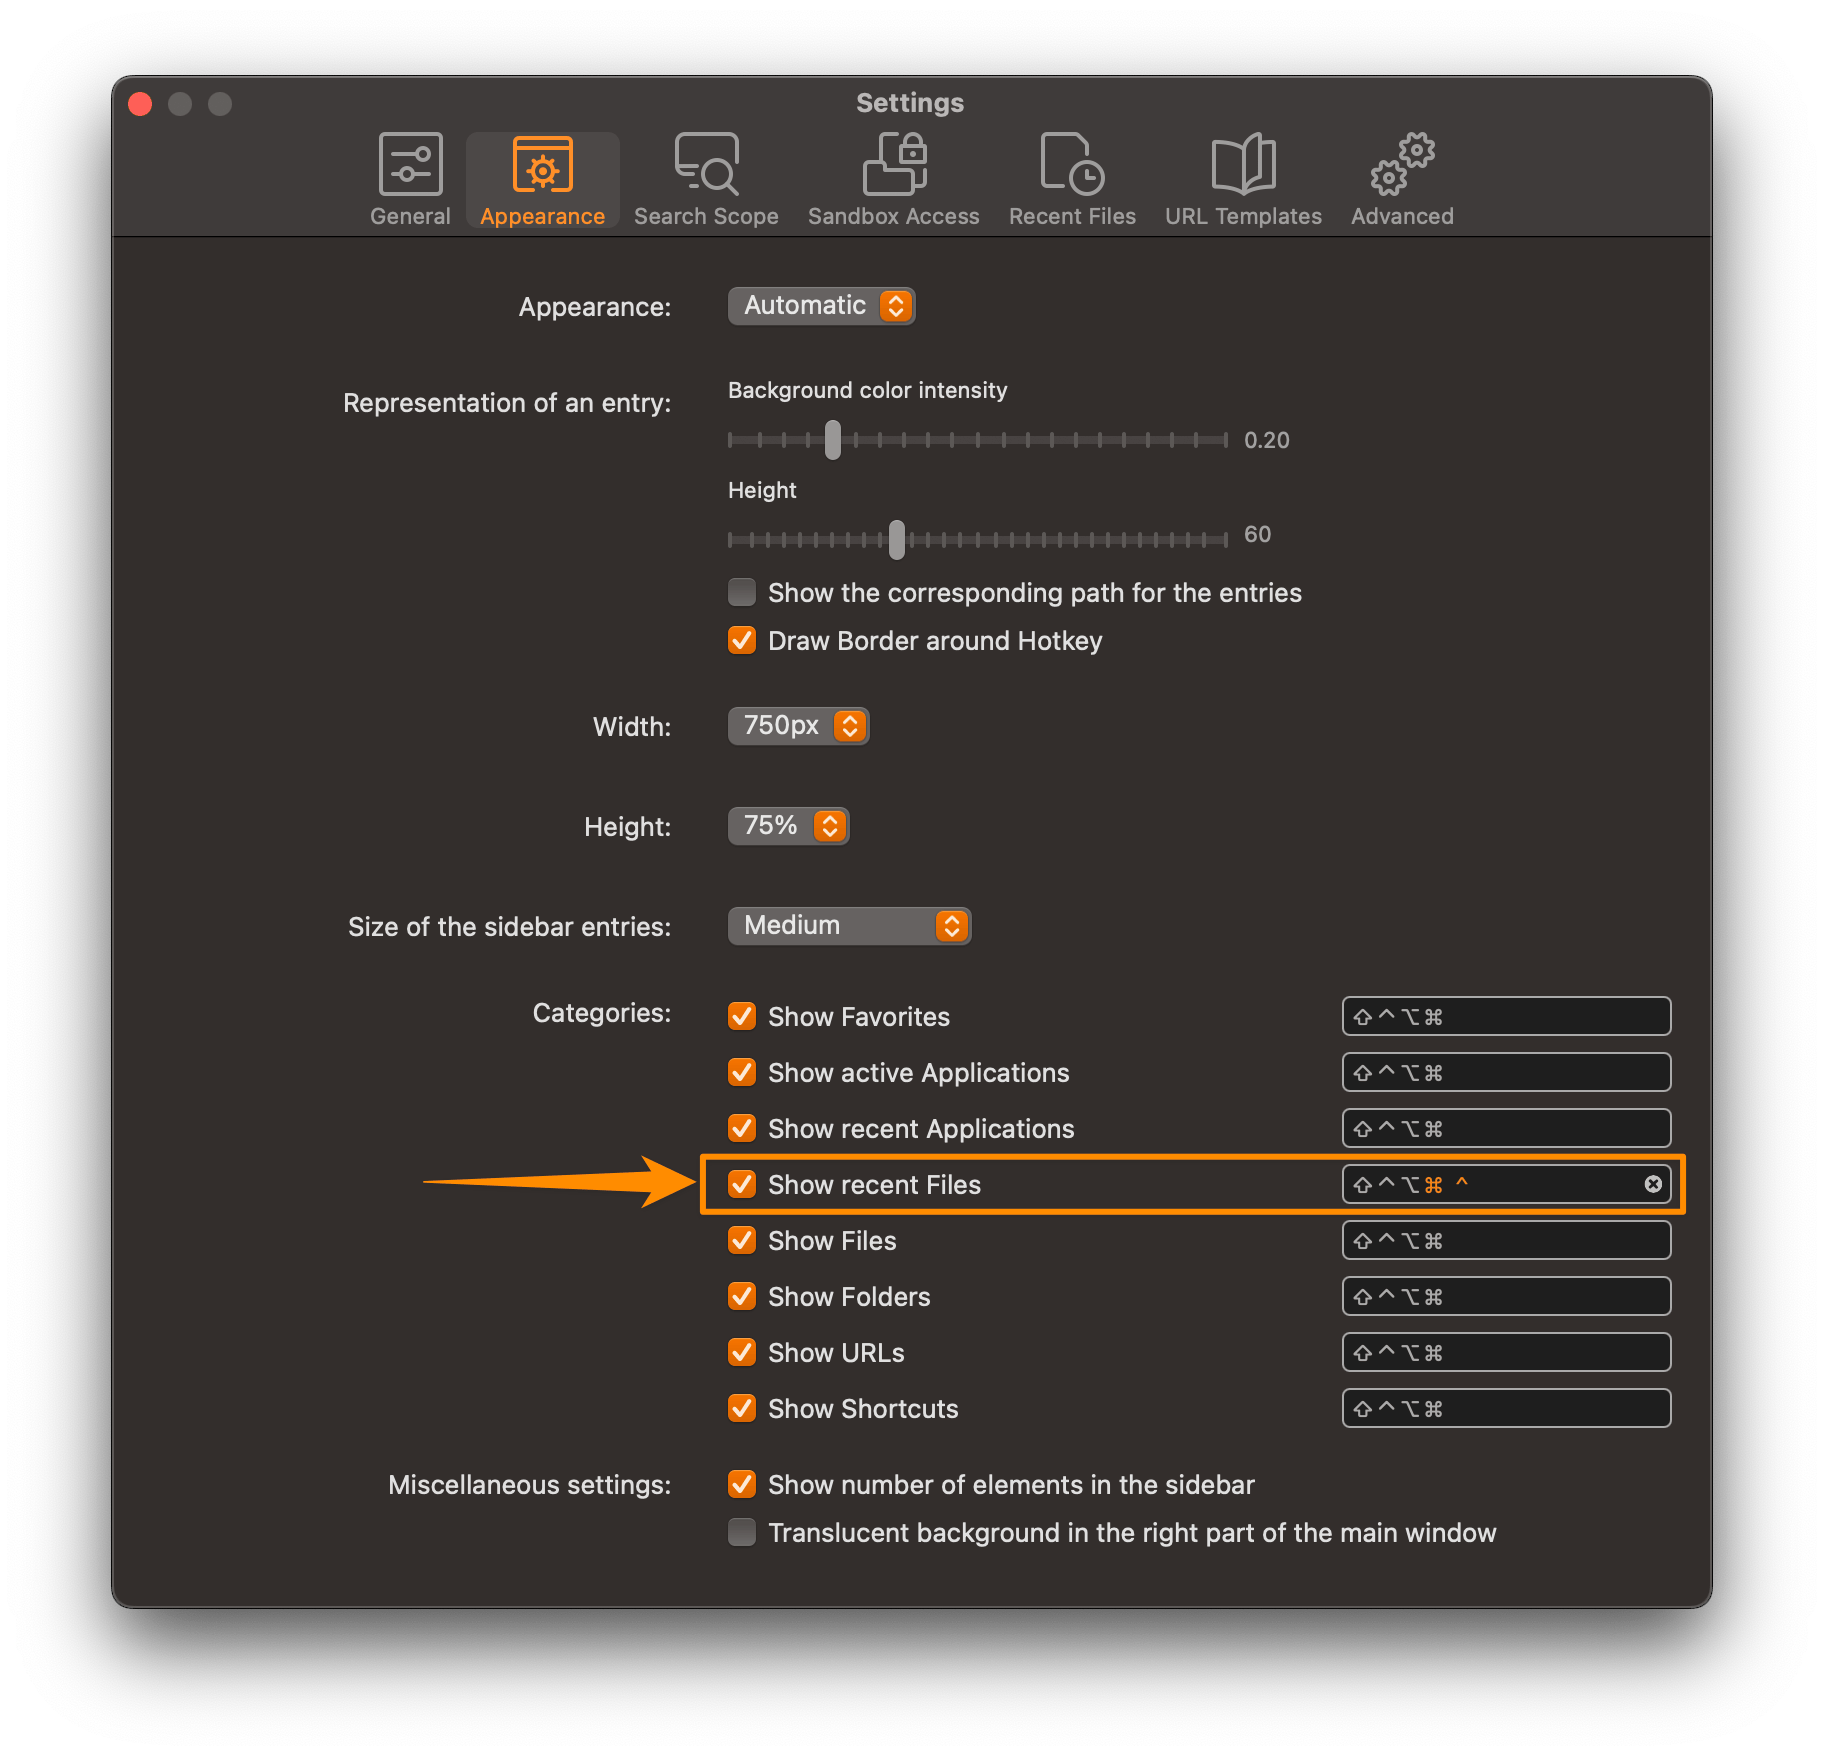
Once the setup is done, you switch the category on.
|
Assign a hotkey such as ⌥+⌘+R to open the Recent Files category with a single keystroke. |
Advanced Settings
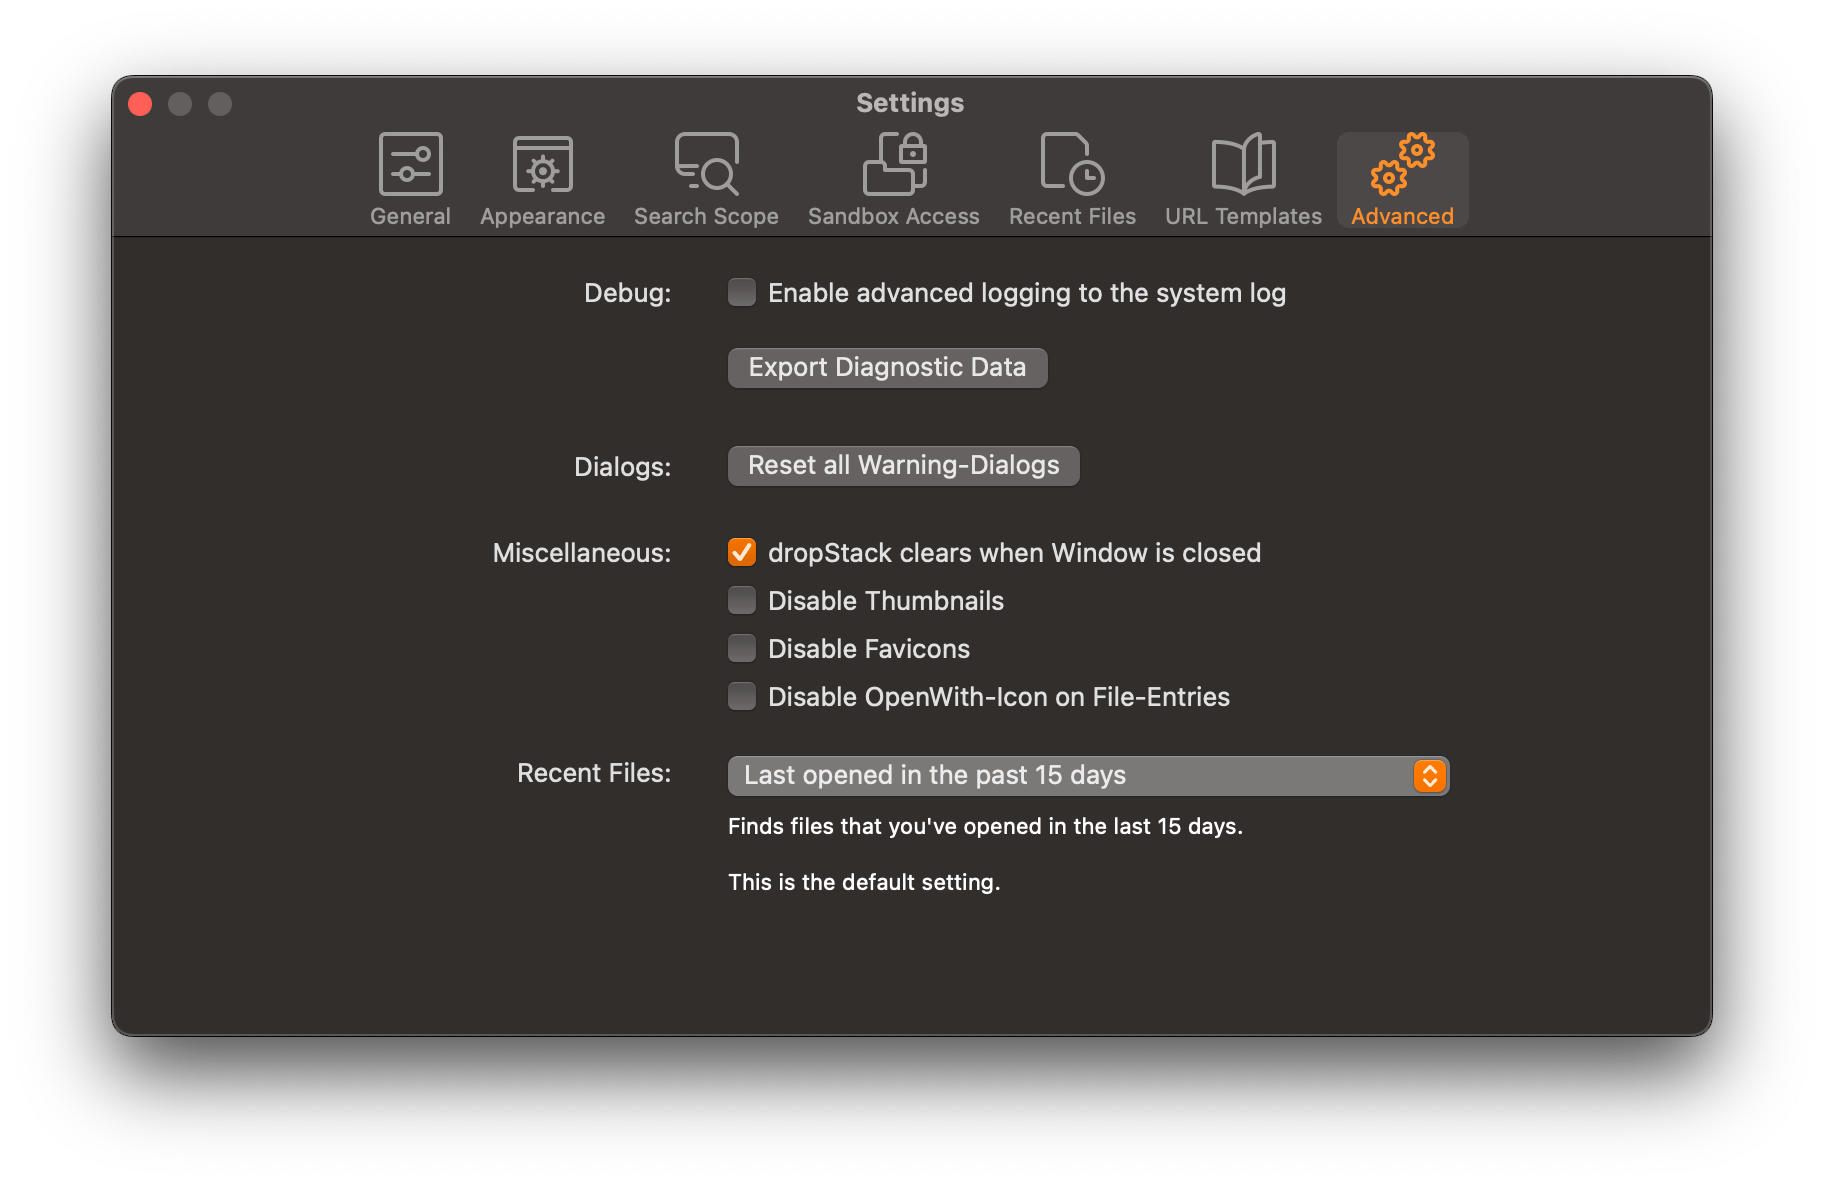
To find recent files, Start runs a Spotlight query. Two values are used: when you last opened the file, and when its content last changed.
By default Start goes by "last opened".
In the advanced settings you tailor the query to your needs. You can choose:
-
Last opened in the past 15 days
-
Last opened and content changed in the past 15 days
-
Content changed in the past 15 days
Missing Files? Here is What to Check
-
Search scope: Are the right folders listed?
-
Full Disk Access: macOS protects certain folders such as Desktop and Downloads.
Switch Full Disk Access on under System Settings → Privacy & Security → Full Disk Access. -
Spotlight index: Make sure Spotlight is indexing the folders. If in doubt, rebuild the index.
Manage Entries
The "Manage Entries" dialog is the heart of the app. Here you see all the data Start currently manages. At first glance it looks a little overwhelming. At its core, though, it is just a table of your data – with plenty of search and filter options.
Back to the basics: where do the entries in Start come from? Mostly from the data macOS supplies through Spotlight. Spotlight also tells Start about changes – when programs are installed or removed, for example. In short: as long as Spotlight runs on your Mac, Start picks up every application in the defined search paths.
And what about entries that are not applications – links to folders, files, and URLs? In theory Spotlight could capture those too. In practice that would make the whole thing unmanageable: imagine Start listing every single file on your system. That is why Start collects only applications automatically. You add all other entries yourself – quickly and easily.
The following sections walk you through the dialog in detail. You will see: it is not half as complicated as it looks.
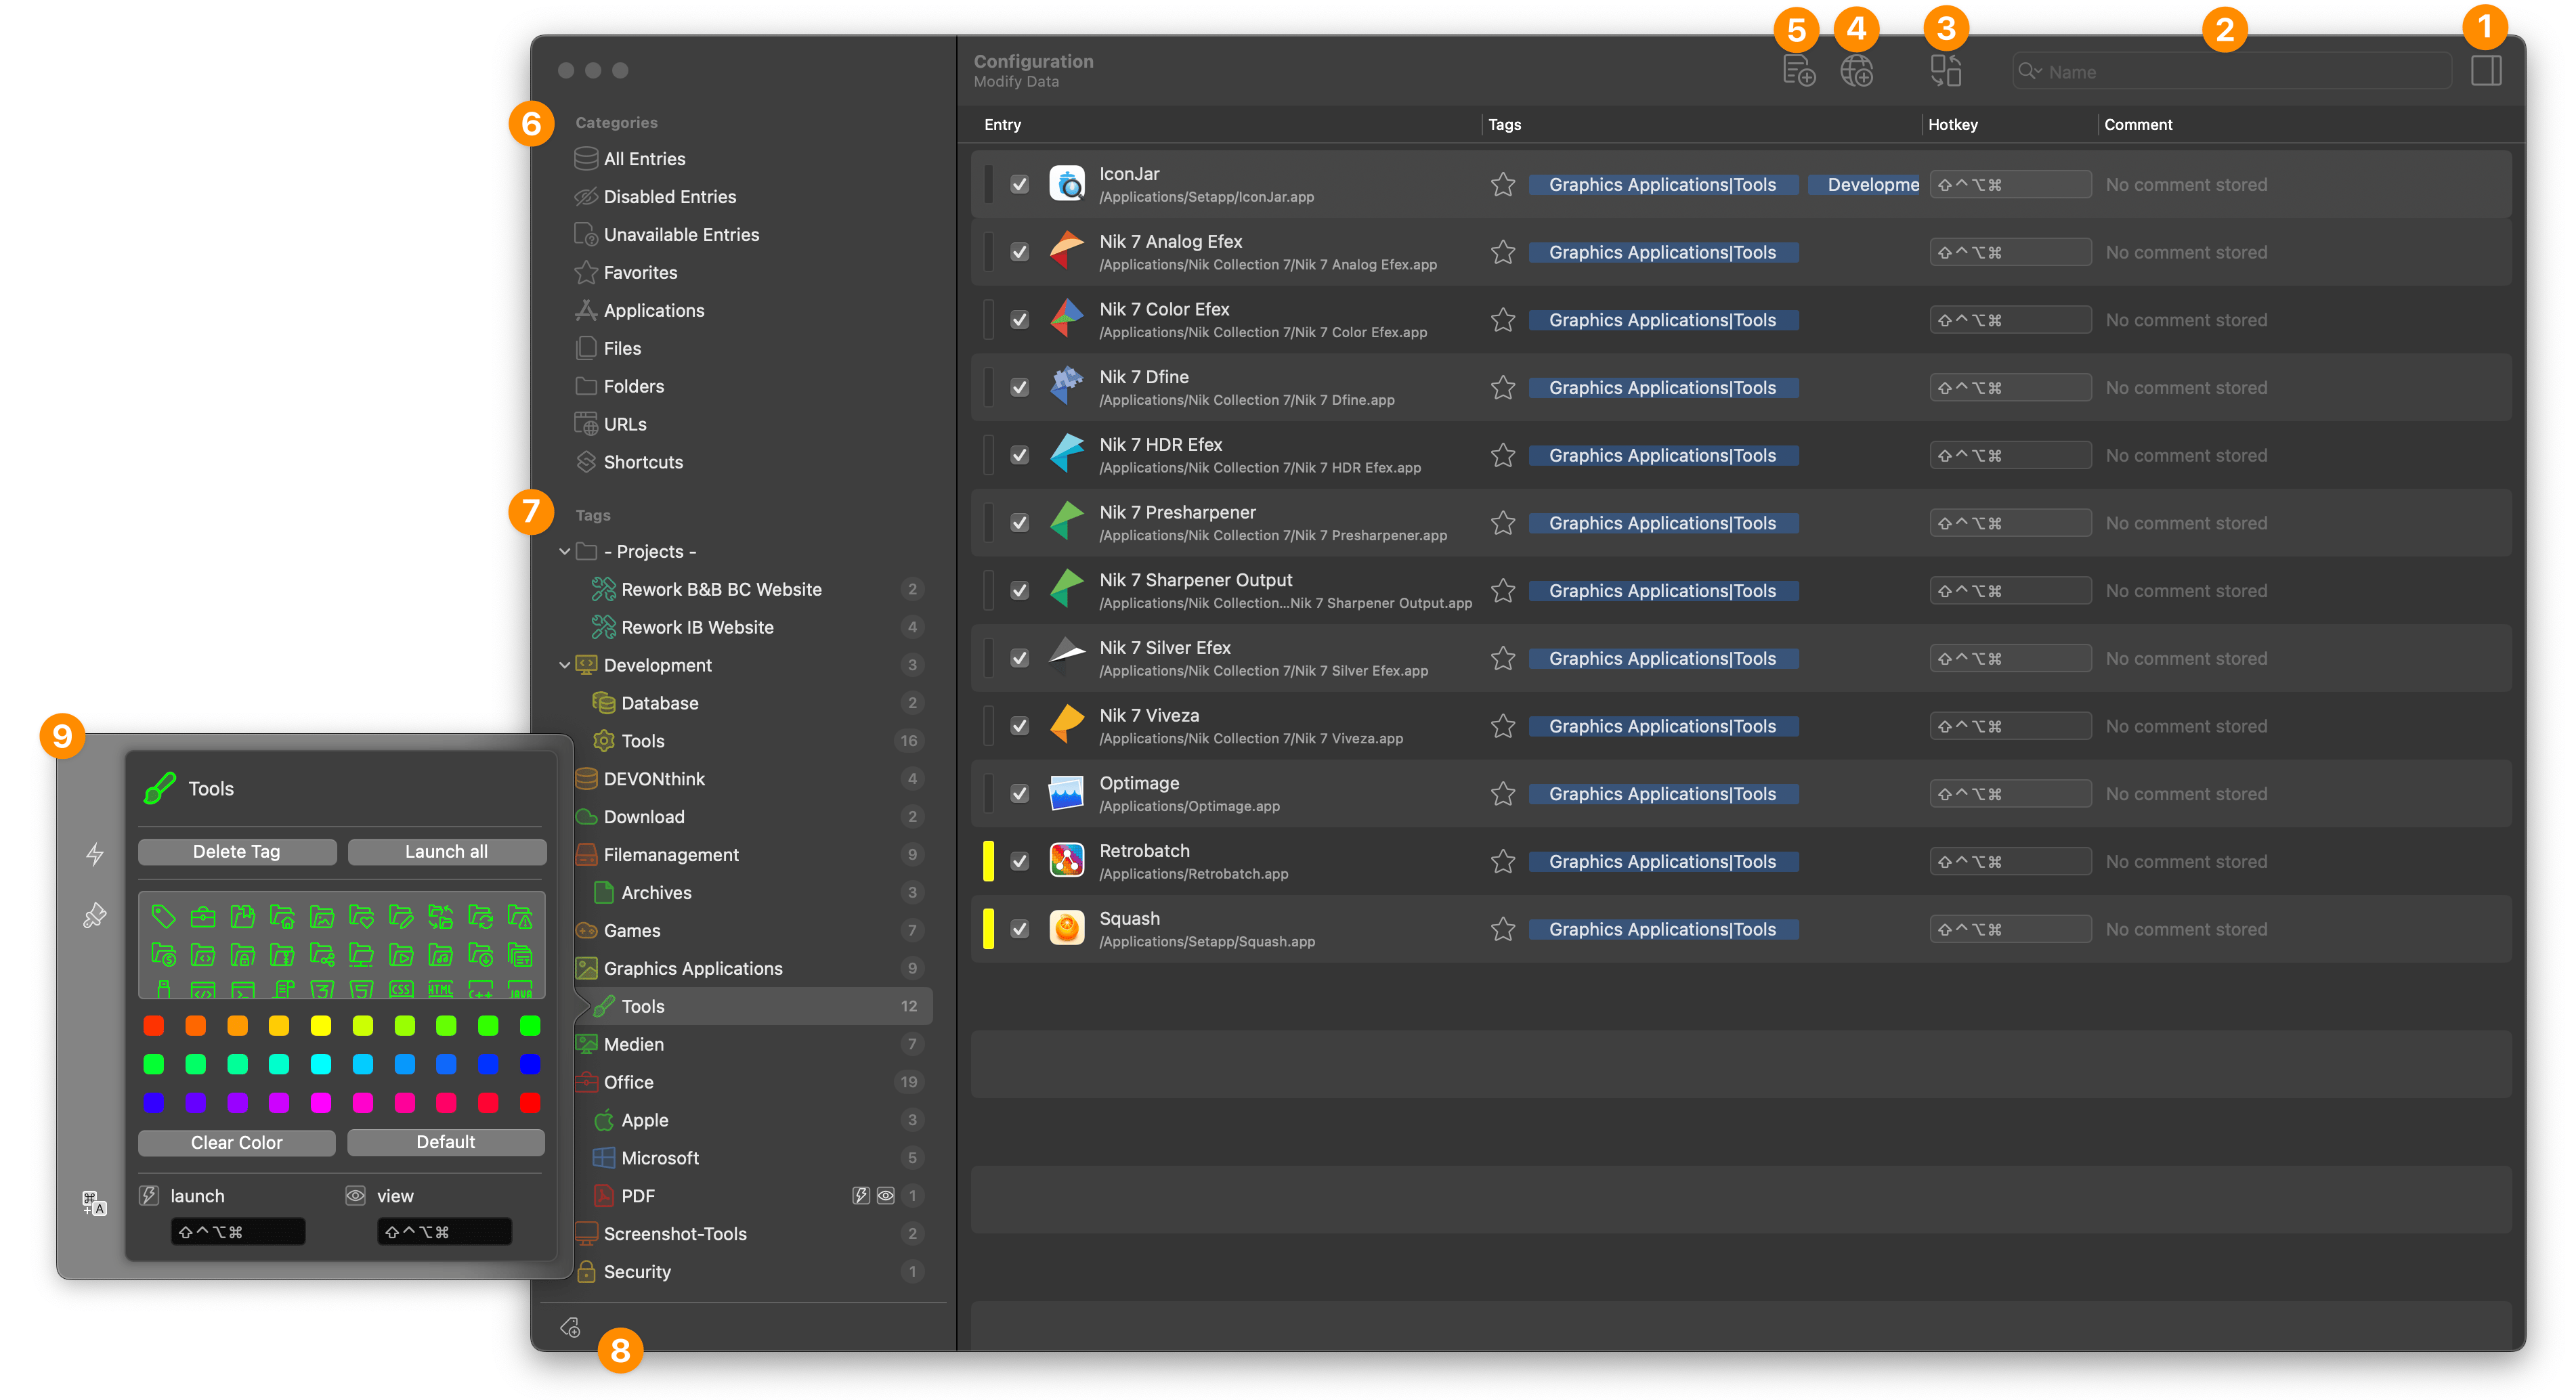
- Sidebar
-
This button shows or hides the sidebar. Use the sidebar to change the tags, comments, colors, or visibility of all selected entries at once.
- Search Field
-
The search field filters the display – much like in the main window. Click the magnifying glass to choose what to search: names, tags, paths, or comments. That way you can list every entry from a particular subfolder in no time.
- Import, Export, and Save as CSV
-
Opens a menu for importing and exporting the configuration. You can also save it as a CSV text file here.
- Adding URLs
-
This button opens a dialog in which you compose the URL you want to add. Alternatively, simply drag a URL from Safari onto the list.
- Adding files and folders
-
Start detects and adds applications automatically – provided they are in the defined search paths and Spotlight is active. You add all other entries yourself: drag files and folders into the dialog, or use the corresponding button.
- Displayed types
-
Besides applications, Start manages many other kinds of entries: files, folders, URLs, and shortcuts. In this section you narrow the display down to one particular type.
|
All Entries |
Shows entries of every type |
|
Disabled Entries |
Shows the hidden entries. Do you want to make a hidden entry visible again? Find it here and enable it again. |
|
Unavailable Entries |
Shows entries that are currently unavailable (no longer found in the file system) |
|
Favorites |
Shows all favorites |
|
Applications, Files, Folders, URLs, Shortcuts |
Shows entries of a specific type |
- Tags
-
Tags play a central role in Start: you use them to structure your entries, much like folders in the file system. Unlike folders, though, you can give one entry several tags. It then appears under each of them.
This section shows all the tags currently in Start. Just as in the main window, a right-click opens a context menu and lets you customize a tag – its icon or its hotkeys, for example. Next to each tag you see how many entries belong to it. Two symbols also show which of the two hotkeys are assigned.
This section gives you access to all tag management options.
|
You can nest tags using drag and drop. Just drag one tag onto another – the dragged tag then becomes a "sub-tag" of the other, much like a subfolder. |
 Create a new Tag
-
A click on this button creates a new tag – exactly as in the main window.
Enabling, Disabling, and Deleting Entries
|
|
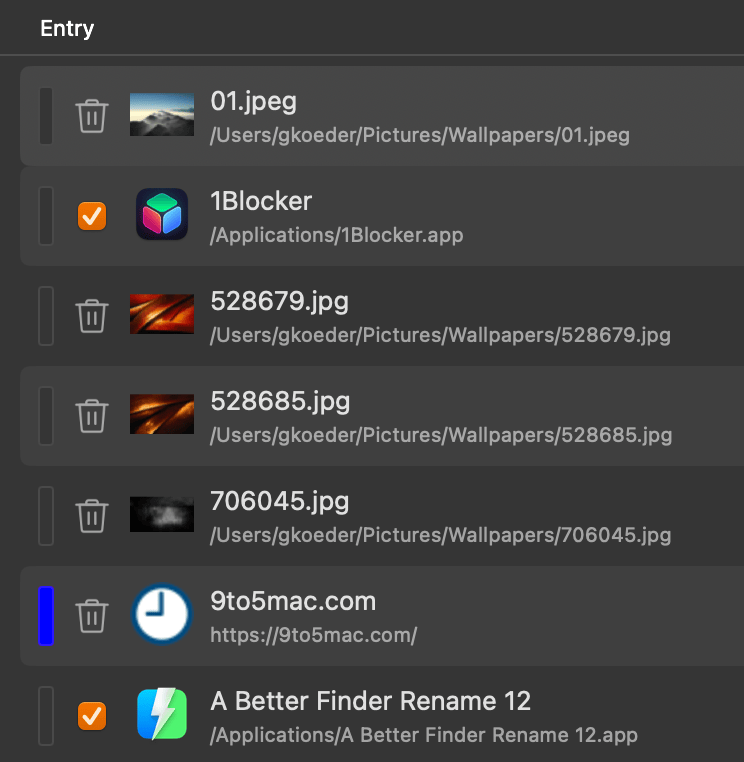
The main data source for Start is Spotlight. All applications come from there. Start does not let you delete these entries – the next synchronization would bring them straight back anyway. You can therefore only disable entries from Spotlight. They then no longer appear in the main window. Manually added entries are a different matter: they are not added automatically, so you can remove them directly. How do you tell whether an entry comes from Spotlight? If a checkbox sits in the first column next to the icon, it is a Spotlight entry. Use it to enable or disable the entry. If you see a small trash icon instead, it is a manually added entry – a click on it removes the entry. |
Backup
Export and Import
|
|
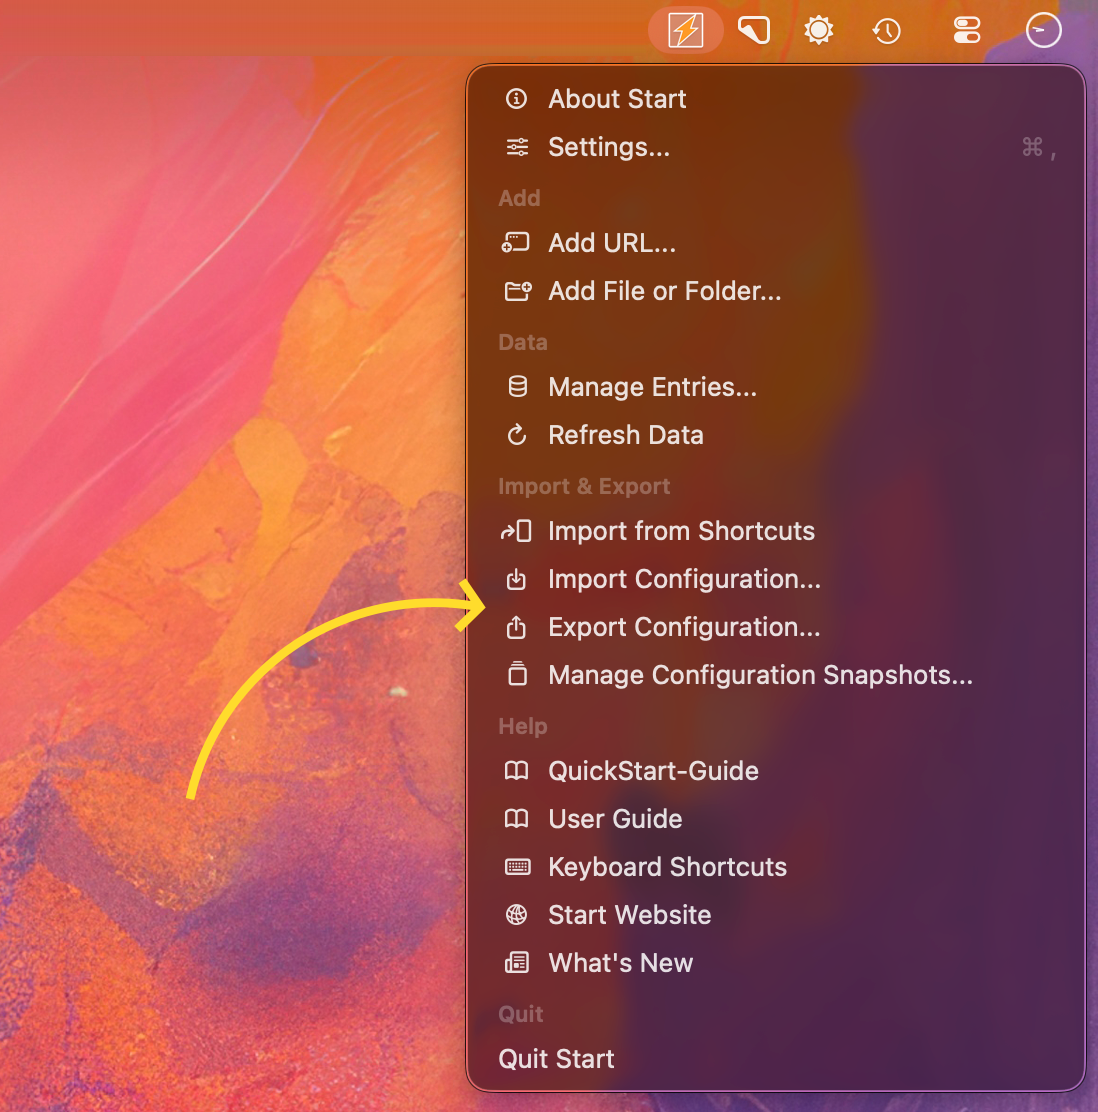
You can export your entire configuration and import it again later. Two menu entries handle this: "Export Configuration…" and "Import Configuration…". |
|
An import replaces your existing configuration completely! |
|
You can also use export and import to transfer your configuration to a second Mac and adjust it there. |
Configuration Snapshots
|
|
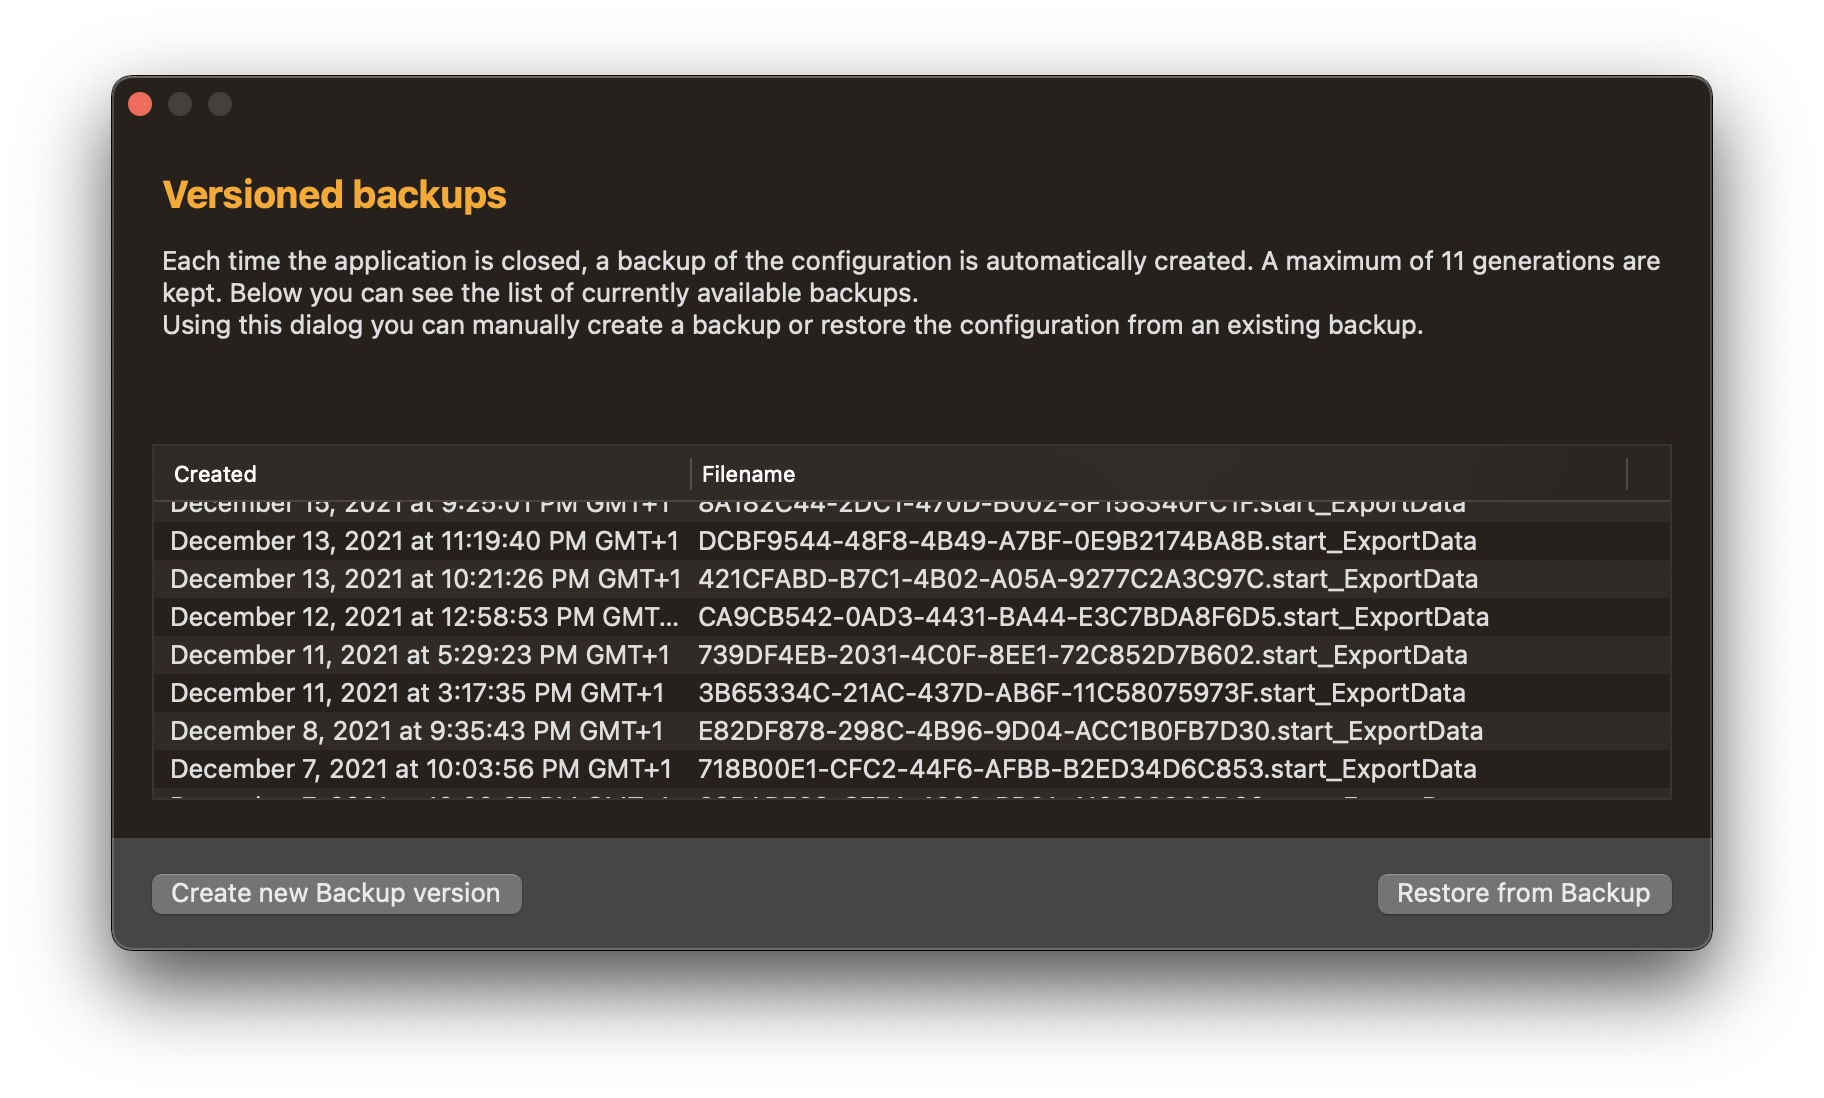
Every time you quit Start, it creates a snapshot, or backup copy, of your current configuration. Up to 11 generations are kept – with each additional snapshot, Start overwrites the oldest one. The "Configuration Snapshots" dialog gives you an overview of all existing snapshots. There you can also create a new generation or restore your settings from a snapshot. |
Commands for the Shortcuts App
Start supplies the Shortcuts app with a handful of commands. With them you build key Start functions right into your own workflows.
Show Start
This action brings up Start from your workflow.
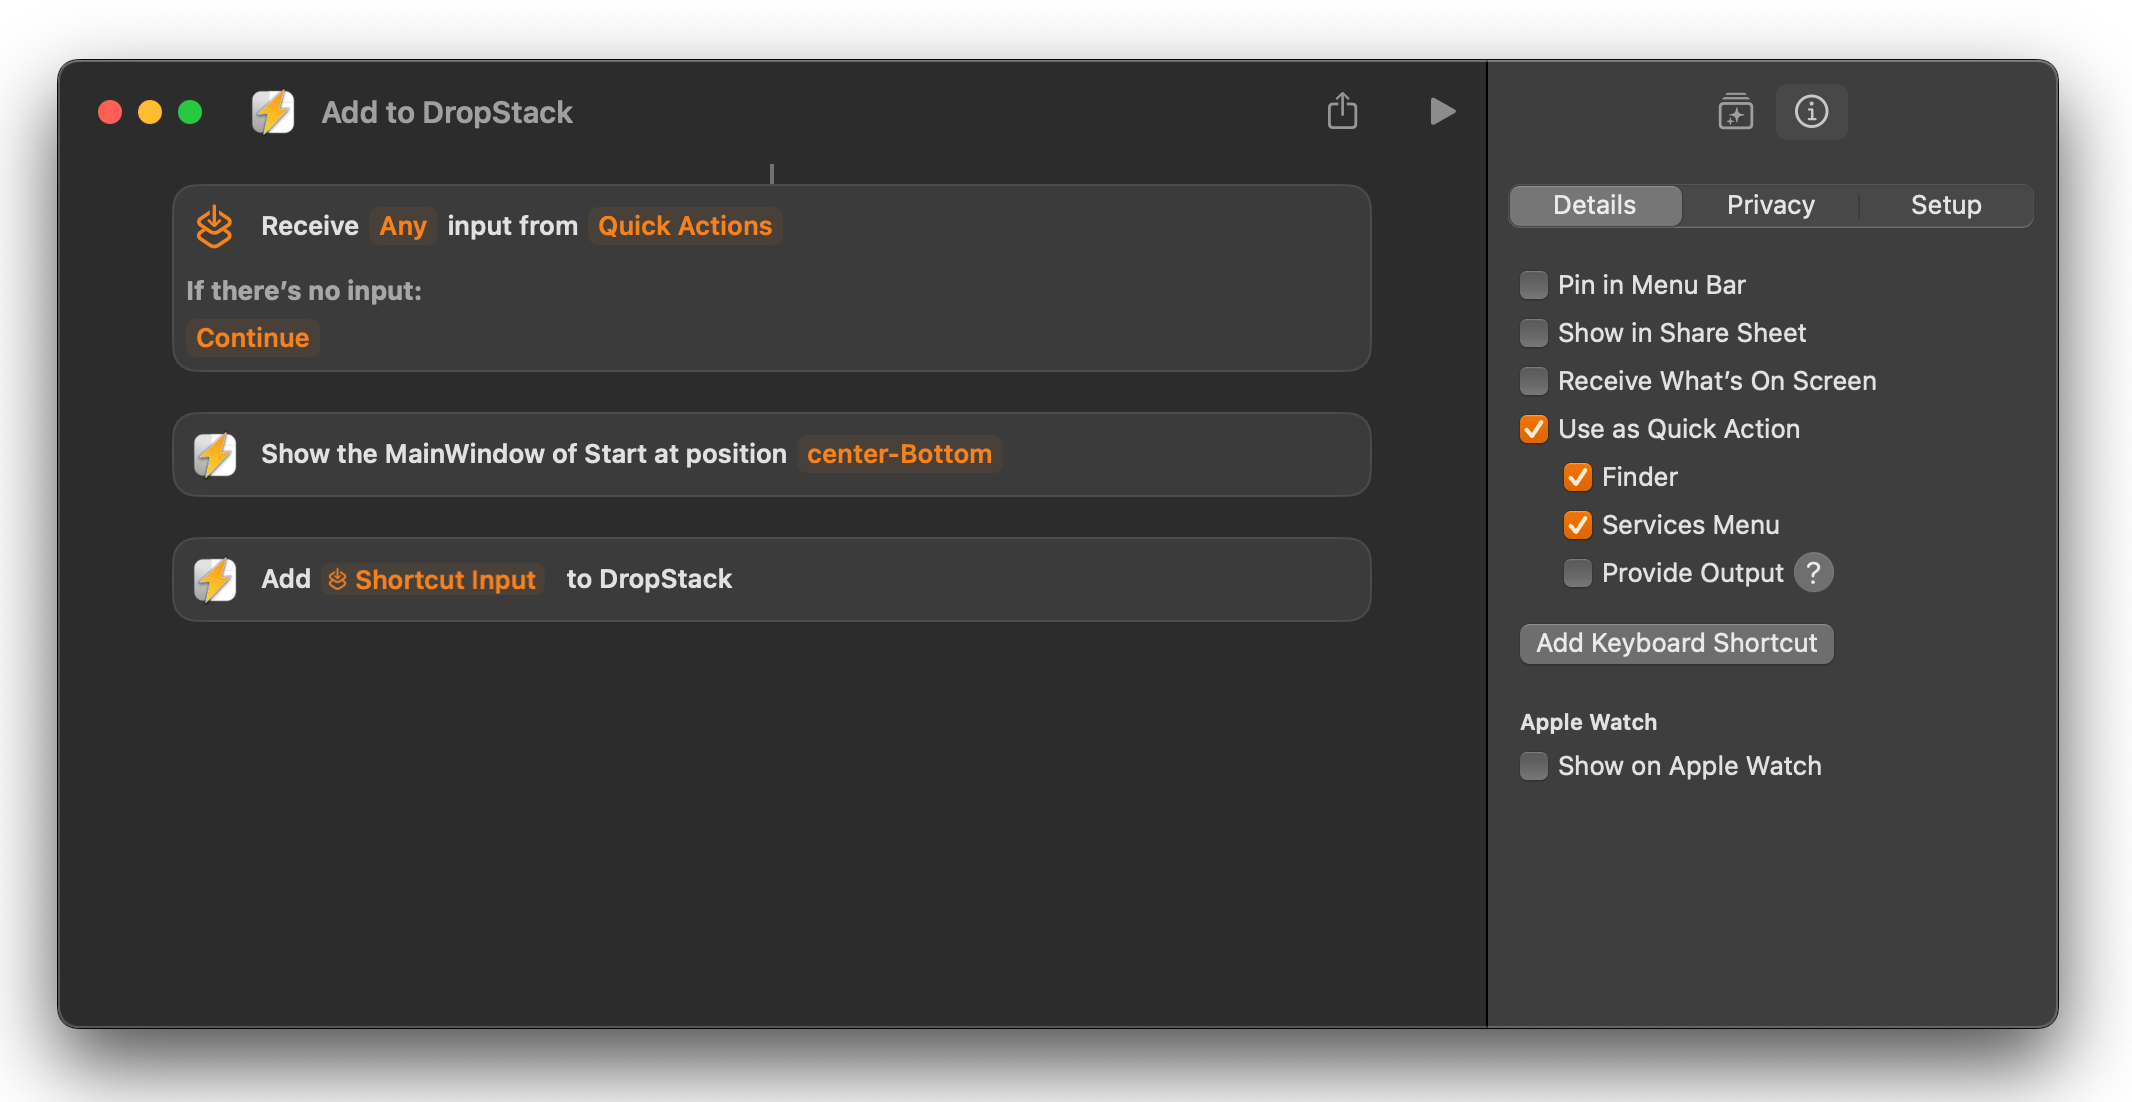
Add to DropStack
This action puts files and folders from your workflow onto the DropStack of Start.
Clear DropStack
This action empties the DropStack from your workflow.
Launch Tag-Items
This action launches all entries of a tag in Start at once.
Show Tag-Items
This action opens the main window of Start and shows the contents of the tag you specify.
Add to Start
"Add to Start" is the command Start supplies to the Shortcuts app for creating entries. Use it to build workflows that add selected files and folders from the Finder or the web page open in Safari to Start.
Examples
The examples below show how to use the command. For the Shortcuts app itself, please refer to Apple’s documentation; an introduction to that app is beyond the scope of this manual.
Add File to Start
This workflow picks up the files and folders currently selected in the Finder and adds them to Start.
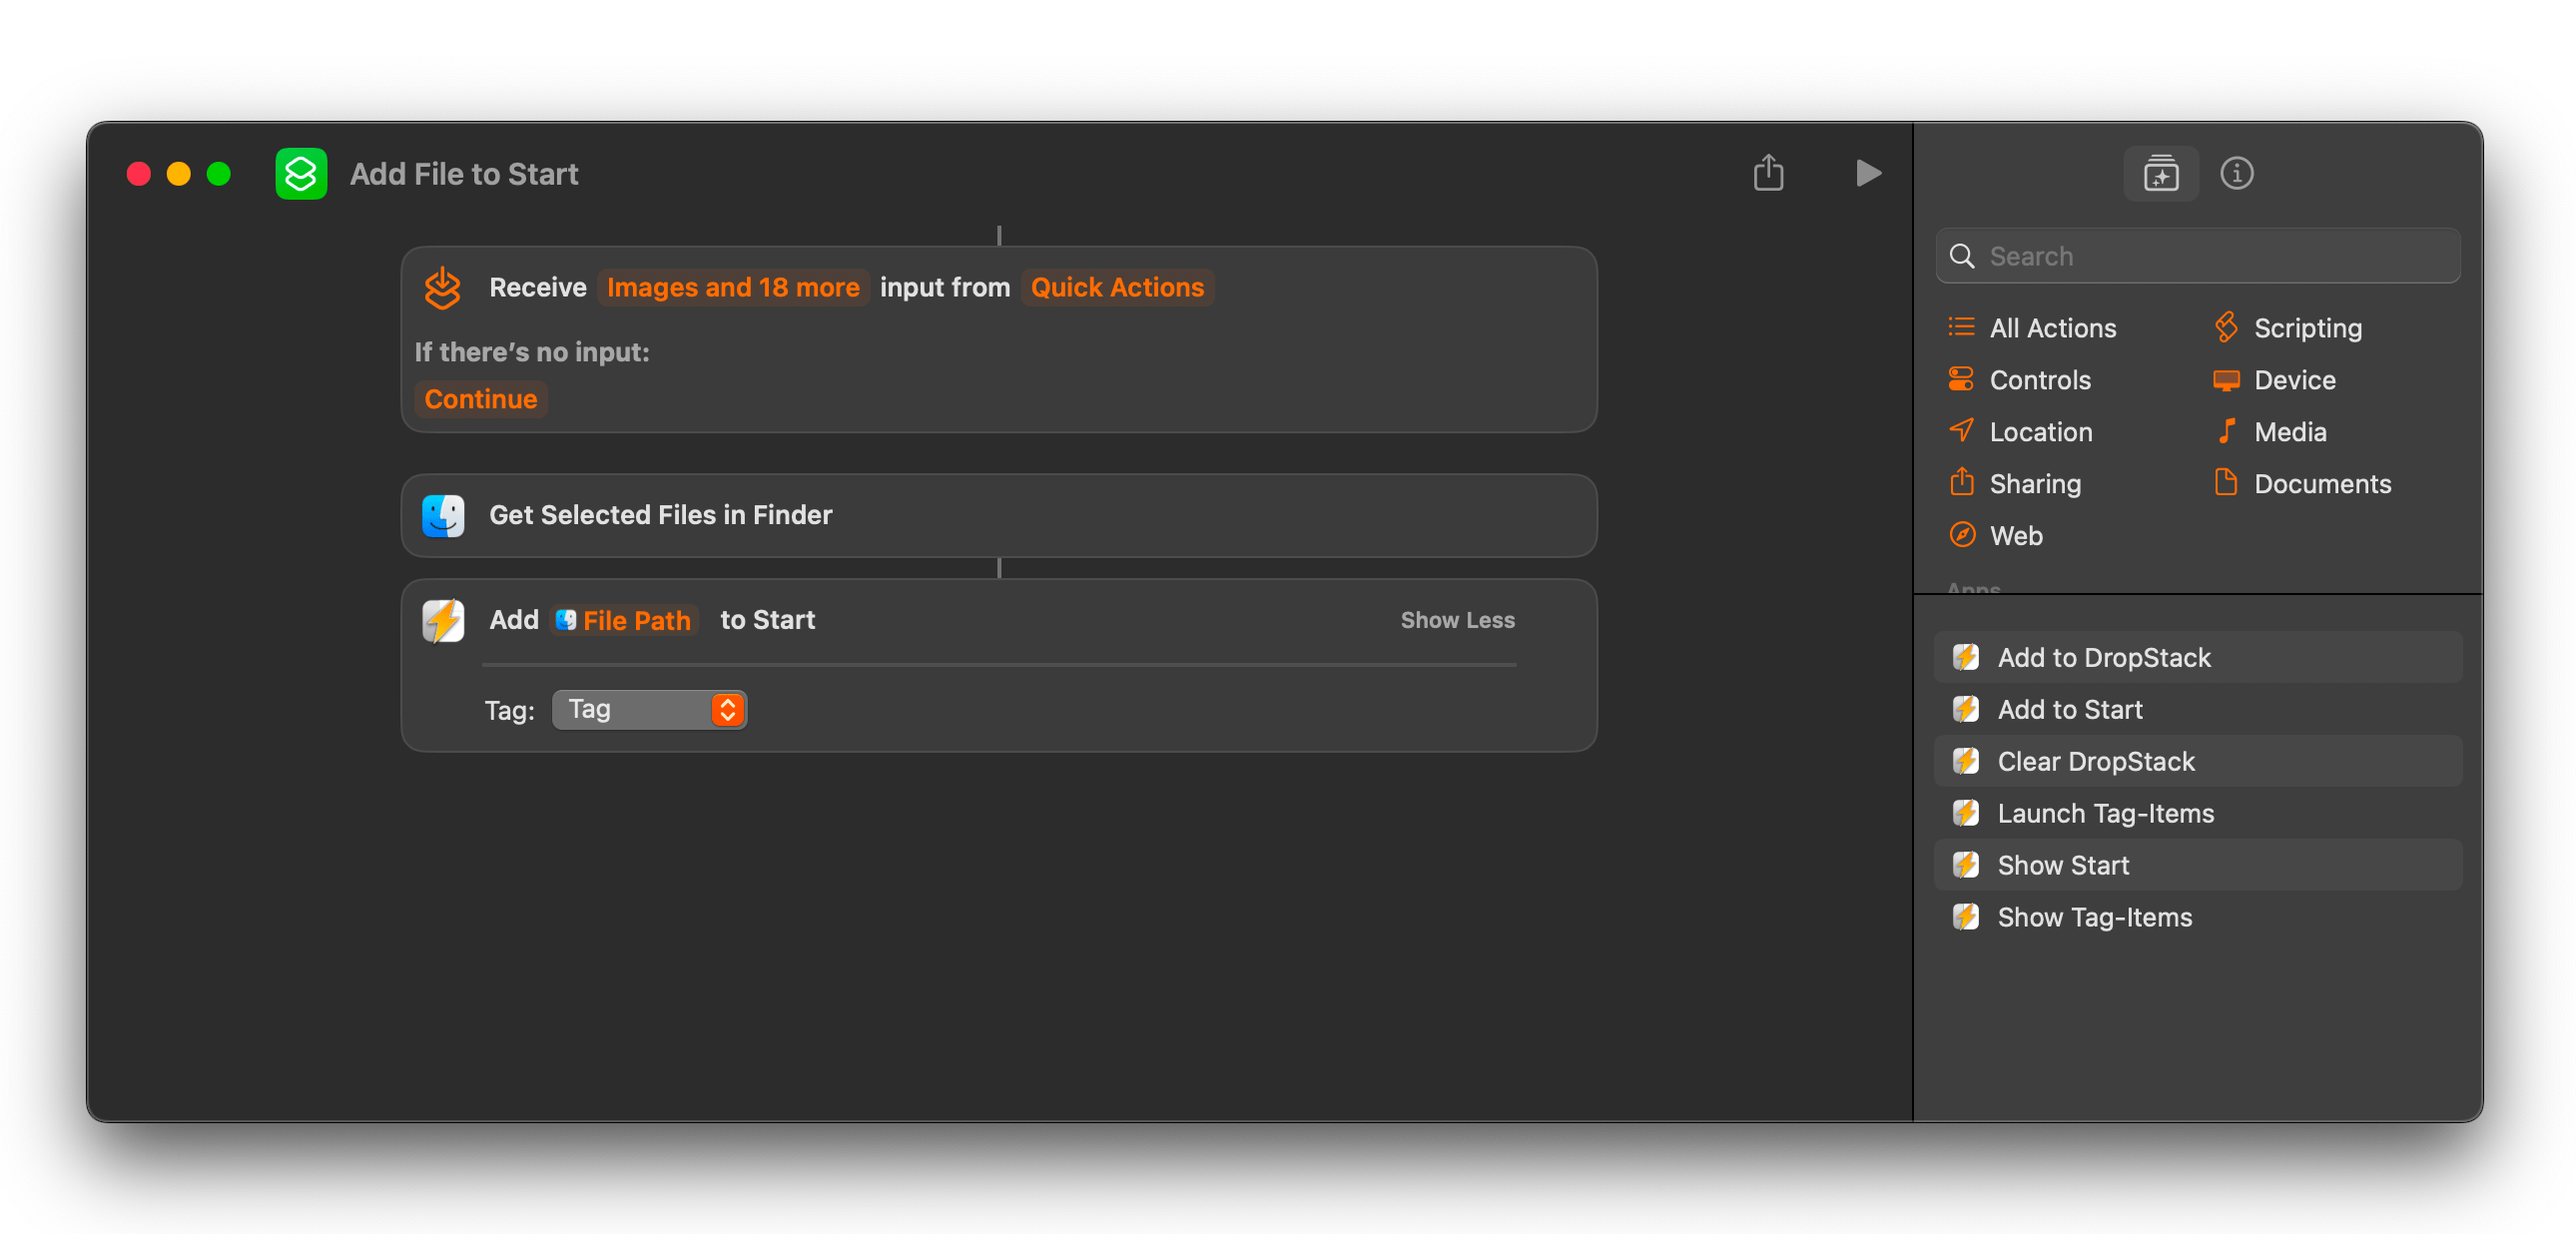
First, ask the Finder for the current selection: drag the command "Get Selected Files in Finder" into the workflow. Next comes "Add to Start". Initially, it reads "Add Item to Start". Right-click "Item" and choose "File" – the entry now reads "Add File to Start". Since only the path is needed, click "File" and choose "File Path".
|
Click "Show More" in "Add to Start", and you can also choose the tag to assign to the entries. |
Add URL to Start
This workflow grabs the current web page in Safari and passes its URL to Start.
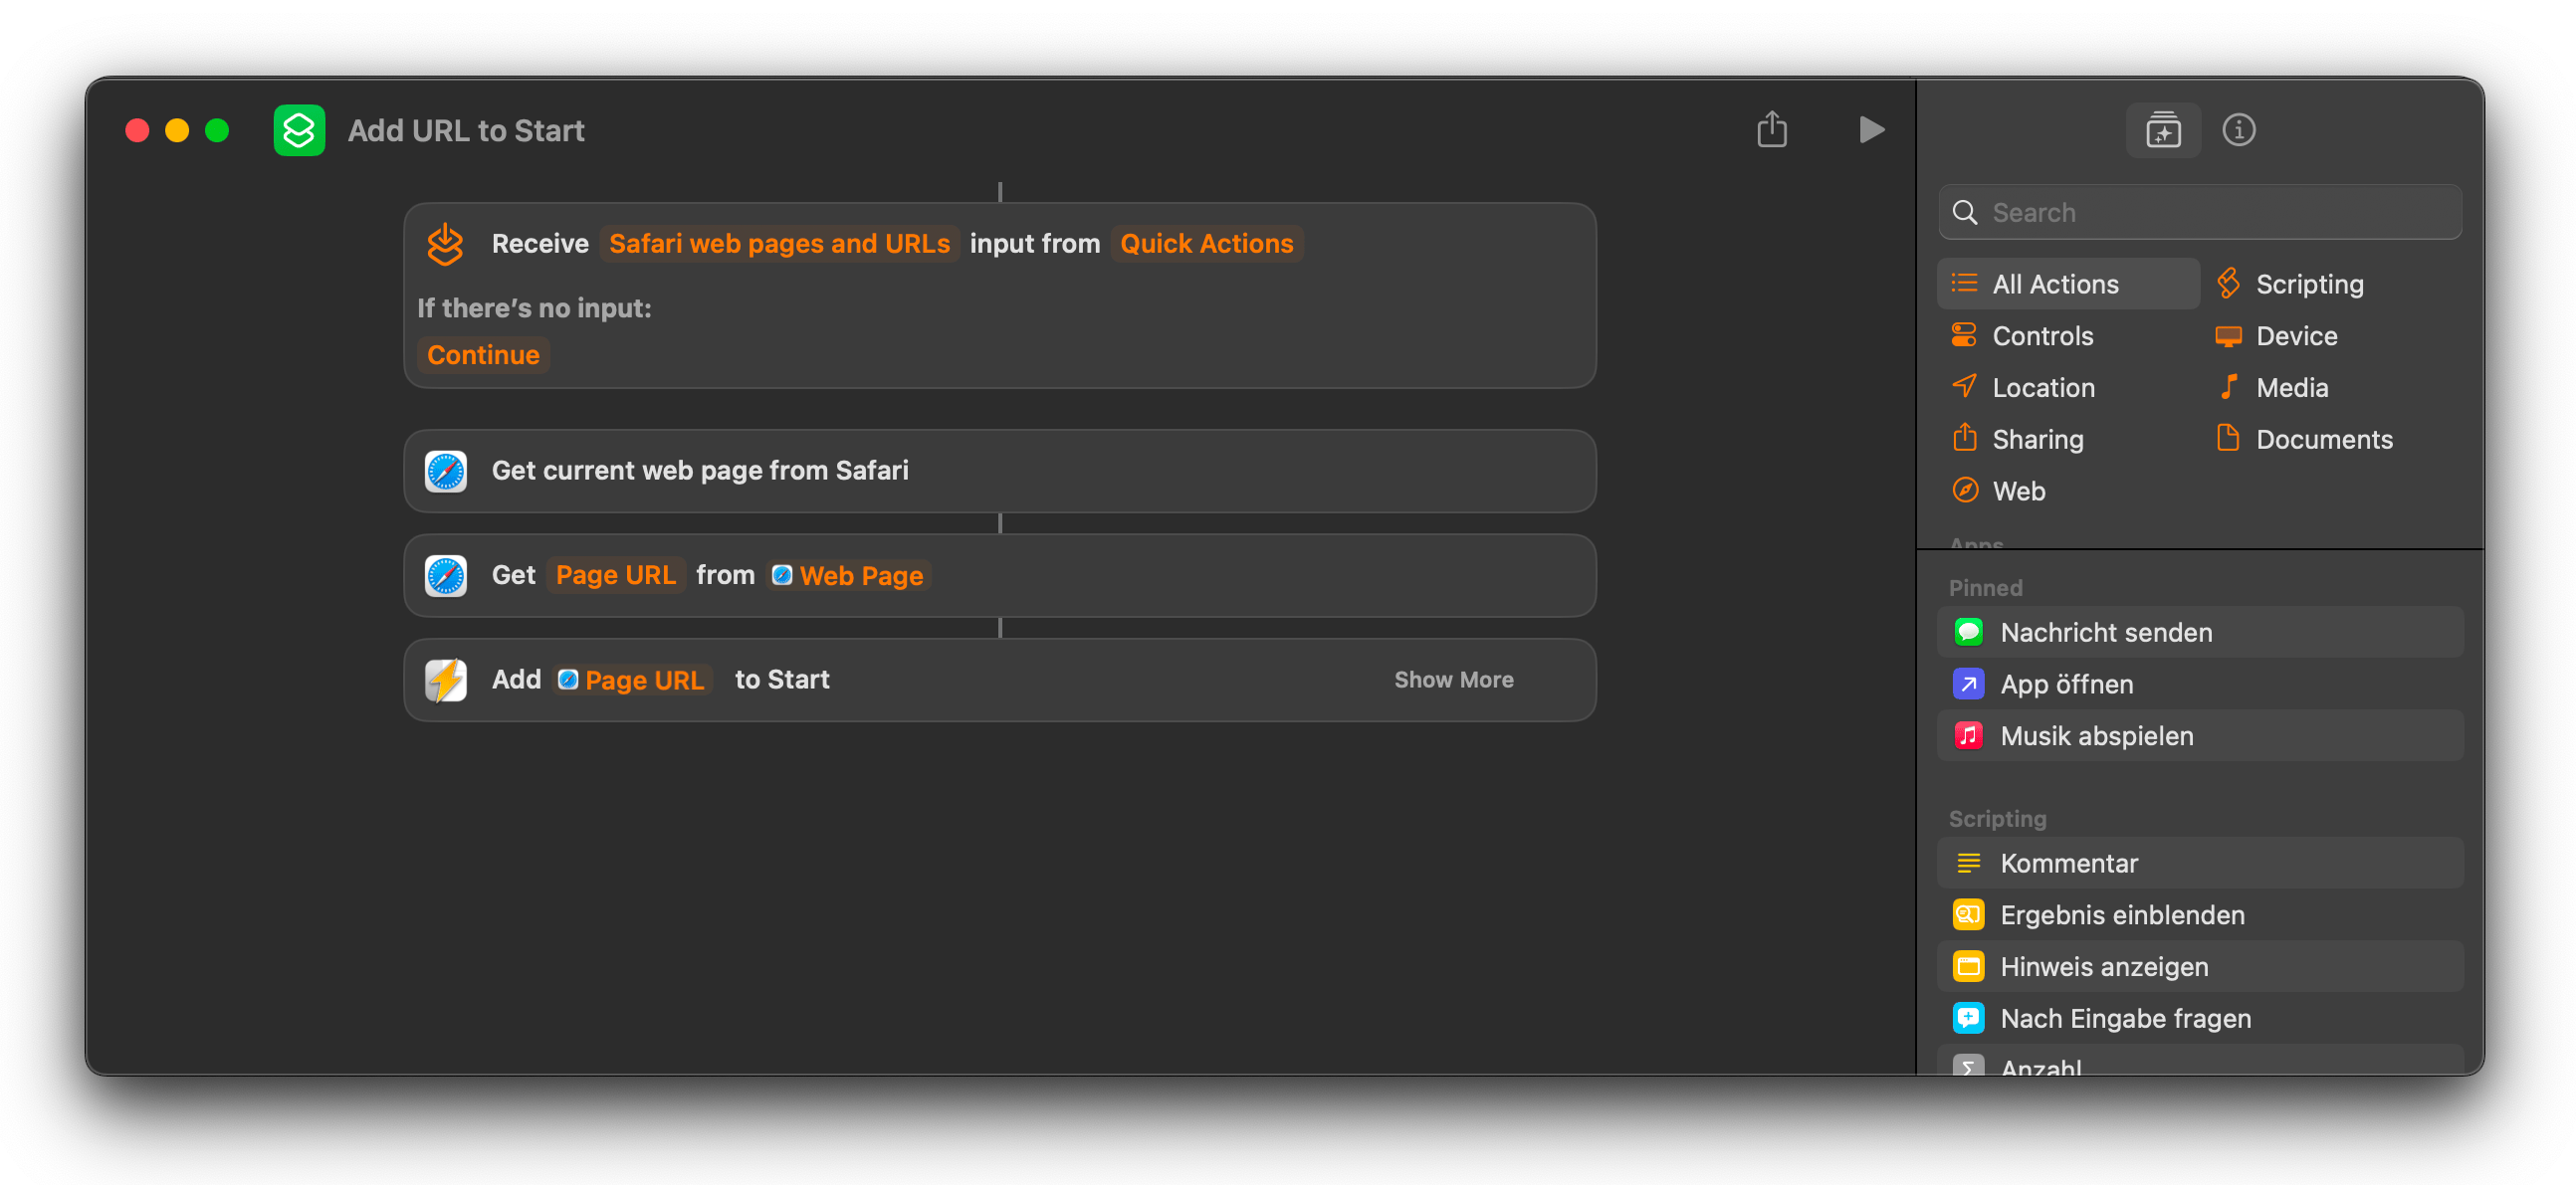
First, get the current page: drag the command "Get current web page from Safari" into the workflow. It now reads "Get Detail from Safari web page". Right-click "Safari web page" and choose "Web page". Only the URL is needed, so right-click "Detail" and choose "Page URL". Finally, add "Add to Start". Initially, it reads "Add Item to Start". Right-click "Item" and choose "Page URL" – the entry now reads "Add Page URL to Start".
|
Click "Show More" in "Add to Start", and you can also choose the tag to assign to the entries. |
Using the Service Entry
Start registers itself as a system service. That lets you send selected files and folders straight from the Finder to Start.
Using the Entry in the Services Menu
|
|
Select the files or folders you want to send in the Finder.
|
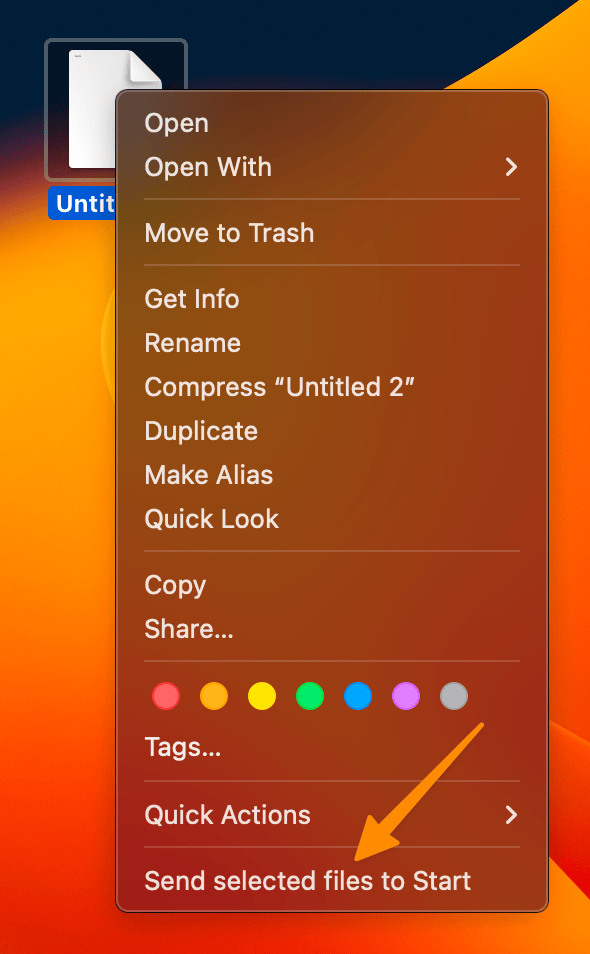
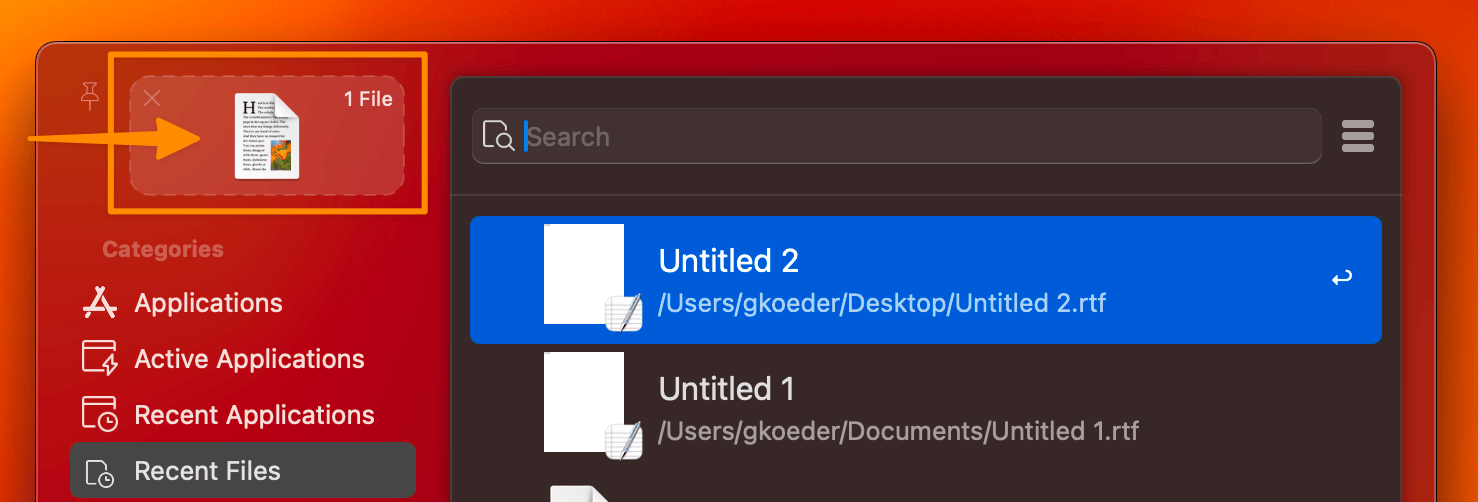
Activating the Service Entry
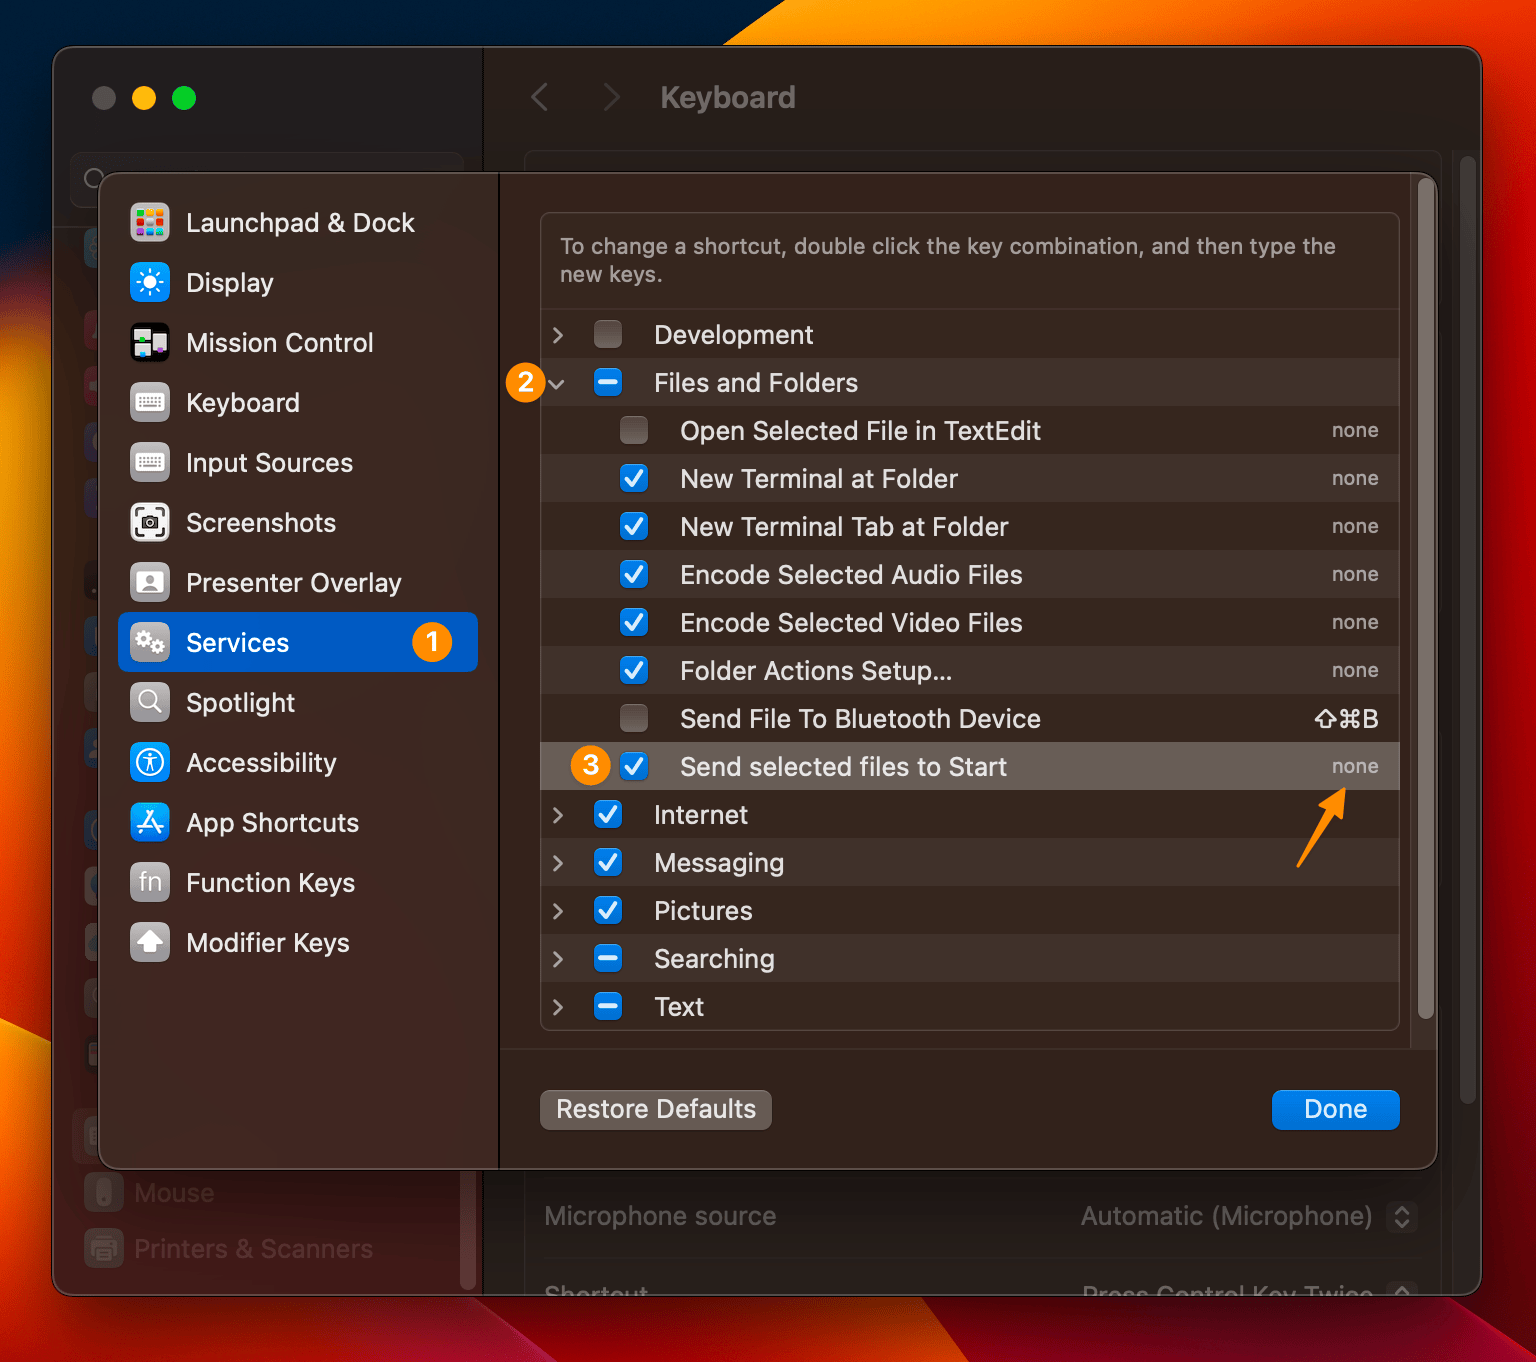
To switch the service on in macOS, follow these steps:
Step 1:
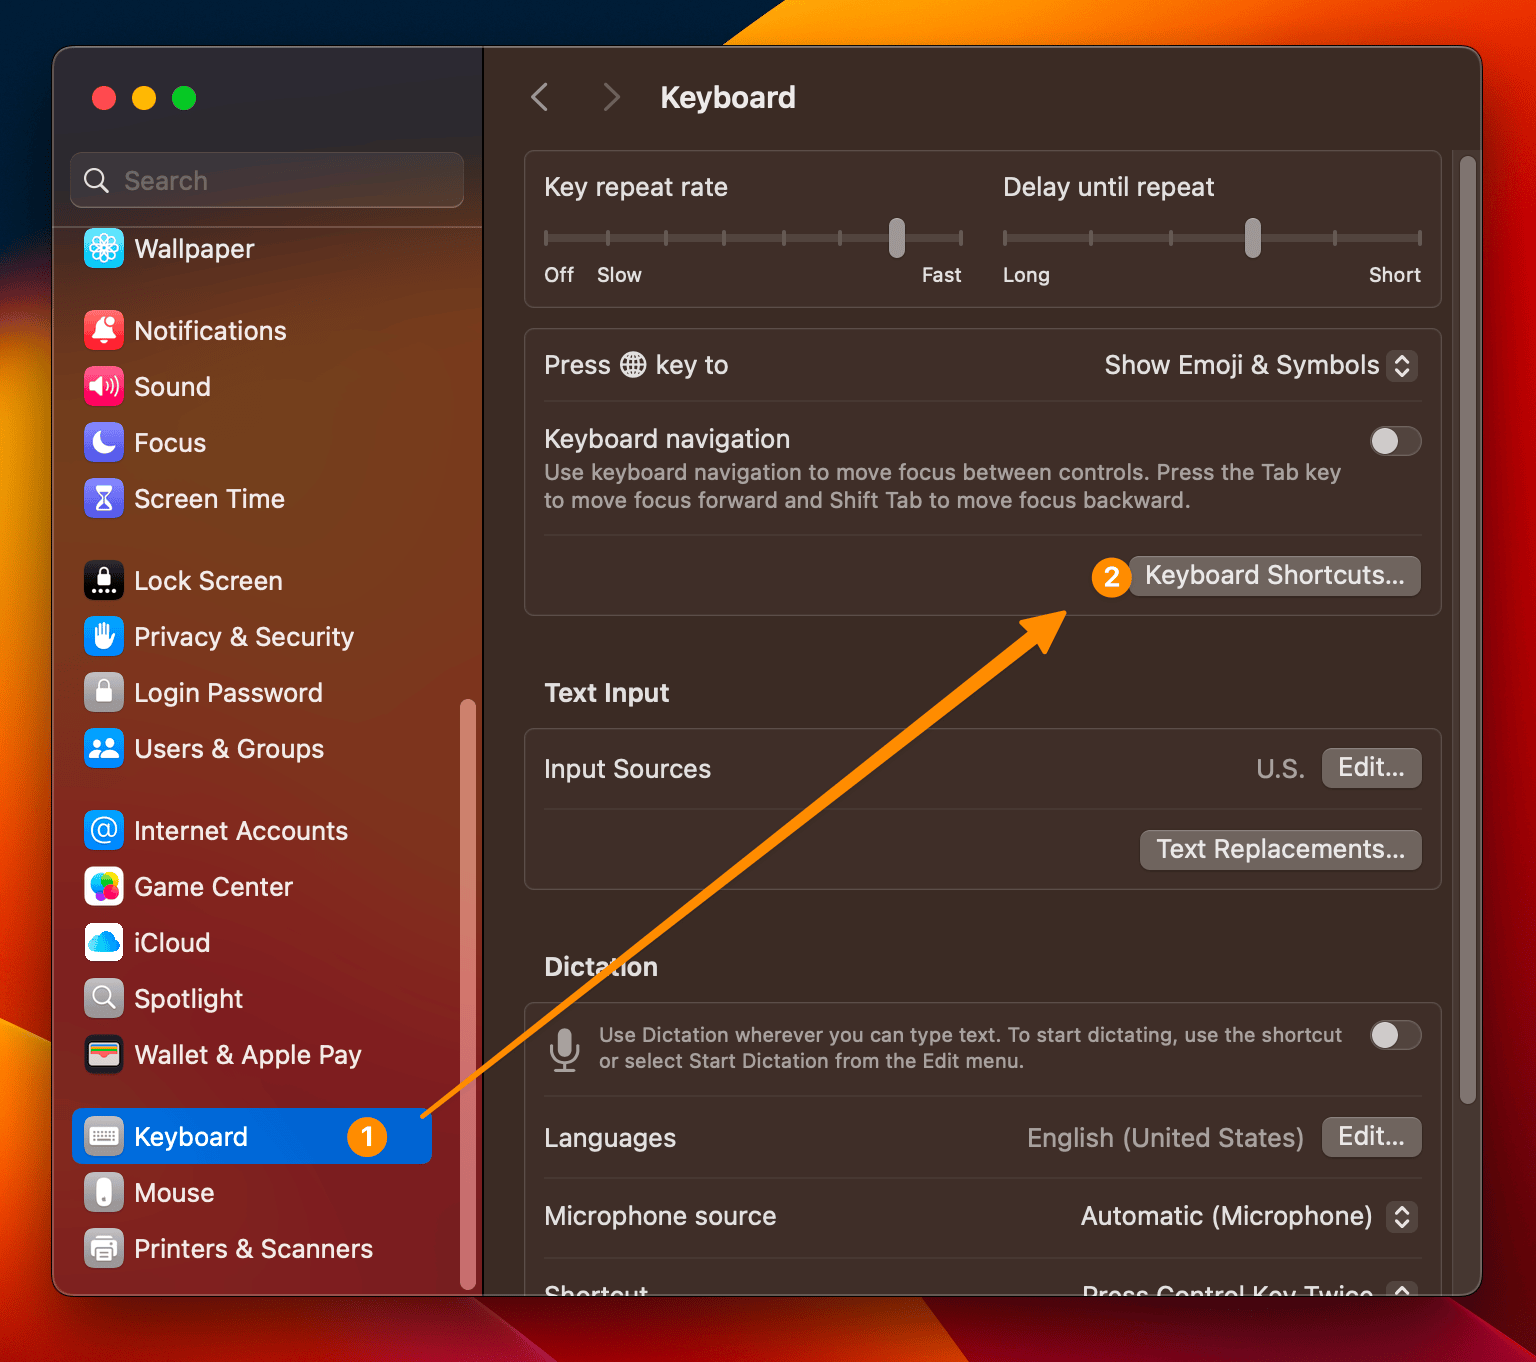
-
Open the "Keyboard" section in System Settings.
-
Click "Keyboard Shortcuts".
Step 2:
-
Select the "Services" section.
-
Scroll down to "Files and Folders".
-
Find the entry "Send selected files to Start" and switch it on.
|
macOS loads system services when you log in. If you have just installed Start and the entry is missing from the Services menu, log out and then log back in. You can assign a keyboard shortcut to any system service. Assign one to the Start service to send your selection directly with a single keystroke. |
FAQ
How do I get hidden entries back?
Open the "Manage Entries" dialog and pick “Disabled Entries” as the displayed category. The list now shows every hidden entry. The checkbox next to the icon indicates whether an entry is enabled. Select the checkbox to make the entry visible again. You can read more about it here.
Why is Start missing some applications?
Start relies on Spotlight to detect applications. So first make sure Spotlight is switched on and indexes applications – which is the default under macOS.
In rare cases, the Spotlight database stops indexing some applications. In the past this happened now and then after a macOS update. Rebuilding the Spotlight index usually helps. The exact steps differ slightly from one macOS version to the next, so please look them up on Apple’s support pages.
Does Start need Full Disk Access?
Following Apple’s guidelines, Start runs in a sandbox. It therefore has limited access to your Mac, particularly to files and folders. Access is granted through so-called security tokens. Start cannot create these itself: they are created when you add entries manually. One token covers a folder and all its subfolders. You can review and manage the existing tokens in the settings.
On top of that, macOS lets you grant an app Full Disk Access. You set that up yourself in System Settings.
Start benefits from it too. Experience shows that for "Recent Files", tokens alone are not always enough to find every file (see here). Full Disk Access is optional and can help when entries are missing from "Recent Files".
Can Start be opened with a Dock icon?
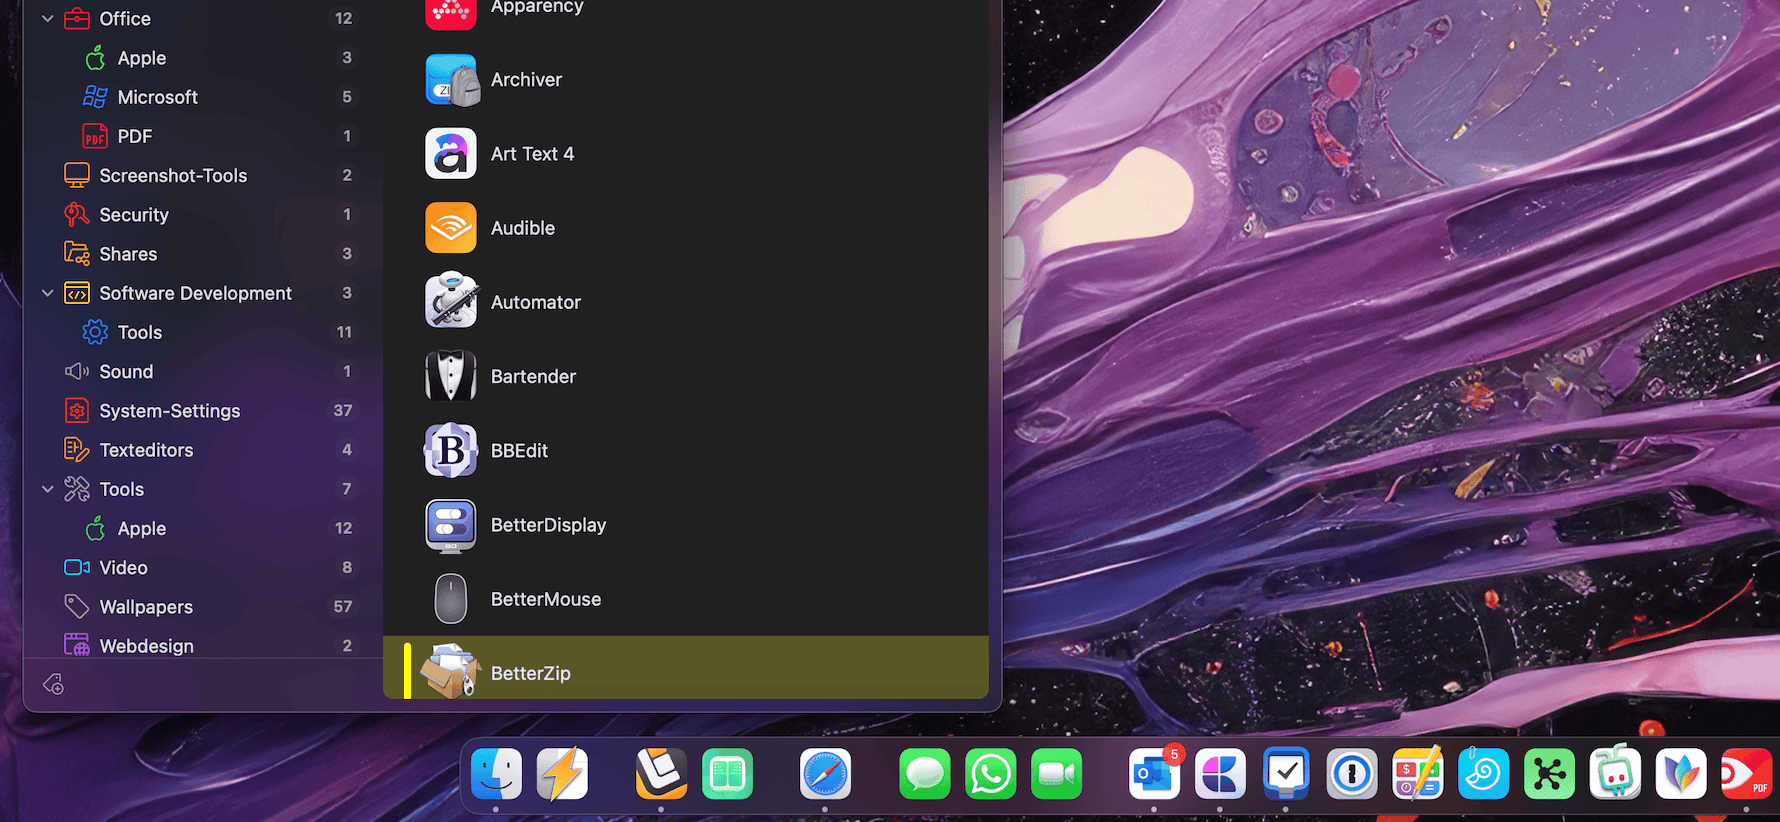
Yes. Two options have been available since version 9.x:
Option 1: Manually add Start to the Dock
This takes two steps:
-
Drag Start to the place you want in the Dock. As a menu bar app, Start does not turn up there by itself – hence this step.
-
In the settings, choose where the main window should appear when you click the Dock icon.
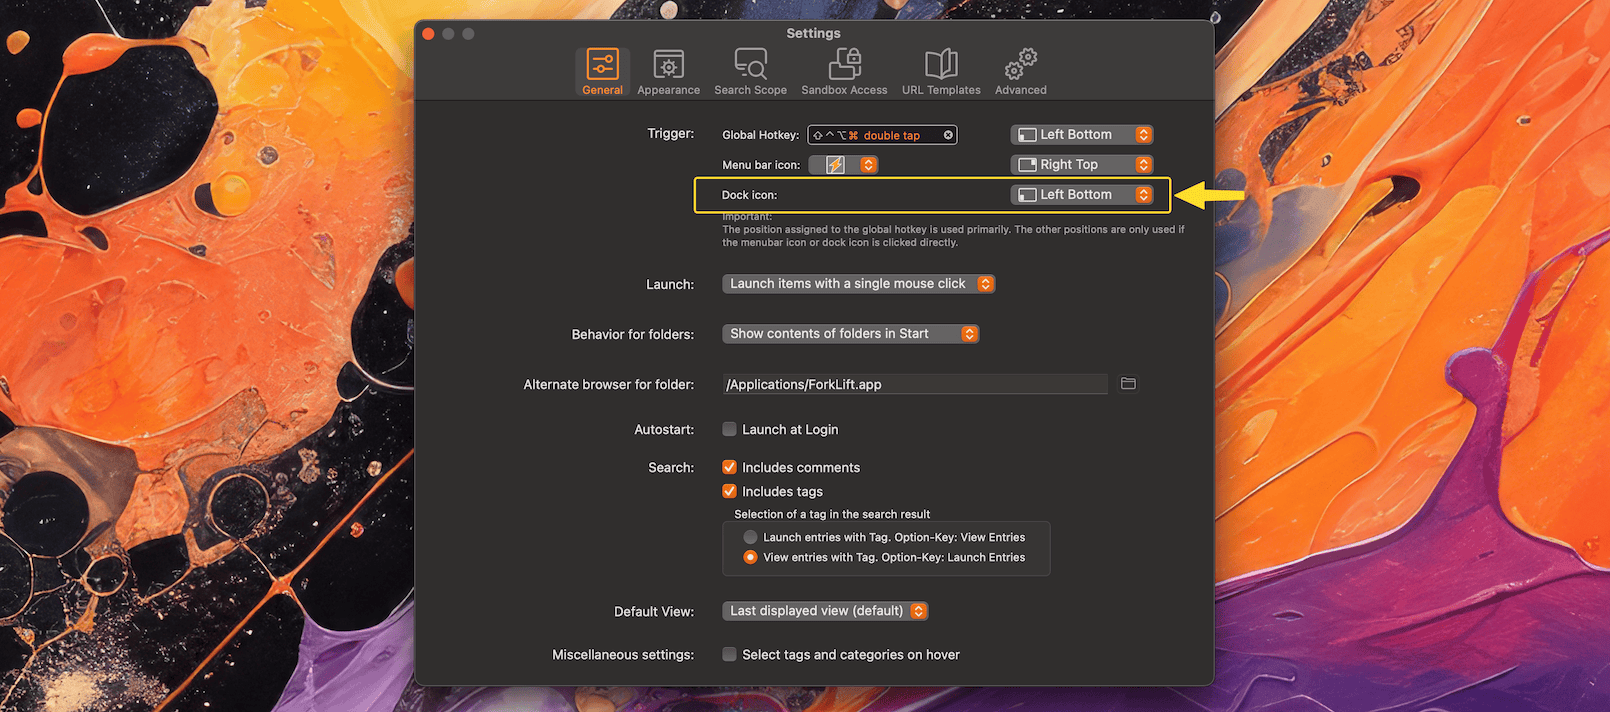
With the setting highlighted above, clicking the Dock icon opens the main window at the bottom left of the screen.
Start cannot determine the position of its icon in the Dock. You therefore need to choose where the main window appears.
Option 2: Enable the Dock icon in the settings
Since version 9.x, Start has offered an option to show a Dock icon automatically at every launch. That turns it into a more or less “regular” application. You find the option in the “Advanced” section of the settings.
As a second step, set where the main window should appear when you click the Dock icon.
What are the advantages and drawbacks of each option?
Option 1:
⚠️ You can open and close the main window through the Dock icon – but you cannot quit Start from there.
✅ Menu bar apps do not provide their own menus: while Start is on screen, the active application’s menu remains visible.
Option 2:
✅ Switching it on is quicker than placing Start in the Dock by hand – and you can quit Start from there like any other app.
⚠️ On the other hand, the menu of the active application changes as soon as the main window appears. Since Start has no menu entries of its own, that menu then looks very bare.
Where does Start store its data?
|
The following is purely for transparency, so you know where Start keeps data on your Mac besides the application file itself. |
Base folder
Start runs in a macOS sandbox, so the paths are a little convoluted. Let us start with the base folder that holds everything. It depends on which version you use:
|
Type |
Path |
|
App Store |
~/Library/Containers/net.innovative-bytes.start |
|
Setapp |
~/Library/Containers/net.innovative-bytes.start-setapp |
The following paths are relative to the respective base folder.
|
Path |
File |
Description |
|
/Data/Library/Preferences |
net.innovative-bytes.start.plist |
This is the main configuration file of Start |
|
/Data/Documents/Backup/ |
Multiple files |
Files from configuration snapshots that Start creates automatically |
|
/Data/Documents/Data/ |
AllData.json |
Backup copy of the internal table of all available entries |
|
/Data/Documents/Data/ |
TagData.json |
Backup copy of the internal table of all available tags |
|
/Data/Documents/Data/ |
SectionViewCollapsedState.json |
Stores which sidebar sections are collapsed |
|
/Data/Documents/ |
Bookmarks.dict |
Security Scoped Bookmarks for accessing files outside the sandbox |
|
/Data/Documents/Thumbnails/ |
thumbnails.json |
Cache file for generated thumbnails |
Legal
The trademarks and product names mentioned in this manual belong to their respective owners and are hereby acknowledged. The mention of products is solely for informational purposes and does not constitute advertising. Similarly, no guarantee is provided regarding the selection, performance, or suitability of these products.
Privacy & Security Information
Start is a commercial application that works right out of the box. Two things matter equally to us: what the app can do, and how it treats your data.
Privacy by Design
Your privacy comes first in Start. Your personal data stays under your control at all times:
-
Local storage only: Start keeps all your data on your own device
-
No data collection: We collect nothing, transmit nothing, and share nothing with third parties
-
No cloud services: The app needs no cloud back end and no user account – your information stays on your Mac
Security Features
Several layers of security protect your data:
-
Apple notarization: Apple has checked and notarized the app, so it carries no malware
-
macOS sandbox: Start runs inside Apple’s sandbox
-
Access on request: Start requests only the file and folder access permissions required by its core functions
System Integration
Start follows Apple’s best practices for system integration:
-
Adheres to macOS security guidelines
-
Requires explicit user permission for file and directory access
-
Operates within the secure macOS environment
Disclaimer and Limitation of Liability
We do our best to give you a secure and reliable application. Please note the following:
-
No Warranty: The software is provided "as is" without warranty of any kind, either express or implied, including but not limited to the implied warranties of merchantability and fitness for a particular purpose.
-
Limitation of Liability: In no event shall the authors, copyright holders, or developers be liable for any claim, damages, or other liability, whether in an action of contract, tort, or otherwise, arising from, out of, or in connection with the software or the use or other dealings in the software.
-
User Responsibility:
-
You are responsible for keeping suitable backups of your data
-
You use the application at your own risk
-
You are responsible for reviewing and complying with all applicable local laws and regulations
-
-
Technical Issues: We cannot guarantee that:
-
The software will be error-free or uninterrupted
-
Any errors in the software will be corrected
-
The software will be compatible with future operating system updates
-
-
Data Security: While we implement reasonable security measures, we cannot guarantee absolute security of your data against unauthorized access or system failures.
By using Start, you acknowledge and agree to these terms and limitations. If you do not agree with these terms, please do not use the software.